Scanner
The Scanner is a powerful tool that can be used to detect security issues, such as malware, fake extensions and so on.
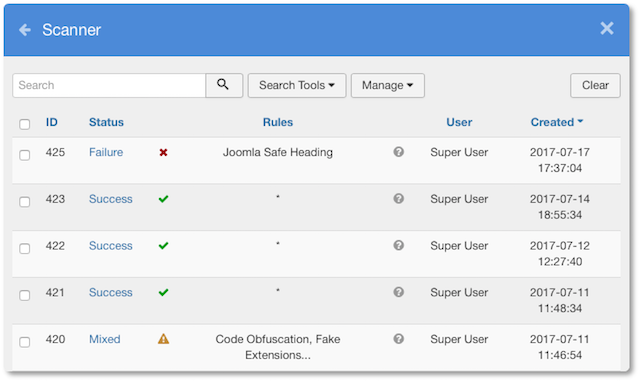
The list keeps all the scans launched by the plugin, from which you can see the final result.
A scan can assume all the following statuses (or results).
- Success: all the rules used for the scan returned a positive state.
- Failure: all the rules used for the scan returned a negative state.
- Mixed: some rules used for the scan returned a positive state and the remaining ones a negative state.
With the Search Tools it is possible to filter the scans by status and rule.
It is possible to search the scans by username (the user that launched the scan).
- Status - the scan result: Success, Failure or Mixed.
- Rules - the rules used for the scan. For an high number of rules, the columns will show only a part of them.
- User - the user that launched the scan.
- Created - the creation date of the scan (when the user launched it).
The icon can be used to read a full description of the scan (rules and parameters used).
From the Manage section it is possible to launch new scans, remove existing scans and see the list of the supported rules.

Supported Rules
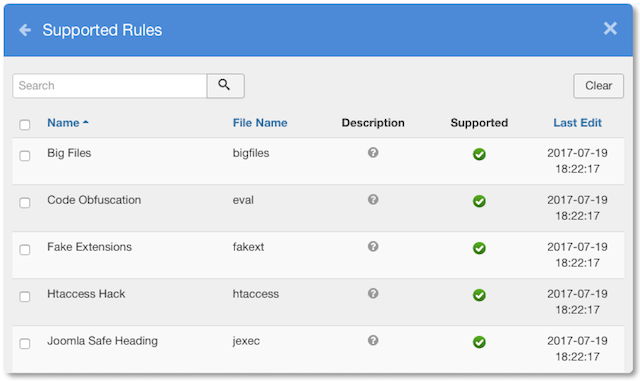
Here's the list containing all the Scanner Rules installed on your plugin.
All the rules are located in /plugins/system/viksecure/libraries/security/rules/.
- Name - the rule name (title).
- File Name - the rule filename (.php).
- Description - the purposes of the rule and how it works (hover the mouse above the icon).
- Supported - shows a green icon if the rule can be used (supported by the server).
- Last Edit - the last modified date of the file. It can be used to check if a rule has been modified after an update of the plugin.
It is possible to search a rule by name or file name.

Scan Launcher
It is possible to launch a new scan by accessing the Scan Launcher page, located in Scanner > Manage > New.
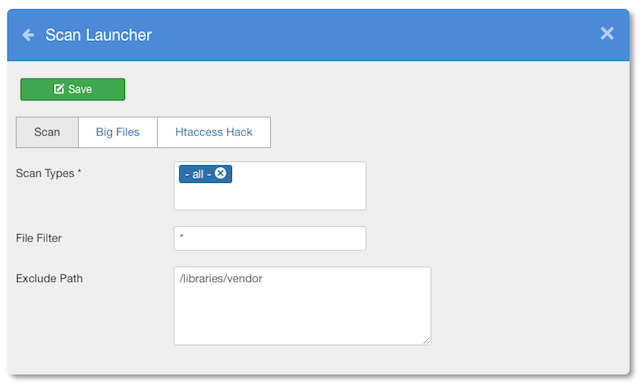
The page contains a form with a few global and specific settings to improve the filtering method. On the top of the page it is possible to find a toolbar containing all the available fieldsets. The Scan fieldset contains only the global parameters. The other tabs contain the custom parameters of the related scanning rules.
The "custom tabs" are not accessible if the related rules are not included in the Scan Types global setting.
- Scan Types - the rules to use for the scan.
- File Filter - the regex to filter the files (e.g. * for all the files or .png, .jpg, .jpeg for the images).
- Exclude Path - a list of folders to exclude the nested files (specify a single path per line).
The scan will be launched after pressing the Save button.

During the scan process, it is possible to see the progress bar for each selected rule. The system will perform a single rule per time.
Next to the rule name, it is possible to check the scanning result, which can be one of the following.
- Scan complete - the scanning has been performed successfully.
- Error performing the request - something went wrong during the scan.
- Try #1 - before to mark a scan as failed, the system will attempt to perform it again up to 3 times.
Even if the scan has been completed successfully, the status of the scan (Success, Failure or Mixed) may contain some warnings.

Scan Result
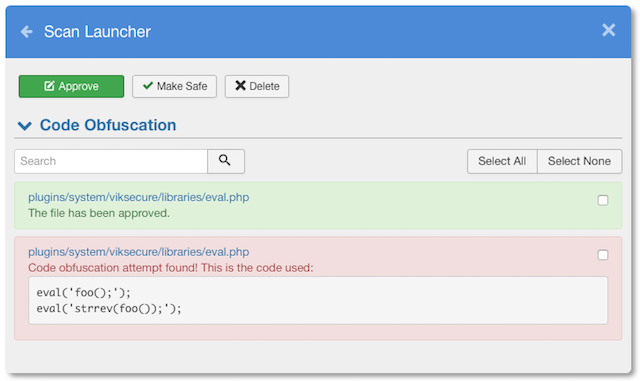
After the end of the scan, the system will open a view containing the scanning results (or states).
The results are grouped by rule name. It is possible to click on the rule title to toggle the related states.
From this page, it is possible to search for a specific text/file contained in the description of the results.
There is a search text field (and 2 buttons to check/uncheck the results) for each rule used.
It is possible to handle the results with 3 buttons located on the top of the page: Approve, Make Safe and Delete.
The Delete button can be used to remove the selected files/folders from the server.
The action of the other 2 buttons may be different for every rule (see the section below).
