Your cart is empty!
Vik Secure Official Documentation
Version: 1.2.1
You can see the configuration page by editing the Joomla! plugin. It is possible to edit the plugin by accessing the Plugins list, located in Extensions > Plugins. The plugin can be found searching by "VikSecure".
Plugin
The list of generic settings for the global configuration of the plugin.
Order Number
The order number of your purchase (you can find it in your purchase e-mail).
The order number is mandatory to receive software updates.
Admin E-Mail
Insert here the list of admin e-mails. Each address must be separated by a comma.
The e-mail addresses will be used to send notifications and the e-mail related to the recovery system.
Enable Recovery System
Turn on this option to allow an administrator to enter in Recovery mode. The recovery system is used to bypass the security restrictions temporarily, so that an administrator can adjust the settings of the plugin. For example, it is helpful in case the website owner forgets the admin token to access the back-end panel. Or in case the administrator tries to login from a country that is not allowed to visit the back-end.
After enabling this option, the system will send a notification e-mail containing the instructions to use the Recovery System. The e-mail will be sent to all the addresses listed within the Admin E-mail setting. Every time you enter a new e-mail address within that field, the system will send automatically the e-mail only to this new address.
In summary, the e-mail contains a secret link that can be used to enter in recovery mode.
The recovery system is not able to prevent the htaccess password. In case you forgot your HTPASSWD login, you have just to open the file below:
.../administrator/.htaccess
and rename it into:
.../administrator/htaccess.txt
Remove Generator Meta
When enabled, removes the generator meta tag to avoid detection of Joomla!
This meta tag can be used by an attacker to recognize which type of CMS is installed on the website. So, it is easier to exploit a known security bug.
<meta name="generator" content="Joomla! - Open Source Content Management">Open Interface
Press this button to open the interface window of VikSecure.
Admin Token
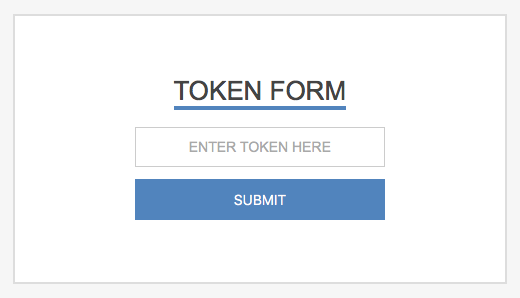
The Admin Token is used to hide the Joomla! login form behind an additional security token form.
Type
Choose if the token must be specified in the URL or submitted through an additional form. By selecting None option the Admin Token won't be considered.
Since VikSecure 1.1, it is also possible to use the HTACCESS password in order to prevent unauthorized accesses to the back-end.
Key
A secret key that MUST be specified in the query string before to access the back-end (for URL type only).
e.g. https://domain.com/administrator/index.php?secret
For form type, the secret key will be the name of the input (you won't have to enter this value in the form).
For htaccess type, the secret key will be the username of the account (mandatory).
Leave this field empty only if the Admin Token is disabled.
Value
A secret value that MUST be specified in addition to the secret key before to access the back-end (for URL type only).
e.g. https://domain.com/administrator/index.php?secret=1234
For form type, the secret value will be the password to enter in the input field.
For htaccess type, the secret value will be the password of the account (mandatory).
Leave this field empty only if the Admin Token is disabled.
Error Handler
Choose how to handle failure tokens (not supported by htaccess type).
Forbidden Error will raise a 403 forbidden error.
Site Redirect will send the user to the home page in the front-end.
Error Message
An error message in case of failure tokens. Only if the handler is Forbidden Error (not supported by htaccess type).
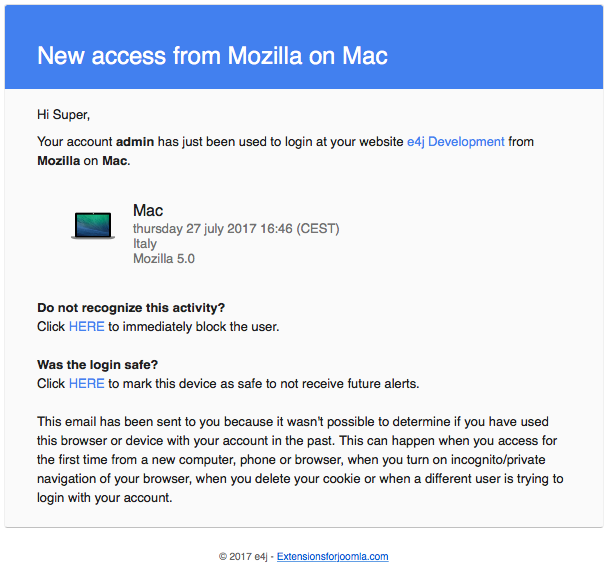
Login Detection
This is a powerful tool to keep track of all the accesses made in the administrator area.
When someone access the back-end and the system is not able to recognize it (first time excluded), VikSecure will send a notification e-mail to the address of the account used.
Within the e-mail contents, it is possible to find 2 links to BAN the IP of the user or to AUTHORIZE the browser and IP address used to log in.
When possible, it will be reported the country from which the login has been made.
This tool will try also to detect if the login has been made through a desktop, a mobile device or a bot.
Check Reliable
When enabled, every time a user logs in to the back-end, the system will try to assume if it is a known connection. If not, the owner of the account will be notified via mail.
The detection is made by checking the remote address (IP) and the user agent of the browser used.
Every time you access the back-end with a different IP/browser, you will receive a notification e-mail.
Password Obfuscation
After a login failure, the username and password used are always stored within the details of a report. You can choose if the password should be obfuscated or not.
Here's a list of supported obfuscation types:
- None - abcd1234
- Partial - ab******
- Yes - ********
IP Auth
All the settings listed in this section are used to define the rules related to the remote addresses.
Current IP
This is your current IP address. If it doesn't change over time, it probably means that you own a static IP.
The static IP addresses can be used in the whitelist to ignore all the rules coming from your network.
Proxy Header
Some servers (usually behind a proxy) may send the IP address of the customers using specific headers. This means that you need to inform the system that the IP address should be recovered in a different way.
You can find a list of suggestions next to this field, for example HTTP_CLIENT_IP (127.0.0.1). This kind of suggestion means that the system detected a header that may contain the real IP of the session. In case the IP address (between the parenthesis) matches your current one (see Current IP field), you should select the suggested option (e.g. HTTP_CLIENT_IP).
If you don't see any suggestion, just leave the default option.
Whitelist
Insert here the list of authorised IPs. Each address must be separated by a comma.
All the IPs in this list won't be affected by any rule of this plugin.
Do not fill anything if you don't own a static IP address.
Thanks to the Apply For field below, you can decide to apply the whitelist restrictions for the site section, the admin section or both.
Blacklist
Insert here the list of banned IPs. Each address must be separated by a comma.
Leave this field empty to allow any IP address.
Thanks to the Apply For field below, you can decide to apply the blacklist restrictions for the site section, the admin section or both.
Allowed Countries
Specify the list of countries from which a user can access into the back-end. When a user tries to access the administrator from a country not allowed, it will see an error message instead than the Joomla! login form.
Blocked Countries
Specify the list of countries from which a user CANNOT access your website. This rule is applied to both administrator and site sections.
Auto-Ban
The auto ban tool can be used to keep your website safe from bots that try to login in your website with brute force or dictionary attacks.
When the system identifies a possible attack of this type (only when this tool is enabled), it pushes the IP address of the attacker into the blacklist, so that it won't be able to access your website anymore.
Enabled
When enabled, tries to auto-ban a certain IP address after a few login failures within a limited time range.
It is possible to apply the auto-ban for login failures in the site section, the admin section or both.
Max Attempts
When the number of failures (within the limited time range) reaches this value, the IP address will be automatically banned.
Time Range
The time range (in minutes) to evaluate the auto-ban.
Registration
Here's a list of settings that can be used to monitor the registration of the users.
Block New Super Users
Enable this parameter to block any registration of new Super Users. The system will block also the users that try to assign the Super User group to the existing users.
This is helpful to prevent the creation of new super users by hackers that found a way to inject PHP code within your server.
In case you need to create a new Super User, you have to turn off this setting first.
Enable SPAM Check
In case the system detects a possible SPAM attempt of a user registration, it will block the process and new user(s) won't be added.
This is helpful in order to prevent massive registrations made by automated processes.
It is possible to apply the registration check in the site section, the admin section or both.
The SPAM attempt is detected considering the fields below.
Max Accounts
When the number of account registrations made by a session (within the limited time range) reaches this value, that session will be no more able (temporarily) to create new users.
Time Range
The time range (in minutes) to check if the session can create a new user.
For example, if we have the following configuration:
- Max Accounts = 3
- Time Range = 5
A single session will be able to create at most 3 accounts every 5 minutes.
Denial of Service
The features below are helpful to prevent DoS attacks.
Block Empty User-agent
Deny all the connections that don't specify a user-agent. This is useful in order to prevent automated connections and DoS attacks.
For example, basic cURL connections are blocked unless they specify a valid USER-AGENT.
User-agents Blacklist
Insert here all the user-agent that should be blocked (one per line). Insert only the USER-AGENT identifier, such as webbandit.
Let's take POSTMAN as example, this is a software used by the developers to make API connections with any server. By default it uses the following pattern for the USER-AGENT:
PostmanRuntime/1.7.1
In case you need to block any connection that comes from POSTMAN, you have just to insert within the list the static substring of the USER-AGENT: PostmanRuntime/.
Block Exploited IPs
Enable this option to check if the IP of the users exist in a database of hijacked PCs infected by illegal 3rd party exploits, worms/viruses with built-in spam engines, and other types of trojan-horse exploits.
By default, this features relies on an external service called SpamHaus.
If you are not able to use this feature, make sure that VikSecure - SpamHaus XBL plugin is published and installed on your system.
Domains Blacklist
Insert here all the referers (hostname) that should be blocked (one per line). If you need to block all the sub-domains of a referer, you can use the * wildcard. For example *.domain.com will block all the hosts that ends with domain.com.
Thanks to this tool it is possible to block all the connections that come from SPAM servers.
Notifications
Choose here for which event you should be notified via e-mail. Here's a list of events for which you can subscribe:
- Failed Login
- Country not Allowed
- SPAM Registration