Your cart is empty!
Management
The Management section of VikAppointments contains the Groups, the Employees, the Services, the Options, the Locations and the Packages.
All the features contained in this section are used to build and to display the structure of your company.
Groups
The groups are used to categorize the services and the employees. By default, this page displays the groups of the services. In order to access the groups for the employees, it is needed to hit the apposite View Employees Groups button.
Within the groups list it is possible to see quickly the total number of services/employees that belong to each group.
Since it is not mandatory to categorize the services and the employees, this part can be totally ignored. Contrarily, it is helpful to create the groups in case the system owns an high number of services and/or employee.
The groups can be translated in different languages only from the group edit page, by clicking the flags on the top right side.
- Name - the name of the group.
This value can be translated in multiple languages. - Description - the extended html description displayed in the Services/Employees List pages. The html can contain native Joomla content features (e.g. {load position MODULE_POSITION}) and it can be translated in multiple languages. It is possible to use the READ MORE separator to create also a short description.
Employees
The employees are used to define the availability system of your company. An employee can be represented as a person, a room, an object or anything else.
If you need to copy and paste an employee, you have to check the checkbox near its ID and hit the Clone button on the Joomla toolbar. In this way an exact copy of the selected employee will be created (details, working days, services assignments). This feature can be used to clone multiple employees at once.
Any employees translations can be made by clicking the flag of a record, under the Languages column.
In order to receive online reservations it is mandatory to create at least one employee.
Employee
- First Name - the first name of the employee.
- Last Name - the last name of the employee.
- Nominative - the nominative of the employee (i.e. Lastname, Firstname).
This value can be translated in multiple languages. - Alias - the alias used for SEF URL.
- Image - you can choose an image for the employee to be displayed in the site.
Description
The extended HTML description displayed in the Employees List and in the Employee Details pages.
The HTML can contain native Joomla content features (e.g. {load position MODULE_POSITION}) and it can be translated in multiple languages. It is possible to use the READ MORE separator to create also a short description. In case the length of the description exceeds the specified threshold, only a part of the description will be used and any HTML tags will be removed (only when the short description is not specified). Such threshold can be changed from the Listings section in the configuration.
Contact
- User ID - the existing Joomla User to allow the employee to access into the Employees Area in the front-end.
- E-Mail - the e-mail of the employee will be used to receive appointments notifications and questions from the customers (see Quick Contact). The e-mail address will never be visible from the front-end.
- Phone - the phone number of the employee could be used to receive SMS notifications.
- Show Phone - enable this value if you want to show the phone number of the employee in the Employees List / Employee Details view.
Visibility
- Group - the group to which the employee belongs.
- Listable - turn on this option to make this employee visible from the front-end. Turn off this parameter in case the customers cannot access the details of this employee.
- Active To - select how long this employee will remain visible (only if the employee is listable). This value should be changed only when VikAppointments is configured as a portal of employees.
The status can assume 3 different values:
- Pending, the employee won't be listed;
- Date, the employee will be listed up to the selected date;
- Lifetime, the employee will be listed without expiration.
The employees can renew the status of the account by purchasing a new subscription from the Employees Area. This field can be selected only if there is at least a published subscription.
Notifications
- Bookings - enable this value if you want to send an e-mail to the specified address every time a customer makes a booking with this employee.
- Quick Contact - enable this value if you want to allow the customers to send e-mail messages to the employee from the front-end.
Calendar
- Timezone - specify a value only if your employee comes from a different area of the world. The dates and the times of this employee will be automatically adjusted to the specified timezone. Leave empty to use the default system timezone.
- Sync Key - the sync key is a unique key needed to protect the URL used to synchronize the ICS calendars of this employee.
- Sync URL - create a new subscription from your preferred calendar (Apple iCal or Google Calendar) using this URL to synchronize the appointments of this employee with all your devices. The URL won't be visible while creating a new employee.
Custom Fields
This section is visible only if there is at least a custom field for the employees.
These fields can be used by the owner to collect additional information about the employees (for example it is possible to upload an ID card) or to enhance the Employees Filter module by specifying additional fields. The fields can be specified only from the configuration of the module, which supports only Text and Select fields.
The employees can fill their own fields directly from the Profile page within the Employees Area.
Working Days
This section represents the complete table of the working days of the employees.
The employees must have at least one working day to be able to receive online reservations.
The left side shows all the working times defined with weekly recurrence, from Monday to Sunday. By clicking the Edit button of a day, it is possible to define whether the day is closed or open. In case of opening, it is possible to define all the accepted shifts.
The right side can be used to define special working times (or closures) for specific days of the year.
The Hide Past checkbox under the Preferences fieldset can be used to toggle the visibility of those special working days that have been created for a date that is now in the past.
Services
From the employees list it is possible to click the icon to access the list of services assigned to the employee.
Here it is possible to attach other services to this employee or detach the existing ones.
While assigning a new service, it will be possible to override some of the default settings of the service, such as the cost and the duration.
Here's a list of settings that can be changed:
- price
- duration
- sleep time
- description (which will be appended after the default one)
These overrides will be applied only in case the selection of the employee is allowed, otherwise the default values will be used.
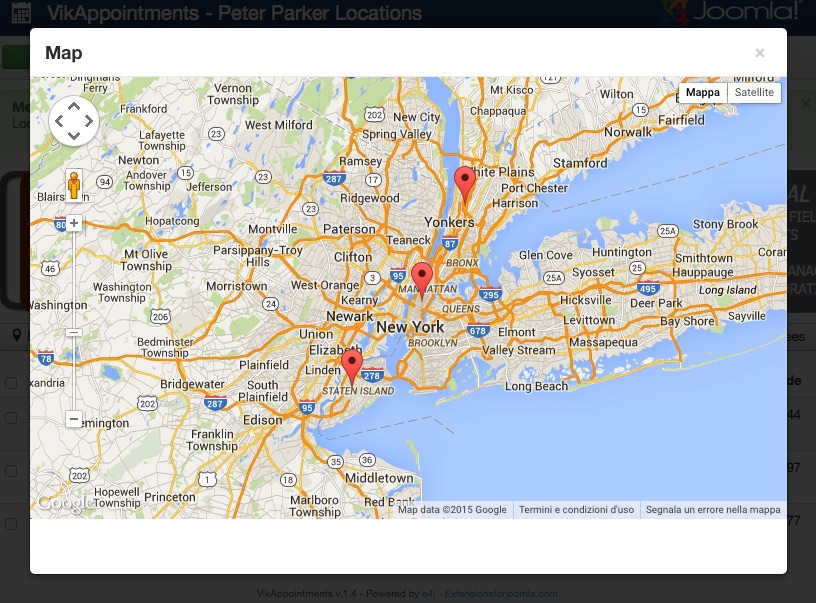
Locations
The locations are used to display the working areas of the employees and to split the working days in different locations. If you own a portal of employees which work in different areas, you should assign a location to each of them to allow the users to filter the employees by country and/or state/province and/or city.
You can see the locations of a single employee by clicking the link in the Employees List page.
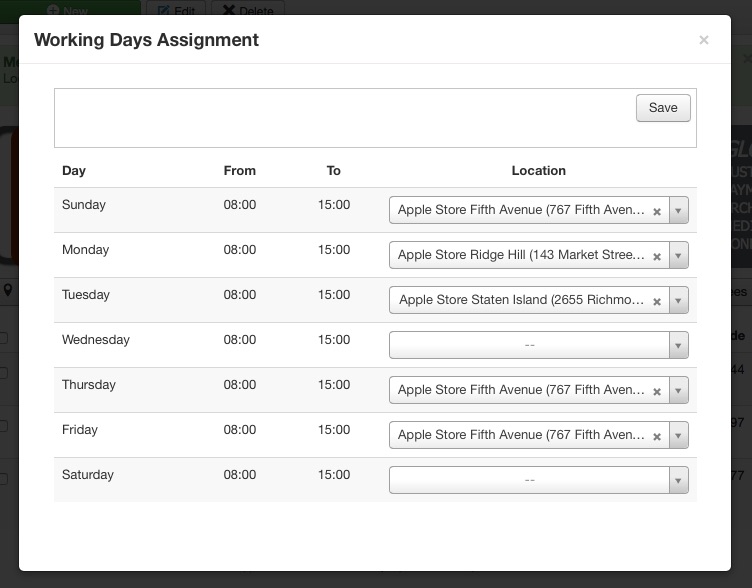
The Map button displays an overview of the working areas of the employee, while the Working Days Assignments button opens a form to assign the locations to the related working days.
The working days assignments are needed if you want to restrict the working days to certain locations, so that the customers are able to understand in which area the employee works for the selected date and time.
A working time can be assigned only to a single location (or it can be left empty).
If you leave all the location fields empty, the employee won't be displayed while searching through the Employees Filter module.
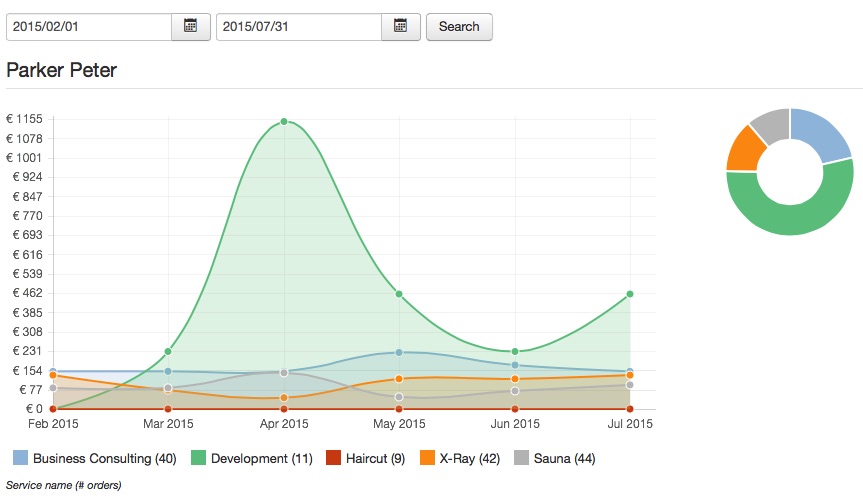
Reports
The reports page displays the main statistics of the selected employee(s): total earning and monthly earning.
The total earning is a cake graph which displays all the money earned for each service of the selected employee.
The monthly earning is a line graph which displays all the money earned from each service month by month.
The reports can be filtered by 2 range dates. It is also possible to display the chart by counting the number of appointments instead of the total earning. This is useful for those companies that offer services without online costs. Last but not least, it is possible to choose whether the chart should consider the check-in time of the appointments or their creation date.
If you select more than one employee this page will display multiple charts.
The download button will download a CSV file (or a ZIP archive) containing the reports of the selected employee(s).
Payments
The employees can receive payments directly through customized payment processors, so that the administrator won't have to transfer money from its account. In case an employee is using one or more payment gateways, the global ones won't be selectable by the customers when booking an appointment with this employee. Contrarily, the global payments will be used if an employee haven't created any custom payment.
For security reasons, an administrator is not able to edit the configuration of a payment that has been created by an employee.
These payment gateways can be created also from the Employees Area in the front-end (only if the related rule is enabled).
Services
The services are the tasks the employees can perform, like Haircuts, Massages, Cleanings and so on. The services can be assigned to one or more employees simultaneously.
In the Services List page in the front-end, the services are displayed following the defined ordering. The services can be categorized in groups, so that the services inside groups with lower ordering will be displayed first. The services that are not assigned to any group will be always displayed as last.
Any services translations can be made by clicking the flag of a record, under the Languages column.
Service
- Name - the name of the service.
This value can be translated in multiple languages. - Alias - the alias used for SEF URL.
- Price - the total cost of the service. Set this value to 0.00 to hide the price label and to skip the payment selection for this service.
- Tax - an optional tax rule to apply to the price of the service during the purchase.
- Image - you can choose an image for the service to be displayed in the site.
Description
The extended HTML description displayed in the Services List and in the Service Details pages.
The HTML can contain native Joomla content features (e.g. {load position MODULE_POSITION}) and it can be translated in multiple languages. It is possible to use the READ MORE separator to create also a short description. In case the length of the description exceeds the specified threshold, only a part of the description will be used and any HTML tags will be removed (only when the short description is not specified). Such threshold can be changed from the Listings section in the configuration.
Booking
- Duration - the effective duration (in minutes) of the service. This value is used to calculate automatically the checkout of the appointments.
- Sleep Time - the sleep time (in minutes) of the service. The duration seen by the customers will be the same but the real duration of an appointment will be duration + sleep time. This option can assume negative values. This setting can be used, for example, when there is a required time to wait between 2 appointments.
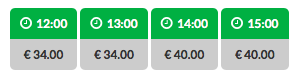
- Time Slots Length - the length (in minutes) of the time slots of the service. This option can be equals to duration + sleep time or equals to the minutes interval setting (configuration). The time slots are the green/yellow/red block displayed when you click on a day from the calendar.
- Min Check-in Date - the minimum number of days required to complete an appointment in advance. In example, by specifying 1 day, the first available date will be one day after the current one (tomorrow). Leave empty (or zero) to ignore this restriction.
- Max Check-in Date - the number of days from now on for which it will be possible to book an appointment. In example, by specifying 7 days, it will be possible to select a check-in date between today and the next 7 days. Leave empty (or zero) to ignore this restriction.
- Advance Bookings - it is possible to specify here the minimum number of minutes required to book this service in advance. This parameter overrides the global Booking Minutes Restrictions configuration setting.
- Employee Choosable - turn on this option to allow the customers to select the employee from the front-end. This option should be disabled in case the employees are not visible by the customers. When this option is disabled, the program will find automatically an employee assigned to the selected service. The selection of the employee is not random, the system counts the number of reservations for all the employees and chooses the employee with the lowest amount.
- Has Own Calendar - this setting should be used only if your service is self-managed and doesn't need a real employee. When this option is enabled, the reservations of this service won't affect the calendar of the other services.
- Checkout Selection - enable this setting to allow the customers to select the checkout time. The checkout selection is allowed only in case the service is assigned only to one employee or when the employee selection is enabled.
Capacity
- Maximum Capacity - set this value greater than 1 if you want to have more than one appointment at the same date & time. The availability is given by the sum of all the participants for each appointment at the choosen date and time and it cannot be higher than the specified maximum capacity. Use this option if you are using services like Yoga, fitness courses, sauna, etc...
- Min People per App. - the minimum number of people allowed per appointment. When a customer chooses the number of people for this service, it can't be lower than this value. This option is considered only when the Maximum Capacity is greater than 1.
- Max People per App. - the maximum number of people allowed per appointment. When a customer chooses the number of people for this service, it can't be higher than this value. This option is considered only when the Maximum Capacity is greater than 1.
- Price per People - enable this option if you want to multiply the price of the service per the number of selected people. This option is used only when the maximum capacity is greater than 1.
- Multiple app. per slot - when enabled, the time slots will be able to host different appointments until the full capacity is reached. Turn off this setting only if you want to receive a single appointment per time slot.
- Display Remaining Seats - turn on this setting to display the remaining seats within the timeline. The seats will be displayed only in case the service is assigned only to one employee or in case the employee selection is enabled.
Visibility
- Group - select the group to which the service belongs. A service may not have an associated group.
- Access - the access level group that is allowed to view this item. By selecting registered option, all the guest users won't be able to see this service.
Publishing
- Published - the status of the service. An unpublished service can't be booked and it won't be displayed in the front-end.
- Start Publishing - the service will become bookable only starting from the selected date.
- End Publishing - the service will be no more bookable after the selected date.
Settings
- Mail Attachment - upload and pick a file from here in case you need to include one or more attachments within the confirmation e-mail for the customers.
- Quick Contact - enable this option to allow the customers to send e-mail messages to the administrator(s) from the front-end.
- Enable Zip Restrictions - if enabled, this service will be available only for those customers that live in ZIP codes that are accepted by the system. It is also required to select a ZIP Code field from the configuration of the system.
- Enable Recurrence - When this option is enabled, the customers will be able to book an appointment with limited recurrence (only if the shopping cart is enabled). All the appointments will be stored in the system as different reservations. The recurrence options can be configured from the shop configuration of the system. The recurrence will be available only if the CART system is enabled.
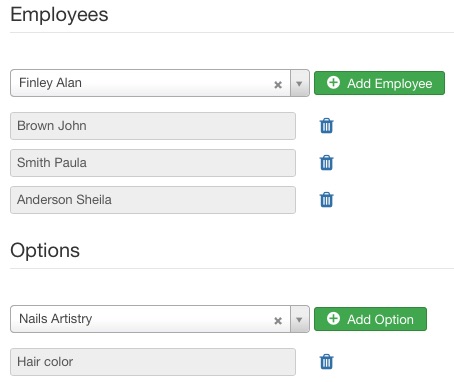
Assignments
While creating/editing a service it is possible to create the relationships with the employees and with the options.
The services have to be assigned at least to one employee, while it is not required a relation with the options.
To create a relationship it is needed to click the "plus" button, select an item from the dropdown and hit the Save button.
The availability calendar is strictly related to the employees. This means that, if a service is assigned to 3 employees, it could be booked up to 3 times at the same date and time.
In order to receive online reservations it is required to create at least one service, which has to be assigned at least to one employee.
Metadata
The metadata section is used to overwrite the metadata options of the active menu item. For example, if you are using a generic menu item (such as a services list), it is possible to use these fields in order to have custom titles and descriptions depending on the selected service.
- Browser Page Title - an optional text for the Browser page title element to be used when the article is viewed with a non-article menu item. If blank, the article's title is used instead.
- Meta Description - an optional paragraph to be used as the description of the page in the HTML output. This will generally display in the results of search engines.
- Meta Keywords - an optional comma-separated list of keywords and/or phrases to be used in the HTML output.
Working Days
The working days of a service are automatically taken by the working days of the selected employees. If you want to remove some working days for a certain service/employee relation, you have to open the Service Working Days page (accessible from the services list page in the administrator section), pick an employee from the dropdown, remove the unused working days and press the Update button.
From here it is also possible to create some custom working days that will be applied only for the selected employee-service combination.
If you make something wrong during this step, you can press the Restore button to reset the working days of the service related to the selected employee.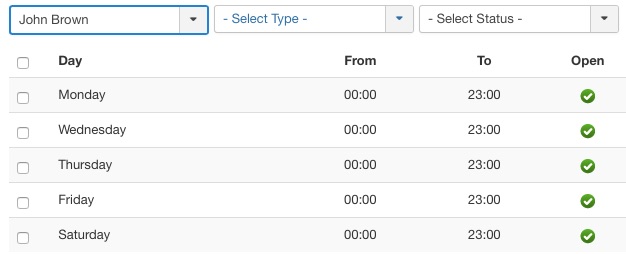
Reports
The reports page displays the main statistics of the selected service(s): total earning and monthly earning.
The total earning is a cake graph which displays all the money earned for each employee of the selected service.
The monthly earning is a line graph which displays all the money earned from each employee month by month.
The reports can be filtered by 2 range dates. It is also possible to display the chart by counting the number of appointments instead of the total earning. This is useful for those companies that offer services without online costs. Last but not least, it is possible to choose whether the chart should consider the check-in time of the appointments or their creation date.
If you select more than one service this page will display multiple charts.
The download button will download a CSV file (or a ZIP archive) containing the reports of the selected service(s).
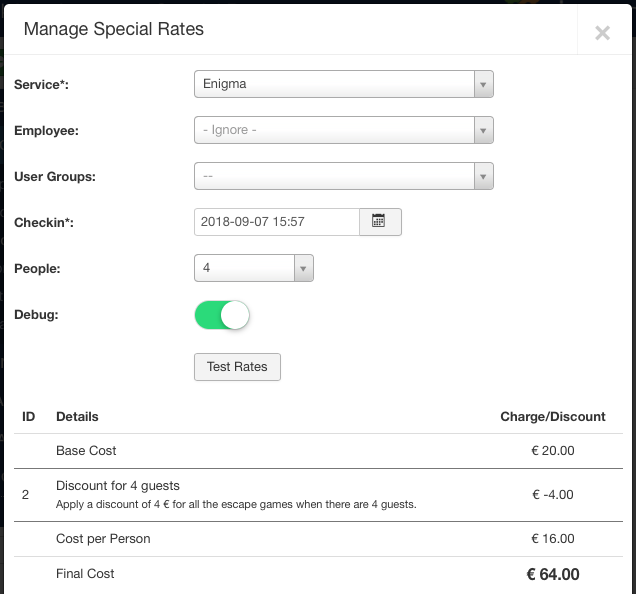
Special Rates
The special rates are used to increase/decrease the default price of a service depending on specific cases.
For example, it is possible to offer a discount for all the customers that book an appointment in the morning, or maybe to increase the price for all the appointments in the weekend. In addition, it is possible to define a fixed price depending on the number of participants.
It is possible to find the special rates from Management > Services page, by clicking the apposite button on the top-right side.
Details
- Name - the identifier name of the rate.
- Cost - the charge/discount amount. Increase or decrease the base cost of the service by the specified amount. The COST cannot be a percentage amount.
Assignments
- Services - the available services for which the rate should be applied.
Description
A short description for administrative purposes.
Publishing
- Published - enable this option if the rate should be applied to the front-end.
- Start Publishing - the start publishing date of the rate. The publishing period is referring to the checkin of the appointments and not to the current date. Leave this field empty to apply the rate with no time restrictions.
- End Publishing - the end publishing date of the rate. The stop publishing date is inclusive of the specified day. Leave this field empty to consider only the start publishing.
Conditions
- People - the number of people for which the rate should be applied.
- Week Days - the days of the week for which the rate should be applied. Leave this field empty to apply the rates to all the days of the week.
- Use Time Filter - when this option is enabled, you can define the time range in which the special rate will be applied. Turn off this setting to apply the rate for the whole day.
- User Groups - the groups of users (guests, registered, etc...) for which the rate should be applied.
Advanced
- Timeline Class - a suffix to be applied to the CSS class of the timeline blocks owning an active rate. This allows for individual styling.
- Timeline Style - it is possible to select one of these presets in order to stylize the time blocks that own an active rate.
- Calendar Class - a suffix to be applied to the CSS class of the calendar days owning an active rate. This allows for individual styling.
- Calendar Style - it is possible to select one of these presets in order to stylize the calendar cells that MIGHT own an active rate.
In case the system detects that the base cost has been altered by a rate, the timeline will be displayed using a different layout, in which it is possible to check the cost of each available time.
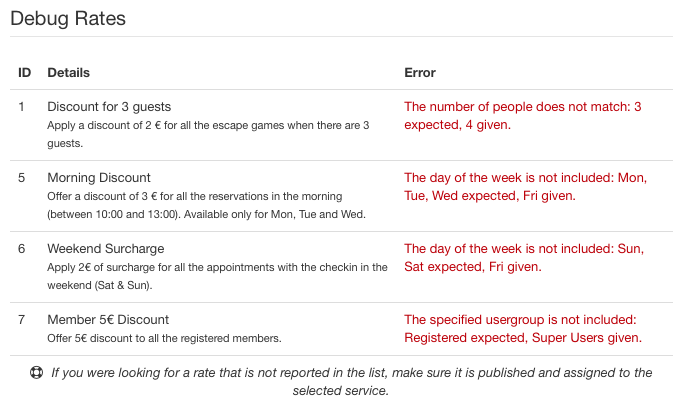
In order to check if the rates have been created properly, it is possible to click the TEST button (within the rates list) to check what are the rates that are applied for the specified data (service, employee, user group, date, time and people).
By enabling the DEBUG button, the system will display a table containing all the rates that cannot be applied to the specified data. It is also reported a short description that explains why that rates cannot be applied.
Special Restrictions
The special restrictions are used to limit the total number of bookings that the same customer can book within a specified interval. Since these restrictions are applied to registered customers, the login is mandatory. It is not possible to complete an appointment as guest in case at least a restriction is published.
In example, it is possible to force the customers to book only one appointment per day or 5 appointments per month.
It is possible to find the special restrictions from Management > Services page, by clicking the apposite button on the top-right side.
Details
- Name - the identifier name of the special restriction.
- Published - enable this option if the rate should be applied to the front-end.
- Max App. - the total number of appointments that can be booked by the same customer within the specified interval.
- Interval - the interval to take when checking if the customer already booked some appointments. It is only possible to choose between a pre-selection of intervals: day, week, fortnight, month, 2-months, quarter, 4-months, semester, year.
- Applies to - the restriction can be applied to the current date or to the check-in date. The first option is more restrictive because it doesn't allow to book an appointment in the future in case a customer already reached the maximum threshold.
Assignments
- User Groups - the groups of users (guests, registered, etc...) for which the restrictions should be applied. Leave empty to apply the restriction to all the user groups.
- Services - the available services for which the restriction should be applied. Leave empty to apply the restriction to all the user services.
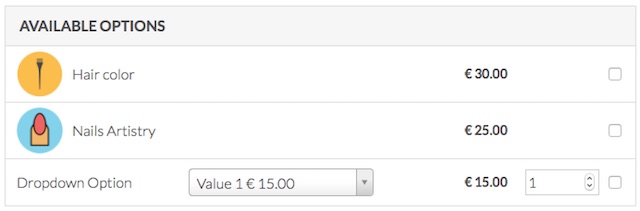
Options
The options can be selected from the customers as additional items or to improve the appointment experience.
The options can be assigned only to the services and they are displayed in the front-end after the selection of the date and time from the availability calendars.
Any options translations can be made by clicking the flag of a record, under the Languages column.
Option
- Name - the name of the option.
This value can be translated in multiple languages. - Price - the price of the single option. The price will be multiplied by the selected quantity. Negative values are accepted to offer services discounts.
- Tax - an optional tax rule to apply to the price of the option during the purchase.
- Image - you can choose an image for the option to be displayed in the site.
- Group - an otional group to which the option belongs. In case of groups, the options will be displayed within a sort of accordion widget.
Description
A short description of the option. The description is displayed as a tooltip by hovering the mouse above the name of the option.
This value can be translated in multiple languages.
Booking
- Published - the status of the option. An unpublished option can't be purchased and it won't be displayed in the front-end.
- Required - enable this setting if the selection of the option is mandatory. Customers won't proceed to the checkout until all the required options will be selected.
- Selectable Quantity - enable this setting if you want to allow the customers to select the option more than once.
- Max Quantity - the maximum quantity that can be selected per appointment. The maximum quantity can be a fixed amount or may vary according to the number of selected participants. This setting can be changed only when the quantity is selectable, otherwise it will be forced to 1.
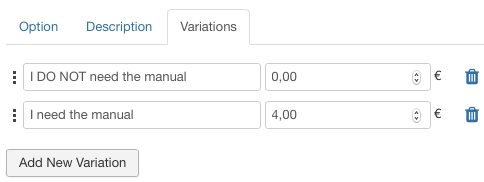
Variations
It is possible to click the "plus" button to create the variations of this option. In case an option owns multiple variations, the front-end will display a dropdown to allow the customers to pick the correct variation. Variations are mainly used to increase/decrease the price according to the preferred choice.
It is possible to drag the boxes of the variations to rearrange their ordering.
Variations
If an option requires a selection between different values, you have just to create 2 or more variations from the apposite section.
In order to add a variation it is needed to click the "plus" button and to fill the name and the additional price of the variation. The specified price will be always summed to the base cost of the option. Negative values are accepted too.
It is possible to drag the boxes of the variations to rearrange their ordering.
When an option owns one ore more variations, a dropdown will be displayed near the name of the option (in the front-end) to allow the customers to select the variation they need.
Locations
The locations are used to display the working areas of the employees. If you own a portal of employees, which work in different areas, you should assign a location to each them to allow the users to filter the employees by country and/or state/province and/or city.
The global locations will be automatically assigned to all the employees and they will be visible from the details of the employees only if they are assigned at least to a working day.
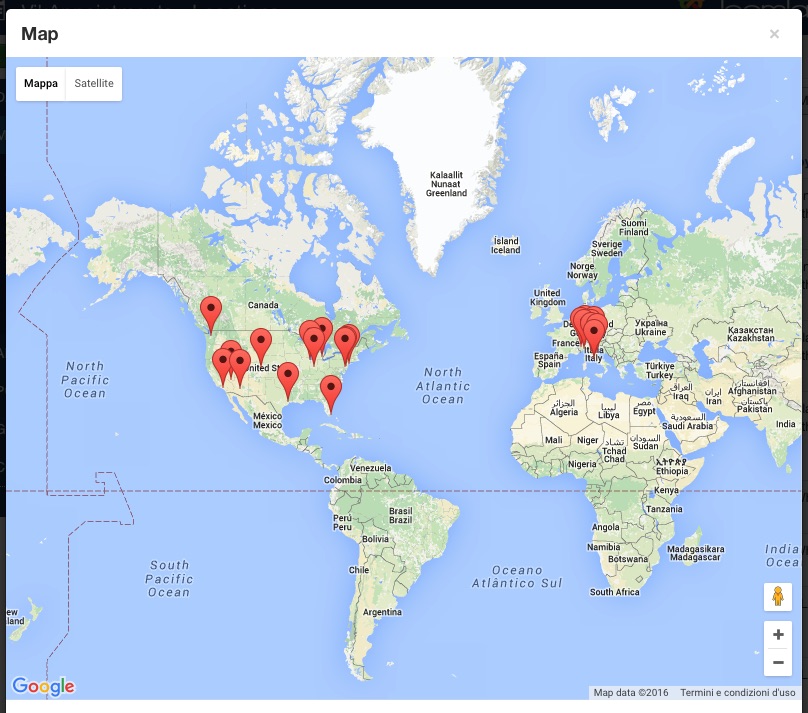
The Map button displays an overview of all the working areas.
- Name - the name of the location or the company name at this address.
- Country - the country of the location. If you are not able to find your country, you have to add it from the Countries page.
- State - the state/province of the location. If you are not able to find your state/province, you have to add it from the States page.
- City - the city of the location. If you are not able to find your city, you have to add it from the Cities page.
- Address - the street address of the location (street number included).
- Zip Code - the zip code of the location.
- Latitude - the latitude coordinate (in radiants) of the location. Required to be displayed on Google Maps.
- Longitude - the longitude coordinate (in radiants) of the location. Required to be displayed on Google Maps.
- Employee - the employee owner of the location. If you leave this field empty, the location will be considered as global.
By filling in the latitude and the longitude in the details page, you will see immediately an overview of the position in google maps. By filling in the address of the location, the system will find automatically the respective coordinates (only if the latitude and longitude fields are empty). You can refresh the latitude and longitude values by clicking the button next to the address field.
It is possible to drag the pin from the map to manually adjust the coordinates of the address, if needed.
Packages
The packages are used to pre-sell a defined number of services without the selection of the checkin date and time.
Once the payment of a package order is made, the customers are able to specify the checkin date and time of one or more services simply by purchasing an appointment from the calendar. In this case, the cost of the services won't be considered.
The packages can be purchased only by registered users, as the system needs to check if a customer already owns at least a package to redeem. In order to redeem a package, during the booking process the customers have to login with the same account used to purchase that package, otherwise it won't be recognized.
In the Packages List page in the front-end, the packages are displayed following the defined ordering. The packages can be categorized in groups, so that the packages inside groups with lower ordering will be displayed first.
Any packages translations can be made by clicking the flag of a record, under the Languages column.
Package
- Name - the name of the package.
This value can be translated in multiple languages. - Num Appointments - the total number of appointments that can be redeemed by purchasing this package.
- Price - the price of the package. It is possible to click the Calculate button to fetch the package price by applying the specified discount to the average price of the assigned services, multiplied by the number of appointments that can be redeemed. Click the Calculate button again to turn this feature off.
- Tax - an optional tax rule to apply to the price of the package during the purchase.
Assignments
- Available Services - the available services that can be booked by redeeming this package. Leave this field empty to allow all the existing services.
Description
The extended HTML description displayed in the Packages page in the front-end.
The total height of each package box depends on the description length. The HTML can contain native Joomla content features (e.g. {load position MODULE_POSITION}) and it can be translated in multiple languages.
Publishing
- Published - disable this option if you don't want to allow the customers to see and purchase this package.
- Start Date - the start publishing date allowed for the purchase. Customers can purchase this package only if this value is lower than the purchase date (current day).
- End Date - the end publishing date allowed for the purchase. Customers can purchase this package only if this value is higher than the purchase date (current day).
Visibility
- Group - select the group to which the package belongs. A package may not have an associated group.
- Access - the access level group that is allowed to view this item. By selecting registered option, all the guest users won't be able to see this package.
In order to speed up the creation process of the packages it is possible to clone one or more existing packages. The cloning feature doesn't affect the translations of the packages.
Packages Groups
The packages groups are used as categories to filter the packages. The packages groups are not required, so if you don't want to categorize your package, you have just to leave this section empty.
The packages groups can be translated in different languages only from the group edit page, by clicking the flags on the top right side.
These groups are used only in the Packages page in the front-end to categorize all your published packages. The packages without group will be displayed as last.
The Packages page can be published by filtering the packages assigned to the specified package group. Otherwise all the packages will be displayed.
- Title - the title of the group to display.
This value can be translated in multiple languages. - Description - a html description of the group to display in the Packages page. The html can contain native Joomla content features (e.g. {load position MODULE_POSITION}) and it can be translated in multiple languages.
- Ordering - a number to display the groups in ascending order, the groups with the lowest ordering number will be displayed first.
Packages Orders
The packages orders contains the list of all the orders made by the customers and the administrator(s). By editing an order it is also possible to manually redeem (or add) an appointment.
It is possible to search the orders by ID (by using the prefix id:), order key, customer name, customer e-mail and customer phone. It is also possible to filter the orders by status, method of payment and purchase date.
Every time an order is made from the front-end, the customer and the administrator(s) will be notified via e-mail.
Order
- ID - an incremental identifier of the order (integer).
- Order Key - an alphanumeric secret value used to search the order.
- Status - the status of the order. Take a look at the Global - Status Codes section for further details.
- Payment - the payment gateway used (or to use) to pay the amount of the order.
- Notify Customer - check this option if you want to re-send a notification e-mail about the order to the customer.
Billing
- Customer - the customer assigned to the order. This value is required to assign the appointments to redeem to a Joomla user. By specifying this value, the nominative, the e-mail and the phone number will be automatically filled-in (only if they are empty).
- Nominative - the full name of the customer for this order.
- E-Mail - the e-mail address of the customer for this order. This value will be used to send e-mail notifications to the customer.
- Phone Number - the phone number of the customer for this order.
Packages
To insert a package into the order, you have just to click the Add Package button and select the type of package. Here's possible to override the cost of the package and the number of units.
It is also possible to edit an existing package to increase/decrease the number of redeemed packages.
The total cost of the order is automatically calculated according to the prices of the purchased packages. The Add Discount button can be used to maually apply a coupon code to the order.
Order Statuses
Within the management page of an order, it is possible to access the Order Statuses section to check an history of the order. From this list it is possible to read a description of each status that the order assumed. For example, it is possible to check how the order has been CONFIRMED or PAID.
It is also possible to change the status manually and to add a custom comment as reminder.
Custom Fields
The custom fields filled-in from the customer during the purchase.