Vik Booking Official Documentation

Version 1.18.7
First Setup
Basic Configuration
In order to configure the Booking Engine in the front-end, these are the steps you should follow to have a basic configuration of a room:
- Create one Tax Rate
- Create one Type of Price
- Create one Room
- Enter the costs per night from the Rates Table
- Add a new Joomla Menu Item of type VikBooking - Search Form or Rooms List for the front-end
By following the 5 steps above, the system will allow bookings in the front-end. Then you can create some Characteristics, some Options and you can apply Tourist Taxes and configure the pricing for your various seasons.
Global
Configuration

The Configuration of VikBooking is divided into 7 tabs
Tab Main Settings
Booking:
- Channel Manager Auto-Sync - This parameter is only for those who are using the complementary extension Vik Channel Manager. If enabled, any new booking generated via back-end or any booking modification, confirmation or cancellation, will be sent to the channel manager automatically in background, without needing to click any extra button. For example: you modify the dates of a booking and the update request will be sent automatically to all the channels connected to your API Key. Strongly recommended to be left ON to avoid issues with manual updates.
- Booking Enabled - With this option you can enable or disable the Booking service, an offline message is available
Note: if you want to give your guests the option to send a booking inquiry, read our article in the knowledge base here.
- Admin e-Mail - The eMail of the administrator that will receive the notifications for new bookings as well as payments. Multiple addresses are supported only if separated with a comma. Leave no white spaces between the commas
- Sender e-Mail - The eMail address set as sender. Some servers do not allow to send email messages with equal sender and recipient addresses.
- Manage Checkin and Checkout times - check-in time is supposed to be at a later time than check-out
- Check-in/out Date Mode - choose the right date format for your clients.
- Bookings for today at any time - if disabled, bookings for today's date after the check-in time will not be allowed
- Enable Coupons - if enabled, the form for entering the coupon code will be displayed at the booking summary page
- Enable Customers PIN Code - if enabled, when users are not registered or logged in and no cookies are available, customers will be able to enter their PIN code to get the billing information fields populated automatically
- Token Form Order Submit- This is a security measure that saves a crypted value in the session. Made for
- Require Login - If this setting is on the user will be forced to register or login before saving the order
- Pre Check-in Enable - If you want to allow guests to pre check-in
- Pre Check-in days in advance - If you want your clients can make the pre check-in any time before their arrival, let the setting to 0. If you want to allow pre check-in till some days before their arrival, set your desired number. If the parameter is set to 2, a customer can make the pre check-in until 2 days before the arrival.
- Upselling Extras - This setting allows you to upsell your extras/options services to clients that have a confirmed and not cancelled reservations till the check-out date. This way it will be possible for customers to order extra services for the rooms already booked and add them to their reservations. This will be valid both for website and for OTAs reservations downloaded by Vik Channel Manager. Click on “View in front site” in the Booking Detail Page of an existing reservation with check-out in the future to see how customers can choose to add services to their reservation from the front-end.
- Orphan dates calculation - set the calculation methods for dates considered as orphans. For more details about this function see our Knowledge Base .
- Minutes of Waiting for the Payment - When the booking status is Stand-By, the rooms chosen are kept as locked for this amount of minutes. During this period it will look like the rooms were already paid. Once these minutes will expire, unless the bookings has been confirmed, the rooms will become available for booking again
- Minutes of Waiting for Auto Removing Unpaid Reservations - If enabled and greater than zero, customers will see a countdown with the time remaining to place the payment. When the countdown reaches the end, the reservation is automatically removed if not yet confirmed (paid).
Search Parameters:
- Days in Advance for bookings - the closest allowed arrival date for bookings will be set to today plus this number of days
- Minimum Number of Nights - a global minimum number of nights for bookings. If this changes depending on the period, leave this to 1 and use the Restrictions
- Number of Rooms - the maximum number of rooms that can be booked with one order. This will affect any search form
- Number of Adults - the min and max number of adults that any search form will display in the drop down menu for bookings
- Number of Children - the min and max number of adults that any search form will display in the drop down menu for bookings
- Maximum Date in the Future from today - this will generate the maximum date in the future allowed for bookings. By default is 2 years
- Multiple Rooms booking Layout - choose the layout of multiple rooms booking for the front-end, between Classic or Compact. For more information about the Compact Layout see our Knowledge Base
- Availability for Multiple-rooms search - choose the type of search engine to use for displaying the rooms in the search results when users are booking more than one room. Properties with a low number of units available for their rooms/apartments like 1 or 2, should set this to Dynamic. This way if there is one unit available only for some dates and the users are searching for two rooms where the same room can suit the party/request, the system will hide this room for the choice of the second room when this is chosen as first room.
- Interactive Map Bookings - only if the Dynamic search layout is enabled and all your rooms contain geolocal informations, the search result will display an interactive Google Map where guests can book their preferred room units based on localization.
- Suggest solutions when no availability - if enabled, in case of no rooms found from the input parameters, the system will display the closest available dates, or other possible booking solutions. For example, if you don't have any rooms that accept 5 adults in one room, the system will suggest to book multiple units in the available dates. We suggest to enable this function.
- Choose Rooms Category - if enabled, any search form will display a drop down menu for filtering the rooms by Category
- Show Number of Children - Choose whether to ask the number of children in the search forms. If disabled the children will not be mentioned
-
Booking Split stay: - With this parameter enalbed, guests will be hosted in different rooms during their stay. The system will split the days of the journey in different rooms for the selected dates.
- Nights/Transfers ratio (if split stay enabled): - The ratio is used to determine when a split stay should be suggested or not. This parameter is useful to avoid proposing too many rooms transfers during the journey.
System:
- Appearance - You can set the light/dark mode for the back-end. If set on auto the system will switch between the two modes according to the device’s settings
- Appearance (front-end)- Apply the Appearance settings to the front-end
- Enable Multi-Language - if enabled, the internal translations will be used
- SEF Router - if enabled, the internal router will be used for rewriting the URLs with the alias of the rooms
- Load Bootstrap CSS - choose whether VikBooking should load Bootstrap for a better rendering of the pages
- Load jQuery Library - The component needs the jQuery library, depending on your template, this setting can be OFF
- Calendar Type - VikBooking has two types of calendar: the native Joomla Calendar, a basic calendar with no customization, nor custom configuration or the jQuery UI Calendar, light and easy to customize with many features. Make sure that the modules of your website will not cause javascript libraries conflicts or this calendar will not work. Using the jQuery UI Calendar is strongly recommended
- Google Maps API Key - This is needed to enable the Geographic Information (Geolocalization) options for your rooms.
Backup:
- Export Type - this function is useful to generate a backup of your Vik Booking configuration. The Export type "Full" will make a backup of all contents inside your Vik Booking, including reservations, customers records, and more. The Export type "Management" will only contain the general setup, with no records for contents like reservations or customers details.
- Folder Path - This is the path where the backup archives (ZIP files) will be saved on your website or server installation. The path can be inside or outside the root directory of your web-server. If you are unsure of what path to use, we suggest following the instructions in the comment below the path field so that you can append any custom folder to your installation base path. Something like "/your/server/installation/base/path/my-custom-backups
- Manage Backups - Will show the list of backups. By clicking on "New" you can create a new backup or upload an existing one.
Tab Prices and Payment
Currency
- Currency Name - the name of the default currency. This should be the 3 Chars-Code of your currency (USD, EUR, GBP etc...)
- Currency Symbol - the symbol of your currency. HTML entities are allowed i.e. € will produce the Euro symbol
- Transactions Currency Code - some payment gateways like PayPal will use this setting. This must be the ISO-4217 Currency Code of your country, 3 chars long like USD, EUR, GBP...
- Number of decimals - define the number of decimals that should be used for the numbers format. Some currencies do not have decimals
- Decimals Separator - define the character to be used to separate the decimals. Usually a comma or a dot. The dot " . " is used by default (90.95)
- Thousand Separator - define the character to be used to separate the thousands. Usually a comma or a dot. The comma " , " is used by default (100,000.00)
Tax and Payments
- Prices Tax Included - if this setting is disabled and a tax rate exists and is assigned to the tariffs, taxes will be added to any price.
- Show Tax in Summary Only - if enabled, all taxes will be displayed in the booking summary, the last step of the booking process. Otherwise any previous steps will display the prices with the taxes applied
- Allow Multiple Payments for one Order - if enabled, when the total amount paid is lower than the booking total, customers will be able to place other payments for the remaining balance
- Pay Entire Amount - when disabled, users will be asked to leave a deposit to confirm the booking, either a percentage amount of the booking total or a fixed amount
- Payment Transaction Name - some payment gateways require a name for each transaction. Define the default text to be used
Tab Layout
- Calendars first day of the week - choose the first day of the week that any calendar will display. Some countries prefer Saturday or Sunday to Monday
- Number of Months to Show - this is to define the default number of availability calendars that each room will display in the details page
- Show Partly Reserved Days - when rooms have more than unit available, if only some units have been booked, the remaining units will be displayed in Yellow/Orange as partially available/reserved
- Templates - in this section you can find the templates of the main files of Vik Booking that you can modify and customize.
- Front Title - Usually a heading tag placed on top of the pages in the front end, this can be your company name. This value can also be empty.
- Front Title Tag - You can write a tag for the style of the title (h3)
- Front Title Tag Class - you can write here a Css class for the style of the title.
- Page Text -You can write an opening and closing text for the page where the user makes the reservation with the form.
- Closing Page Text - This text will be placed right below the search form.
- Bookings Color-Tags - Create and assign color tags to each booking.
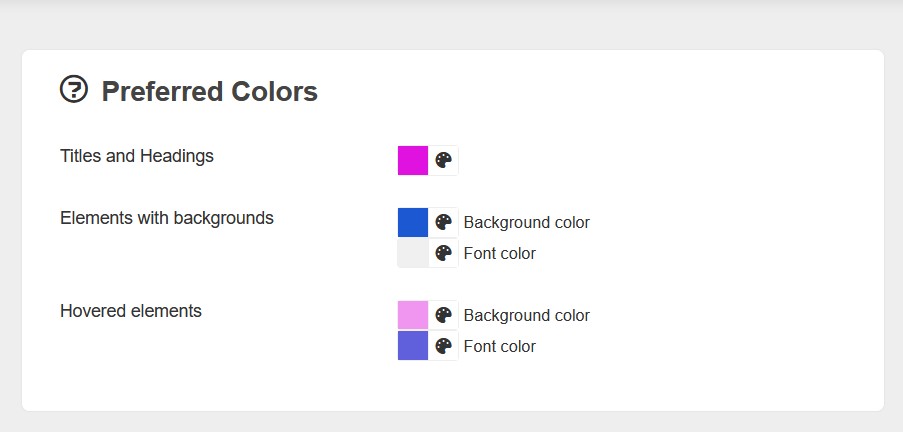
- Preferred Colors - Select your preferred colors to adjust the default front-end styles. This way, the look of the elements (titles, buttons, font color and backgrounds) of the various pages of the booking process can match with your Template or Property design.
Tab Company and Reservations
- Terms and Conditions - Use this text field to enter your global Terms and Conditions. The text will be used also for the generation of the PDF Check-in Document at the Registration.
- Company Logo and name - The name and logo of your company, a jpg, gif or png image file that will be included in every document generated.
- Footer Text Order eMail - This HTML text can be placed in every order email at the bottom of the page.
- Disclaimer- a text showed in the page of the front site when the user is selecting the the type of rate and the options. This should not be used for the Terms and Conditions. Read the Custom Fields section for further information.
Bookings Color-Tags
Many of our client have asked us to integrate different color tooltips for each booking to separate them. Starting from VikBooking version 1.9, we have added the option to define different colors per booking. You can easily set them and assign them to different bookings and different booking statuses. You should go into the 'Configuration' page, click on the 'Views and Layout' tab, and, if you are using version 1.9 or higher, then on the right there should be a list of names with color tags next to them, and a drop down selection menu.
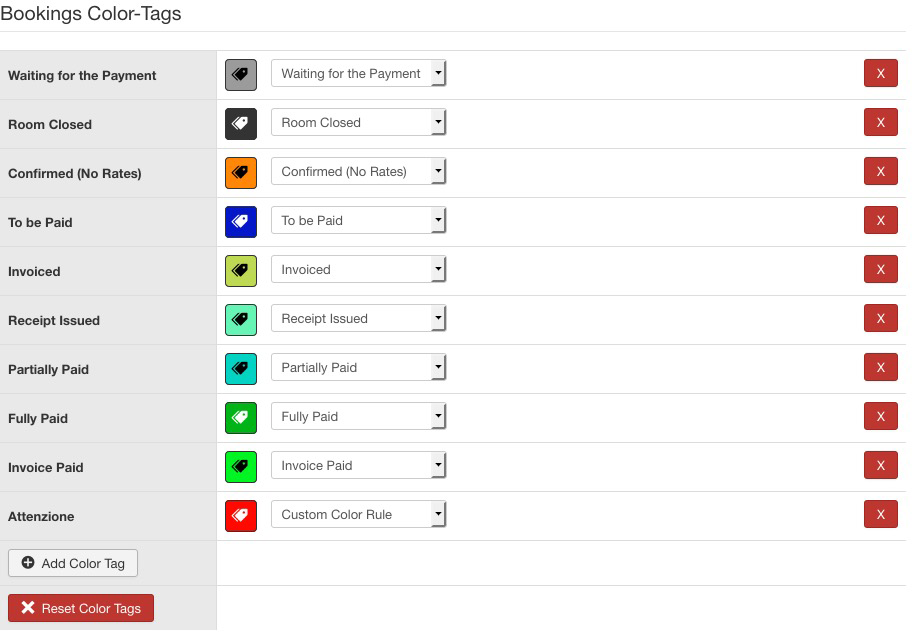
Each of these represents a color that can be applied to these statuses:
- Custom Color Rule - A Custom Rule you can assign to whichever booking you wish.
- Waiting for the Payment - This tag is applied to all unpaid bookings that temporarily block the room.
- Room Closed - This tag is applied to all bookings created from the 'Calendar' view to close rooms for a certain number of days.
- Confirmed (No Rates) - This tag is applied to bookings for rooms that don't have any rates or that don't cost anything at all.
- To be Paid - This tag is applied to bookings that have the Total Paid at 0 or not specified.
- Invoiced - This color is applied to bookings for which an Invoice has been generated.
- Partially Paid - This color is applied to bookings in which the Total Paid is less than the Total to Pay.
- Fully Paid - This color is applied to all bookings which have been fully paid.
- Invoice Paid - This color is applied to bookings for which the booking has been fully paid and invoiced.
To change the color related to each status, simply click on the colored tag box, and a color picker window will appear. All of these colors (Except Custom Color Rule) are applied automatically depending on the status of the booking described above. All bookings created will have a color assigned based on these rules. To apply a color manually, instead, you will need to visit either the 'All Bookings' page, or the 'Availability Overview' page.
From the 'All Bookings' page, you can click on the column to the right of the 'Total' column. If you do, a list of the colors defined in the configuration page will appear.

In the 'Availability Overview', you should hover your mouse on a booking and a transparent window will appear, with a color tag image in it. If you click on it, you will be able to change the color tag. Custom Color Rules can be applied to bookings only manually.

SMS Gateway
This tab lets you enable and configure an SMS Gateway to use for any SMS notification to the customers, and/or to the Administrator. Vik Booking comes with a few pre-installed gateways to send messages with certain providers. You will need to choose the right SMS provider for you, create an account from their site, and then enter the credentials in Vik Booking to start using this function. Please notice that credit for sending SMS messages should be purchased from the provider's website. Our company is not related to any particular SMS Provider. Lastly, the SMS framework could be extended to send SMS messages through your preferred provider if not available in the list.
Tab Guest Reviews
NOTE: this function is available only if the Vik Channel Manager is installed
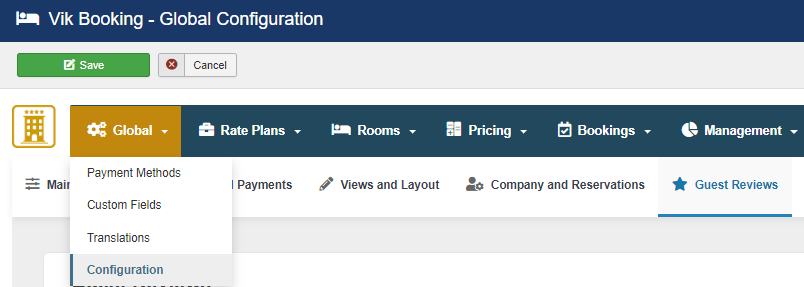
- Enable Guest Review: whether to enable your guests to leave a review;
- Review message minimum chars: set a limit of words for the message. When this parameter is set to 0, the comment will be optional. Insert -1 to avoid that the customer leave a message;
- Reviews approval: set an “automatic” or “manual” reviews approval method;
- Review type: choose to let customers rate per services or per global experience. If you chose the Service rating you can add in the list your customized service/field to be rated.
The possibility to leave a review starts from the day of the check-out onward. From the front end of the reservation detail, the customer will see a tab where to insert their message. Go to the Booking Detail Page of an ended reservation and click on “View in front site” to see how this will be displayed.
In the “Bookings” Menu -> “All Bookings”, you will see a little golden star near the name of the customer that left a review.

Click on the star to see the review. Here you can also check if the review already got a reply or not. If not, you can click on the little eye icon under “DETAILS” to reply to the customer.
To see all the reviews you got, both from the website and from channels, click on the Guest Reviews button in the Dashboard. A notification icon will appear each time you receive a review.

Tab Conditional Texts
In this section you can create your custom messages and texts for you guests based on specific needs or situations:
- Conditional Text Name - the title of the custom text will be the name you want to add to this task, useful to remember what it is for. It won’t be shown to guests. Based on the title, the system will automatically create a tag that will be inserted in the template you want.
- Conditional Message - in this box, you must insert the custom text which will actually be shown to your customers. The editor supports HTML and CSS format, so you can customize the graphic of the text as you prefer.
- Add Rules - the rules are precise conditions that should happen in order to let the custom message appear. They work as filters assigned to your text.
Below you can find two examples of conditional texts:
- You need to make a special offer only for the existing customers by giving them a private coupon for their next stay.
By adding the rule of type “ Number of Nights” and a rule of type “Returning Customers”, if the guest that books a room on your website meets both conditions, then the returning customers will receive the custom message.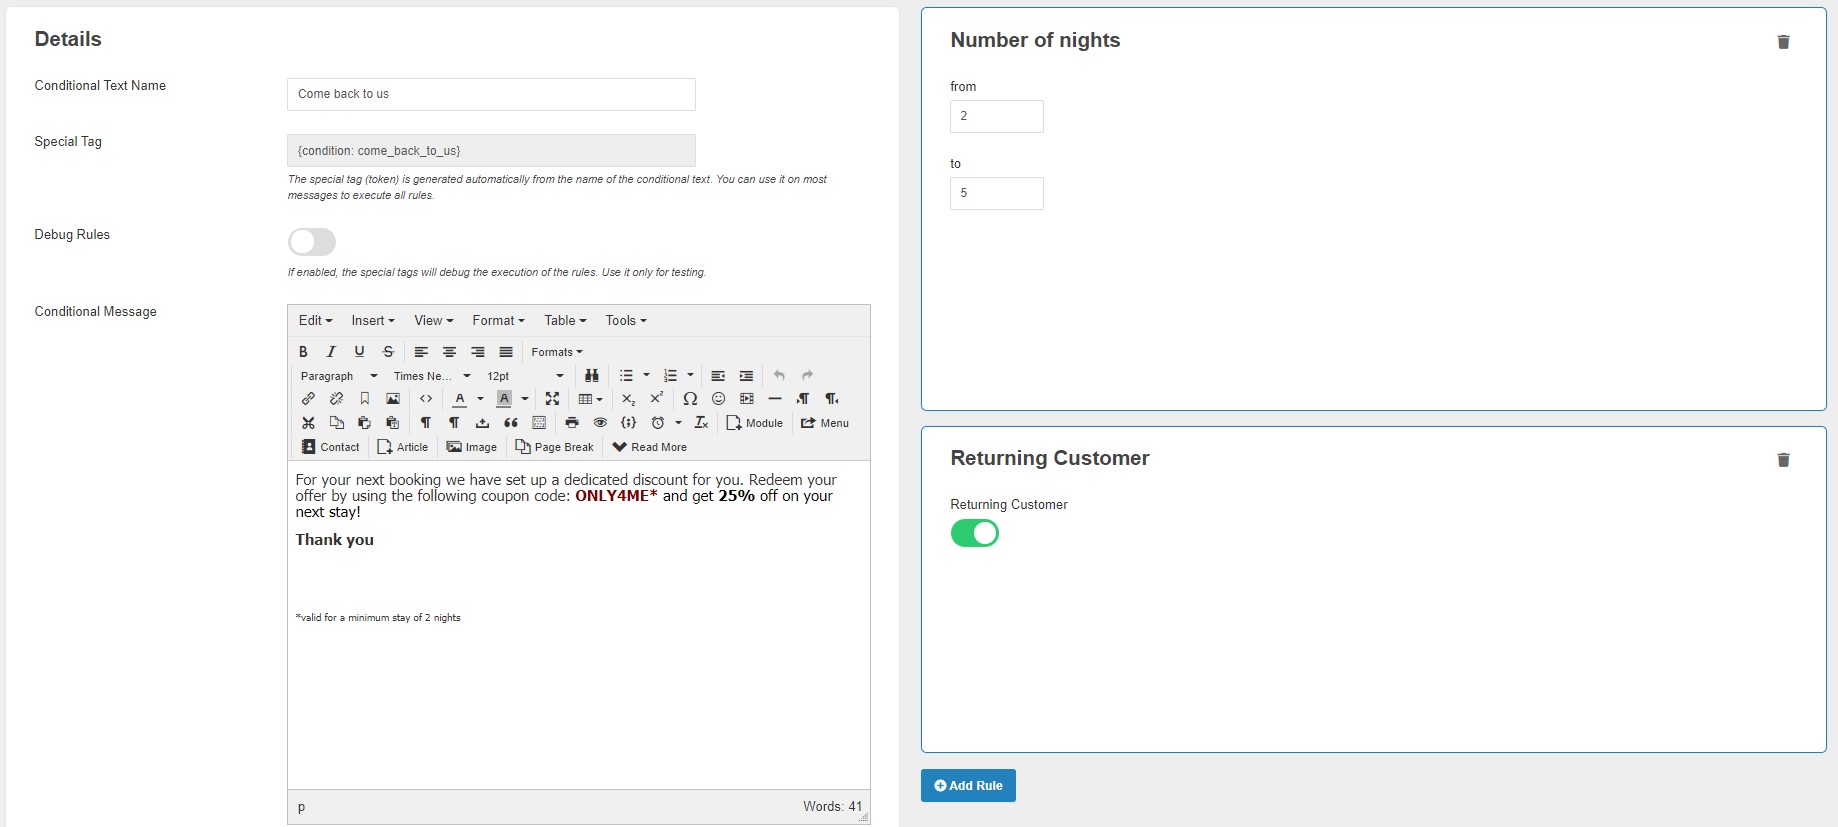
- You need to give additional information for a particular room, for example, in case of apartments or villas that sometimes do not have a reception point, we would like to let you know how to collect the key for that kind of accommodation.
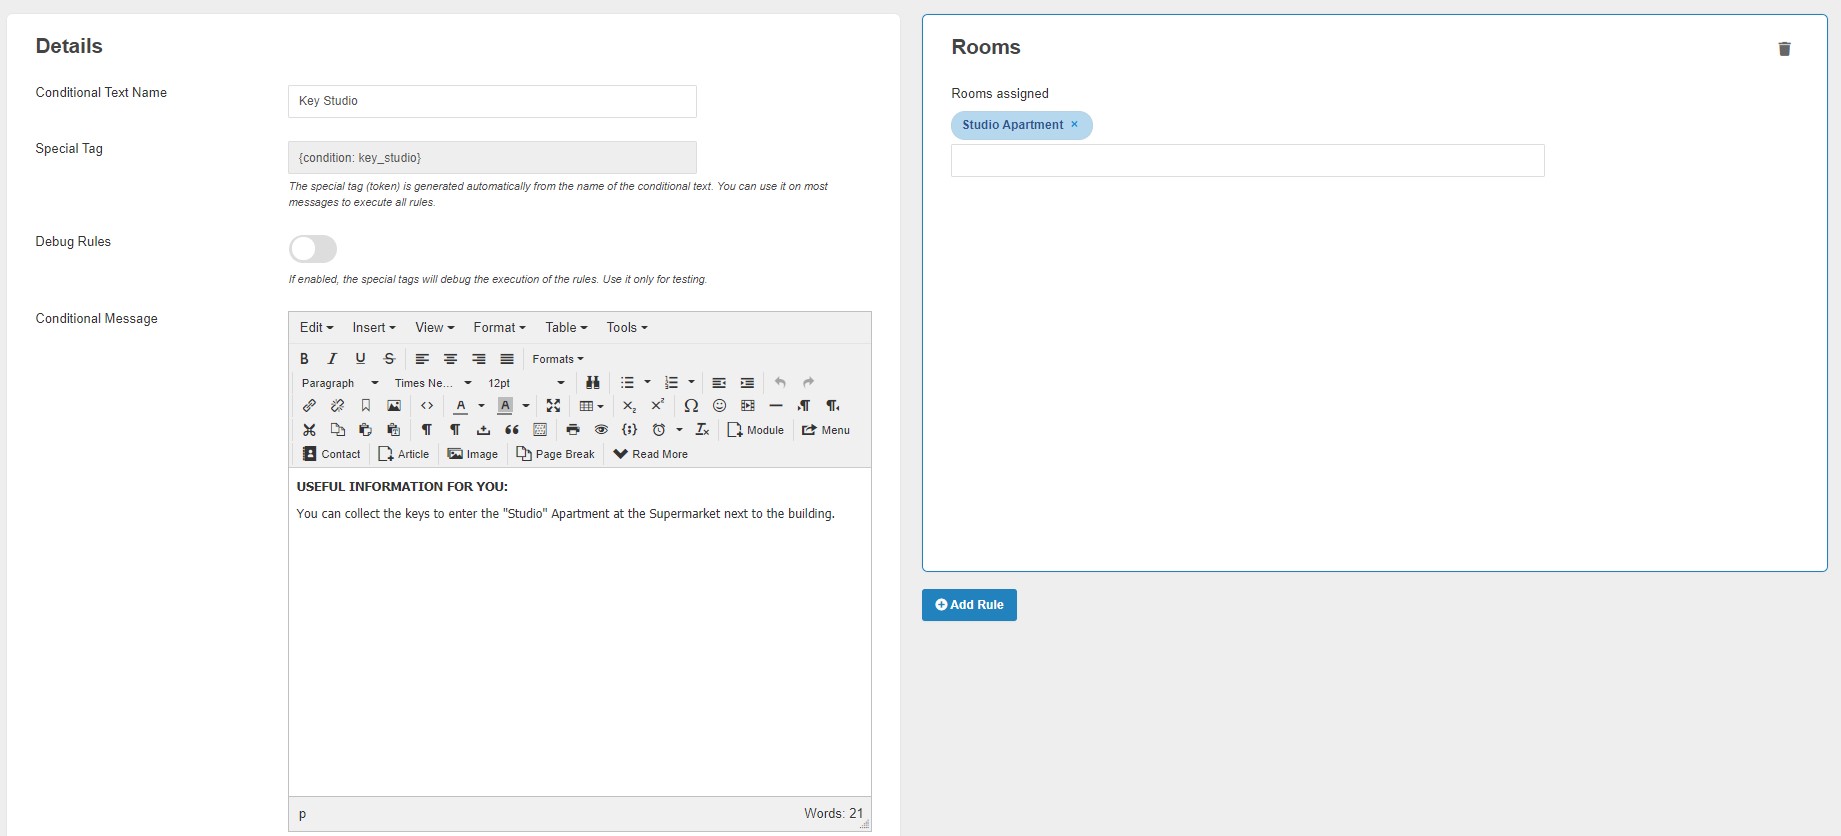
We added the rule “Rooms” and selected among the list of all rooms, the room we want to give this information for.
With this rule, any customer that will book this kind of Room will receive this message.
After saving, you will have the list of all your Conditional texts created.
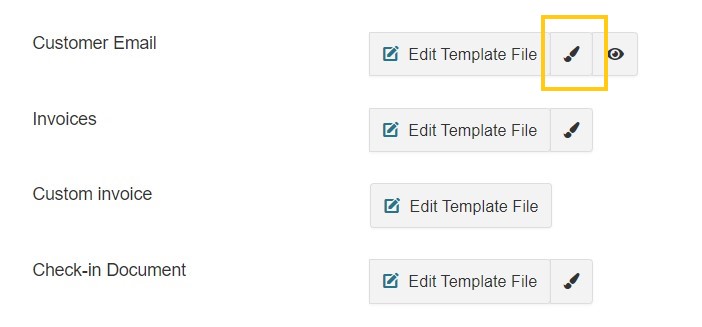
Remember to assign this text to a precise template where you need to display it: click on the desired template: click on the desired template name among the three proposed: “Customer E-mail”, “Invoices”, or “Check-in Document”.
When you choose the template, it will be opened in an interactive way, and you can insert your custom message by simply clicking on the position you prefer. When you click on a precise point of the template, the special tag will be added.
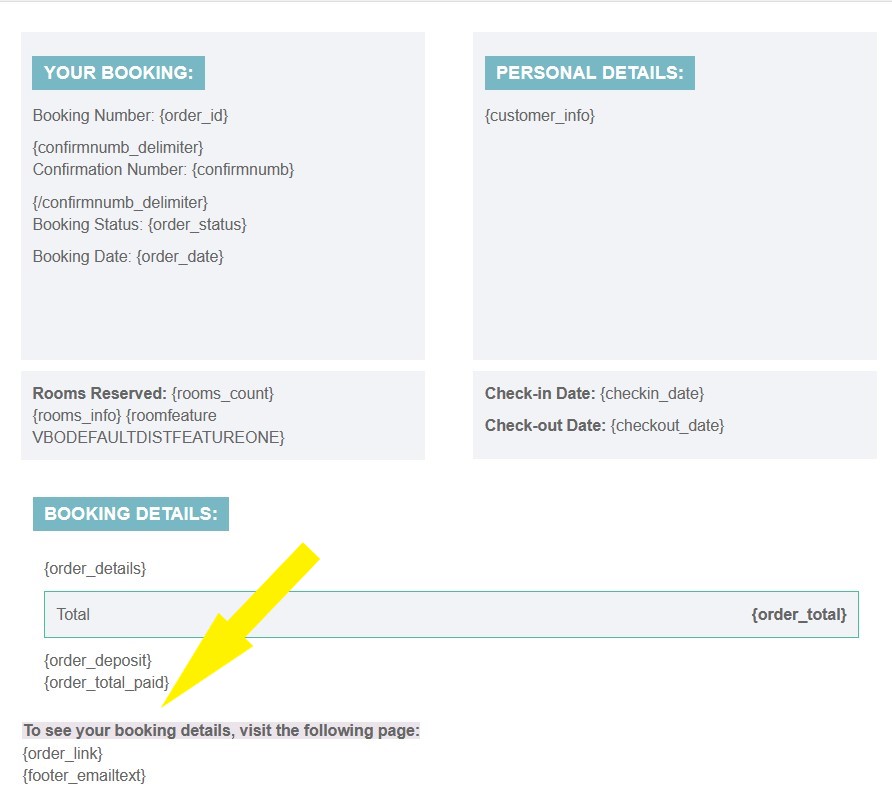 |
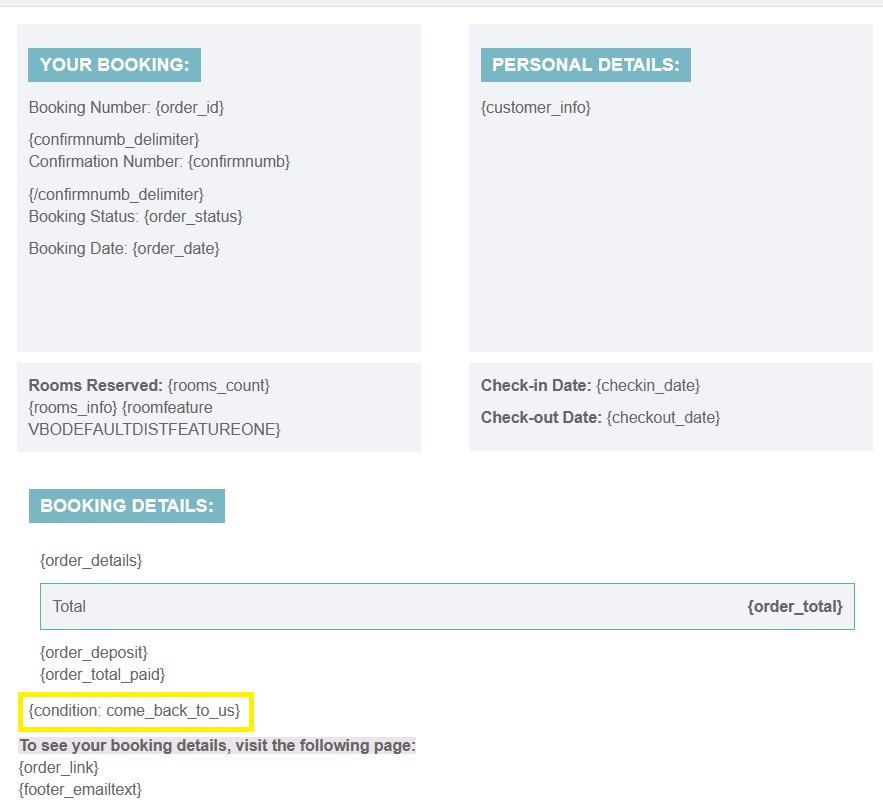 |
Custom Fields

From this task you can manage all the fields that the users will have to fill in before saving the order.
During the first installation of VikBooking, some fields are created by the program but it's always possible to manage these fields.
The field types are:
- Text - the user will have to fill in an input text field
- TextArea - a text area with more rows will be shown
- Select -a select menu is shown in this case, you can create all the select options from the same task
- Checkbox - a checkbox field will be displayed
- Country - a list of countries in a drop down menu
- Separator - this field is not an input field but just a text separator. It can be used for dividing the Purchaser's Information from the Billing Information. If the text of this field is longer than 30 chars, a different style will be applied to it. Some people use for writing extra information.
The field name is the label that will be next to the input field or the text of the separator.
If your website is multilanguage, the label should be a definition inside the .ini language file of each language that you have.
For example, the field Address should have a label like ORD_ADDRESS and each .ini file of VikBooking that you have should contain a row like this:
ORD_ADDRESS="Address"
From VikBooking 1.6 the custom fields can be translated with the internal translator tool.
A field can be required or not, in this case the system will check that the user provided something for that information.
If the field type is Text and the setting Is Email is On, that email will be used to send the order email. Make sure to have only one custom field of type Text, Required and marked as "is eMail". There is no need to have more than one because the system will validate that the email is valid. A field like "confirm email" would be useless just like having more than one field marked as email.
It is strongly recommended to have at least two custom fields of type text, required and marked as "is Nominative". The system will use this to get the first and last name of the customer.
Another important setting of the fields is the Popup Link. This function is usually used when the field type is Checkbox and the user has to accept something, the Terms and Conditions for example. The popup link is a page that is opened in a modal box every time the user clicks on the label of the field. The modal box is "modern" popup that is never blocked by any browser and leaves the user in the same page.
Usually the link should be a Joomla article link with an additional parameter in the query string like &tmpl=component.
Here is a screen shot that shows a correct configuration of the Custom Fields. It is important to keep a correct configuration in order to let the system add customers to the database and to use all the management functions correctly (Invoices, SMS, Cron Jobs etc..):
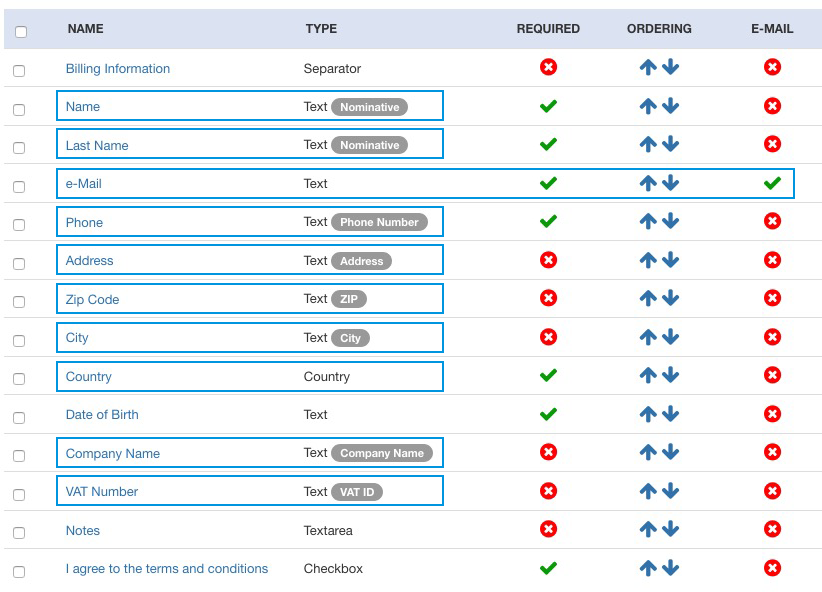
Since Vik Booking 1.10 it is possible to add extra flags to certain custom fields, like Address, City, ZIP, Company Name and VAT Number. Please visit the demo website back-end to see an example of a correct configuration of the Custom Fields.
Customers
The Customers page will let you manage all the customers of your property. This function is useful to keep track of all your clients who made a booking for their stay so that they will be able to find their billing information populated at the next bookings.
One customer record will store the following information:
- First Name - first and, optionally, middle/second name of the customer.
- Last Name - the customer's last name.
- Company Name - the name of the company, in case of a company.
- VAT ID - the VAT number of the company.
- eMail - the primary email address of the customer.
- Phone - the phone number of the customer inclusive of the prefix.
- Address - customer address.
- City - the city of residence.
- ZIP - the ZIP code of the city of residence.
- Country - the country of residence of the customer.
- Gender - male or female. Useful for the Reports.
- Date of Birth - the customer's date of birth.
- Place of Birth - the customer's place of birth.
- ID Type and Number - stores the customer's ID details.
- Notes - internal notes for this customer, only visible to the administrators.
- Joomla User - in case the customer has a login name for the website, a relation between the Joomla Users can be created.
- PIN Code - the unique personal identification number of the customer, 5 digits, integer number. This code is used for storing information in a cookie sent to the customer's browser so that at the next bookings the custom fields will be populated automatically. The PIN code is sent to the customer together with the booking confirmation email.
Every time a customer makes a booking, the system will create a record for the new customer, unless a record for the same email address was already saved. However, in order to have the system store the customers records in the database, you need to have the Custom Fields configured correctly:
the system requires to have two custom fields of type Text, Required and marked as Nominative; one custom field of type Text, Required and set as eMail; optionally you can have one custom field of type Text, marked as Phone Number and one field of type Country. Setting up the Custom Fields as in the demo website back-end is what we recommend for every new version, and for compatibility with the Reports functions.
Translations
With the Translations page you can translate any content of the database that was created through VikBooking such as the names and the descriptions of a Room, the names of the Rate Plans, the Characteristics or the Custom Fields.
We strongly discourage the use of third party extensions to manage the translations. Through the Joomla native functions it is possible to translate articles, menus and modules. Through the Vik Booking functions you can translate any contents created with this extension, so there's no need to use third party extensions that could just slow down your website and cause conflicts.
Multi-Language Contents
Wordings like "Book Now", "Room", "Confirm Booking" etc... do not need to be translated through this function because those are handled by Joomla with the .INI Translation files.
This page will list all the Languages that you have installed on your Joomla website. For installing new languages use the Language Manager page of the administrator section or download the translation packages from joomla.org.
Please notice that the default language for the front-end Site, configured from the Language Manager, should be the one that you use for entering the default names and descriptions of the Rooms and everything else. Basically, all the contents that you create with VikBooking should be in the same language as the Default one set from the Language Manager page of the administrator section for the Front Site.
By choosing a content type from the drop down menu on the right of the page, the system will load the original translations for that content (Rooms, Categories, Types of Price, Characteristics, Options, Special Prices, Custom Fields, Payment Methods etc...) and you will be able to create a translation for any other language than the default one for the Site.
There is a configuration setting for allowing the Multi-language contents so make sure this is enabled.
.INI Translation Files
Still from the page Translations it is possible to get an overview of all the .INI Language Files that should be on the server so that no language definitions will be missing for some languages, for the component VikBooking or for some Modules like the Horizontal Search or the Currency Converter.
By clicking on the last tab to the right called .INI Status, the system will list all the default .INI files of VikBooking for the component, front and back -ends, and for the modules. Please notice that it is not required to have all the .INI Files translated into all the languages that you have, in case some files will be missing or in case some translations are not available, Joomla will revert to the default English language definitions.
The screen shot below shows that the .INI Translation Files for the front-end part of VikBooking (component) are all available except for French. However, not all the available translation files have the same number of rows (number of definitions) and this means that some translation files are outdated, meaning that they were made for a previous version of VikBooking so some definitions are missing. In these cases it is necessary to open the default English .INI language file and compare it with the outdated translation file of another language. The number of rows will be different and it is sufficient to copy all the missing translations at the bottom of the English file onto the other language .INI file so that the number of rows will be the same. At that point it is necessary to translate the missing language definitions for having the .INI file updated.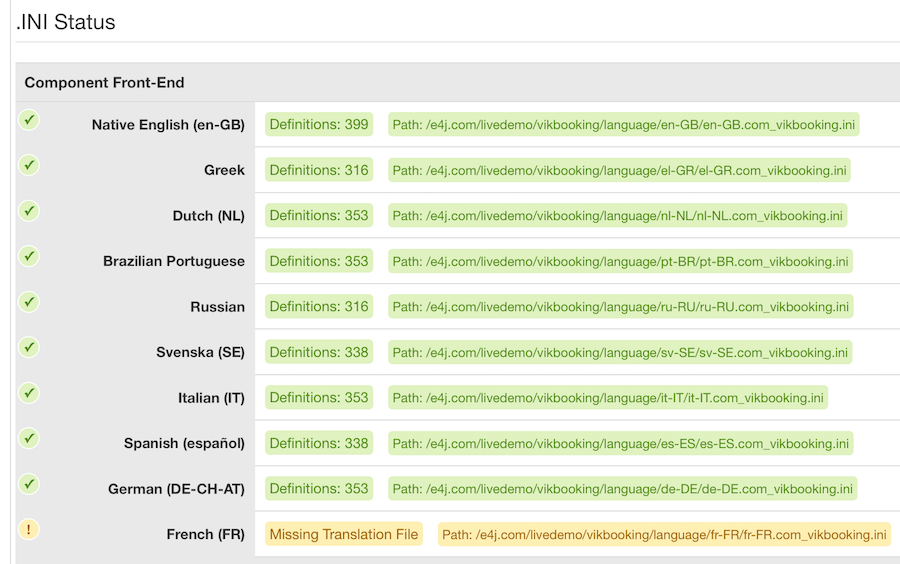
This screen shot instead shows how the translation files for the Horizontal Search Module are all updated to the latest version because they all contain the same number of Definitions. However, the rows in yellow show that the .INI Translation Files for Greek and Russian are not on the server. This means that the module will be displayed in English when the front Site is visited in either Russian or Greek.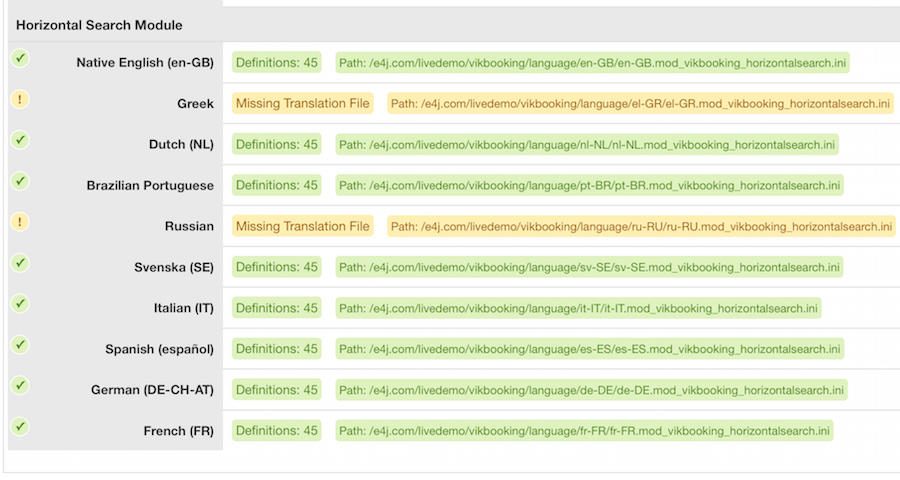
Payments

From this task you can manage the methods of payment for your website. Paypal, Bank Transfer and Offline Credit Card are pre-installed but disabled by default after the installation.
The method of payment chosen by the customer will affect the status of the booking that can be either Pending (Stand-By) or Confirmed.
In case all the methods of payment are disabled, every booking will be considered by the system as Confirmed and the user will not be asked to select any method of payment.
In case the payment option requires the validation of a payment, the setting Auto-Set Order to Confirmed must be DISABLED or the status will be set to Confirmed before requesting the payment or before starting any transaction. Payment options like PayPal where a payment is required should have that setting DISABLED while you can enable it in case you want the booking status to be Confirmed when that payment option is selected.
The payment option Bank Transfer is a flexible method for giving the customers certain instructions for the payment through the Notes field such as your Bank Account Number (IBAN). Some Properties offer a payment solution for paying upon arrival. In this case it will be sufficient to rename the Bank Transfer to anything like "Cash" or "Pay Upon Arrival". In this case, properties should decide what status to apply to the bookings where the customers chose to pay by cash or upon arrival. Bookings not Confirmed will not lower the availability of the rooms on the requested dates, they will just keep them as Locked for the amount of minutes defined in the Configuration.
The Payment Name is the title showed in the front site during the order confirmation when the user has to select a method of payment.
The File Class is a php file that is executed by VikBooking to start the transaction and to validate the payment, do not change this unless you are creating a new method of payment.
VikBooking supports customized methods of payment, by creating a new file class .php in the payments directory you can create your own gateway for your bank.
A method of payment can apply a charge or a discount to the total order. From the setting Charge/Discount you can enter an amount, percentage or value that will be added/deducted from the order total. This can be useful if you want to give your clients a discounts if they are paying by credit card.
The Notes field, is a text displayed in the order page in the front site. Usually the notes are shown only if the order is Confirmed, by enabling the setting Always Show Notes, the notes will be displayed in the order page even if the status is Confirmed. For those who use Bank Transfer, this could be useful for showing the information for the payment or other details.
Rate Plans
Tax Rates
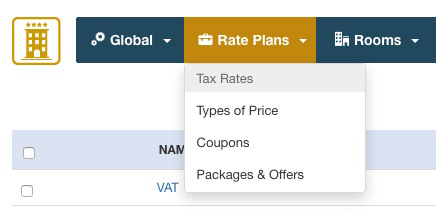
Most countries use just one tax rate. However, in some cases the room stay is affected by a certain tax rate while some extra services sold and booked through the options, may be affected by another tax rate.
Do not create multiple tax rates in case your country has Federal and Provincial taxes or anything similar, use the function Taxes Breakdown to specify how the total tax rate is composed.
You will then be able to assign any Rate Plan or service that can be booked, to one tax rate or none.
Types of Price
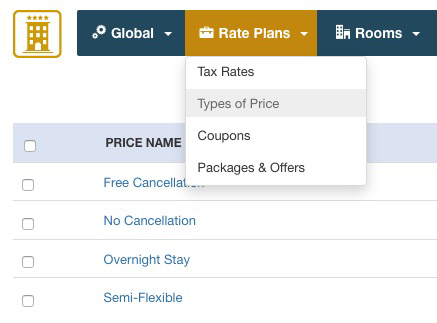
The Types of Price are required for the creation of the rates. It's what most portals call Rate Plans.
In order to be able to enter the rates per night or per occupancy for your rooms, you will need to have at least one type of price.
Some examples of types of price are: "Free Cancellation", "No Cancellation", "Standard Rate", "Room Stay", "Half Board", "Full Board", "All Inclusive" etc...
The costs per night or per occupancy can be defined for each type of price that you have. For example you can offer a free cancellation booking of the rooms as well as a no cancellation/non-refundable price. Another example is offering a Half Board stay or a Full Board service. This way the customers will be able to pick their preferred type of price and the relative cost of the room.
It's incorrect, instead, to create Rate Plans to reflect your seasonal rates or specific periods such as "Summer", "Winter", "Christmas", "High Season", "Low Season", "Rates for 2021" etc.. This is because Rates Plans should only reflect your types of stay, the services they include, or the cancellation policies. Also, the costs for any rooms and any Rate Plans can be changed on any dates of the year by using the Special Prices or the Pricing Calendar in the page Rates Overview.
It is possible to specify a Price Attribute which is a label/explanation text of the type of price. An example of an attribute could be "Services included". From the page Rates Table, where you enter the costs per night for each type of price, you will be able to specify with a text, what services are included depending on the length of stay. For example, breakfast can be included only if the nights of stay are 3 or more.
Please notice that most Hotels do not need this function and you can just give the type of price a name without any Attribute (by leaving it empty).
Tax Rate: each type of price should be assigned to one Tax Rate, or taxes will not be calculated or displayed.
For third parties connections with channel manager or meta searches systems, you should define whether the type of price includes breakfast and what's the cancellation deadline if it's free.
Minimum Nights of Stay: if greater than one, this rate plan will be available only after a specific number of nights of stay.
Minimum Hours in Advance: set it to a value greater than zero to hide the rate plan if the time until the check-in is too low. For example, you could decide to not offer a refundable rate if there are less than 48 hours to the arrival. Please remember to not apply this kind of limitation to all your Rate Plans, or you will risk to not have any available Rate Plans, and so last-minute bookings won't be allowed.
Packages
Packages are the e-commerce side of Vik Booking. This means that they will be sold separately to your clients from a specific section of your website and they will not affect the price shown in the research result from the Search Form or its price configured in the Rates Table.
To display your packages list, you need to create a Menu Item of type "Packages List" in your Menu.
How to create Packages:
You can do it from the Rate Plans Menu > Packages & Offers > New

Packages settings:
- Package Name - the name you want to give to your offer.
- Main Image - add an image for your package.
- Validity Start Date - the starting date you want your offer is valid from
- Validity End Date - the last date of your offer validity time
- Excluded Date - If you want to exclude some days from the validity date range of the package
- Available Rooms - Select the rooms available for this offer
- Min Num of Nights - set a minimum number of nights of stay
- Max Num of Nights - set a maximum number of nights of stay
- Package Cost - Set a value for the package
- Tax Rate - insert the Tax Rate to apply
- Cost Type - choose if the cost is per night or total
- Cost per Person - choose if the cost is per person or not
- Display Room Options - display all or some of the rooms options
- Packages Short Description - insert a fast description of your offer
- Packages Description - insert detailed description of your offer
- Conditions - insert your conditions
- Benefits - let your customers what are the benefits from choosing this offe (i.e. xx% saved)
Coupons

The coupon system allows you to create discounts that will be applied to the order total.
A coupon has:
- A code that can be any letter or number including special characters.
- The type can be permanent or gift, in the first case the discount will be always applied when this coupon is used. If the type is gift, the coupon can be used only once, after that it will be removed.
- The discount can be a fixed value expressed in your currency or a percentage value.
It's also possible to apply some filters to the coupons:
- Rooms: The coupon can be used only for some rooms or for all the rooms.
- Validity Dates: You can restrict the date of usage of the coupon.
- Min. Booking Total: You can set a minimum order total in order to apply the discount.
- Exclude Taxes/Fees: You can choose to include or exclude taxes or other mandatory fees from the coupon calculation. If taxes are included it will be a 100% off discount.
- Customers Assigned: You can choose if only the selected customers can use this coupon
- Number of uses: You can define the max limit for usage
- Apply automatically: if enabled, the coupon will be automatically applied in the checkout page without customers inserting it manually.
The users will be asked to enter the coupon code in the order summary page.
Please note:
- if the coupon is granted from the Front-End, the order total will be displayed as discounted in the oder details and bookings list pages of the administrator section.
- if the coupon is granted from the Back-End, the order total will not be displayed as discounted in the order details and bookings list pages of the administrator section.
In any case, the system in the Front-End will initially calculate the total amount that needs to be paid, and, if there is any discount, this will be applied.
Therefore, discounts created both from the Front-End and the Back-End will produce the same result.
Rooms
Categories
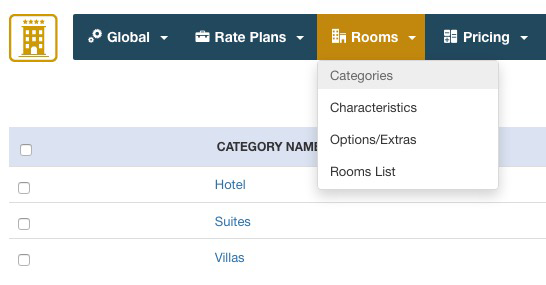
From this page you can manage the categories to which the rooms belong. Categories are useful when the users are searching for rooms because they can filter the results by selecting a category from the search form.
You will only be asked for the category name and for an optional description field that will be displayed in the view type Rooms List filtered by a Category ID.
Options
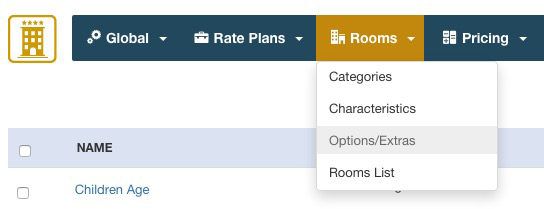
The Options/Extras are services, tourist taxes or fees that the users may want to add to their reservations or costs that should be listed separately from the room stay. Options can be anything, an additional Bed, a Tourist Tax, a Bottle of Champagne, a Resort Fee or any other kind of service/fee.
Options have a Name, an optional description, a cost, an optional tax rate, an optional image and a few Parameters:
- Cost per Night - the price will be multiplied for the nights of staying;
- Cost per Person - the price will be multiplied for the number of Adults;
- Selectable Quantity - if this parameter is on the user will be asked for the units desired, otherwise a checkbox will be displayed;
- Maximum Cost - in case the option price is multiplied by the nights of staying or the units, it is possible to set a maximum cost that the option can reach.
- Only for Children - the Option will be visible only if there are Children;
You can also force the option to be Always Selected, this could be useful in case you need to make the user pay for some service and list this service in the order summary as a separated cost from the rental fare. Tourist Tax for some cities could be an example and some Hotels would rather show this Tax in the Order Summary by checking the checkbox "Show Only in Order Summary". This way the user will see a row for the Tourist Tax in the Order Summary that will be added to the booking total.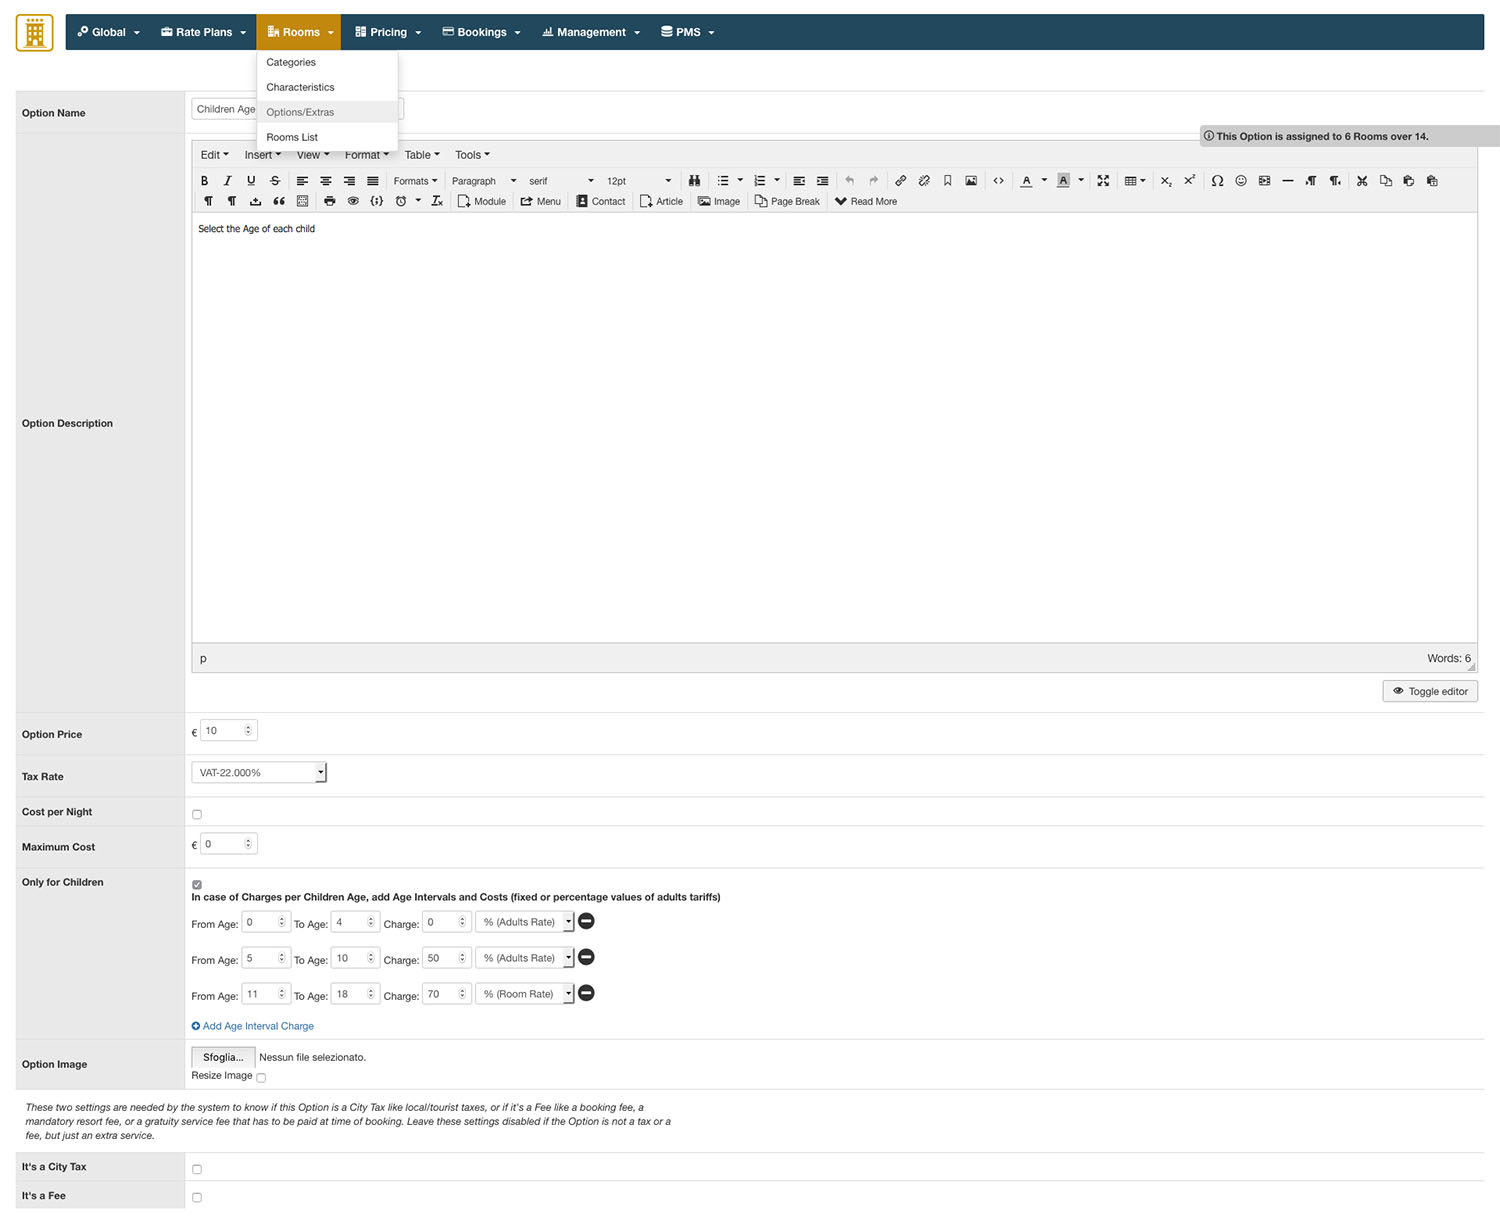
Charges per Children Age: when the setting "Only for Children" is enabled, you can create age intervals and a cost for each interval that the users will have to select for each of their children in the front site. This type of Options are threated a little different than the others, in fact, the selection in the front site is shown underneath the Rates in the page after the search results.
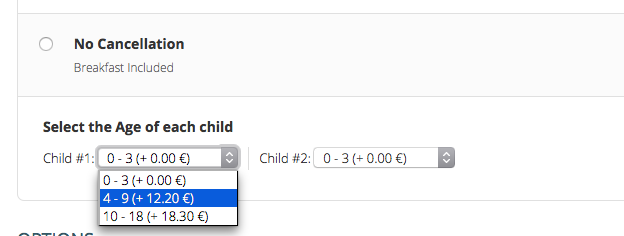
Percentage calculation: you can select to calculate the cost of this option by a percentage of the room total. In the example below, there's the summary of what this function does. We recommend the use of this function in case of the Tourism Levy taxes. Remember: the tourism levy are also taxable.


Characteristics
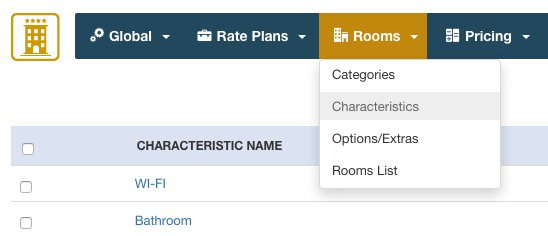
The Characteristics are the amenities of the rooms. Characteristics have a name, an optional icon and a text to be displayed in the front site with a tooltip when hovering the icon. By creating or editing the rooms, you will be able to assign some Characteristics to be displayed.
Since the version 1.10, the Text of the icon can be an HTML tag to render a specific font icon. Remember that Vik Booking ships with FontAwesome installed, so you can use a large set of scalable icons for any device and resolution.
![]()
Rooms
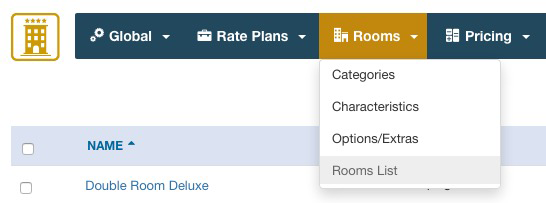
Before creating the Rooms you are supposed to have created the tax rate(s) and the type(s) of price. The options, the categories and some characteristics/amenities can be created later on.
The Room should be interpreted as either Room Type (like Single, Double etc...), Apartment, Dorm or Room Number (i.e. Double #3 First Floor). The room is what customers will book in the front-end.
When creating a new room, you will be asked to provide some information:
the name, the main image, optionally more images to create an image gallery with a caption text for each image, the category to which the room belongs and a description text, short and long.
Both the Descriptions, small and html, support Content Plugins. The content of the descriptions will be parsed by Joomla so, for example, by using the special syntax , the description will render the module published in your_module_position through the Joomla native Content Plugin "Load Module". Any other Plugin of type Content could be loaded in the descriptions.
Occupancy:
For each room you can define a Maximum and Minimum number of Adults and Children. This way you can define the Occupancy of your rooms.
Please notice that if the minimum number of Children is set to 1 rather than zero, by making a search for 2 Adults and 0 Children for example, the room will not be available. It is also possible to define the minimum and maximum number of total people allowed (Adults + Children).
After saving the room, if this is available also for a number of Adults that is less than the Maximum capacity of Adults, you can create Charges or Discounts for the different usage of the room. This is how the pricing by occupancy can be managed.
Example:
Double Room: Min Adults 1, Max Adults 2. You can create a discount (or a charge depending on your policies) for the usage of the room for 1 or 2 Adults. You can say that if the Adult is only 1 in the Double Room, the cost is the 20% less or $20 per night cheaper.
Units:
Another important detail of the room is the units field. This value will be considered when the system is checking the remaining availability of the rooms depending on the bookings received for certain dates.
Categories, Characteristics and Options
You can also assign some of the characteristics (amenities) to the room by clicking on the checkbox next to them. The same thing works for the Options, this way you can only assign some of the amenities and options created before, not all of them.
Rooms Parameter:
In this section you can find some useful parameters to customize the information on the view of your room:
Book Multiple Units: If there are more units of this room type, you can enable multiple selections for the same room during the booking process.
Custom Starting From Price: Select a custom price to show in your room's view (list and details). If empty, the price will be the one you set in the Rates Table.
By leaving this parameter empty, you will see the exact daily price of the room on that day. This means that if you have a special price applied for that day, the showed price will be one of the rates table +/- the special price applied. The visible "starting from price" will be no more the default price in Rates Table, but the effective day price you have in your Rates Overview.
Enable Request Information: if this parameter is enabled, you will see a contact form in the rooms details page by which customers can send information requests about the room.
Availability Calendar with prices: if enabled, this parameter will show prices defined per day in the calendar of the Rooms Detail view. You can specify a custom default cost per night to show each day. Leave it empty if you want to show the default price defined in rates table for that room. If special prices are applied, they will be applied to that cost view.
Show seasons calendar: If enabled, this parameter will show a table of prices for the defined number of days and various seasonal prices (discounts, charges, promotions) applied, if any.
Availability Calendar Settings
This function should be used if you have an accommodation (generally Apartments) that can be booked both entirely and by different rooms. In this way you can sync the availability calendars of each room that compose the apartment with the one of the entire apartment itself.

If a client books the apartment in full, the availability calendars of the 4 rooms connected will be blocked as well. And so if one of those 4 rooms were booked, the entire apartment will be not available for other reservations in the same dates.
To share a room calendar, go in the Room Menu > Rooms List. Open your Room and go to the “Availability Calendar Settings” area. Start sync the calendar of this selected Room by inserting the name of all the Rooms you want to be synced.
Once done, in the Rooms List, you will see a little icon of a Calendar near the Rooms that have a connection.

- Enable Geocoding - enable this parameter in case your Property has multiple locations and you want to specify the exact location of each Room Type and its sub-units. For example, this is useful for Vacation Rentals or Camping sites whose accommodations types can be scattered over a wider territory. The map will be shown in the Room Detail page on the website front-end.
- Base Address - Specify the base address of your Property.
- Center Coordinates - In order to give a location to your rooms type, you will be asked to enter the geographic information to locate the map. The map is interactive, meaning that you can drag and drop the marker and position it.
- Zoom Level - adjust the zoom of your Map.
- Map Type - choose among street view – satellite view – Hybrid view – Terrain view.
- Map Marker - In case your accommodation has no more similar units of this type, use the “one per room-type” option.
In case your Room Type has more units, you can decide to use different markers for each-sub units by choosing the “one per sub-unit” option. In case your accommodation has no more similar units of this type, use the “one per room-type” option.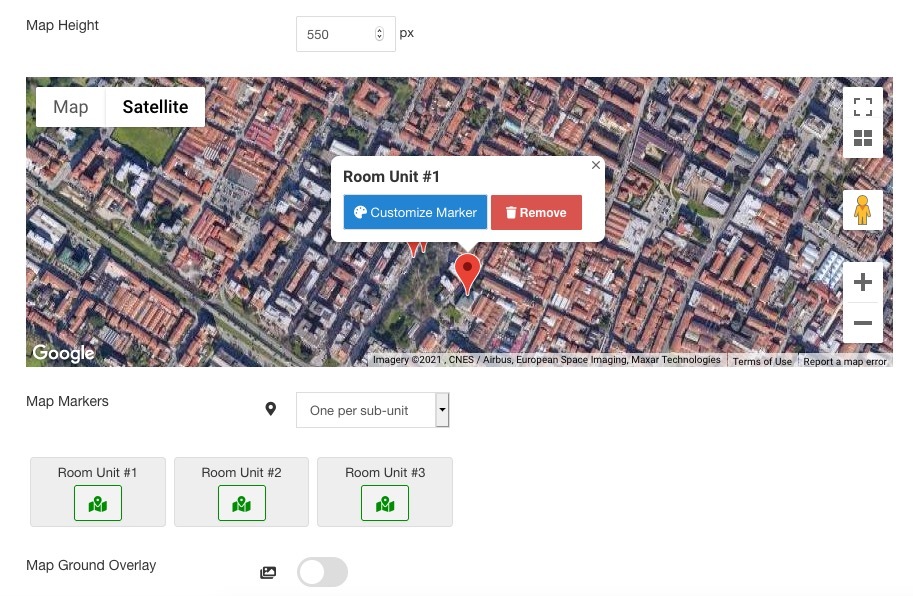
In this case, you will be able to customize the marker icon of each sub-unit: you just need to click on the Room Unit Number tab > Customize Marker and choose between: "classic google marker", default or new "icons in SGV format" and "custom image" to upload.
In the image below an example of pre-installed SVG icons that you can customize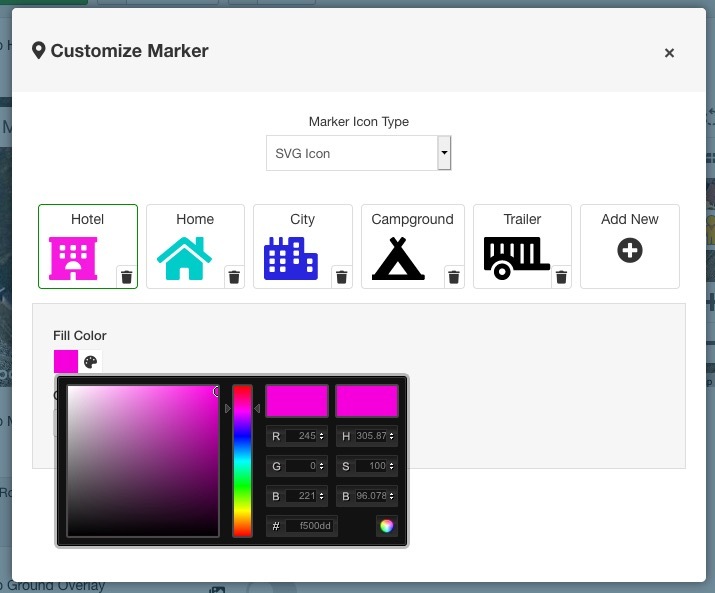
After saving your selection, each Unit will be marked with its assigned custom icon.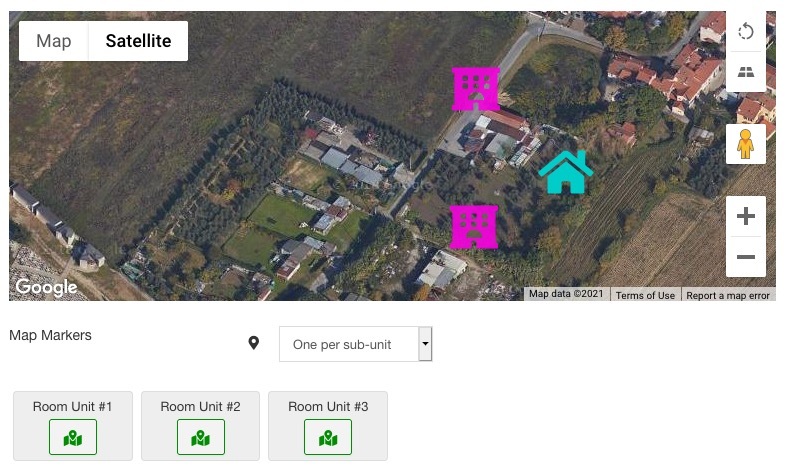
Please note:
Only if all the rooms type configured in the back-end Rooms List menu do have a map, then a main map with each room type icon will be displayed after the search results (in the front-end Rooms list page). By this way the customers will be able to reserve and continue with the booking process just by clicking on the property icon they prefer. You must have enabled the Dynamic Search Layout in the Global Configuration of Vik Booking and then enabled the parameter to show the Interactive Map to let booking process starts from the map in the search results.
- Map Ground Overlay - use this parameter to upload a custom image of your location map in case you have it. The image you use will go to overlay the standard map view based on the coordinates you give to it.
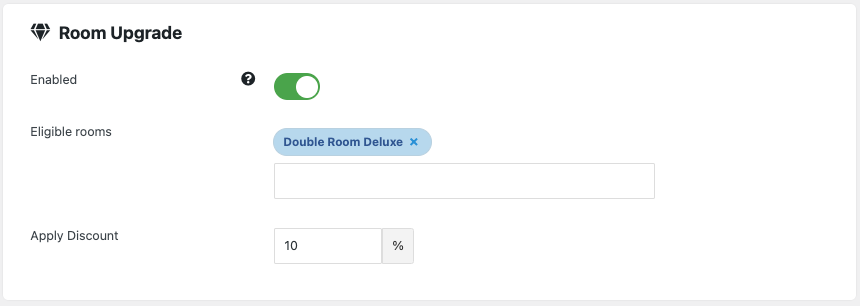
Enable this parameter if customers that booked this room can upgrade to a better room.
- Eligible Rooms: choose the eligible rooms for the update.
- Apply Discount: select a % value to offer the upgrade at a special cost.
Pricing
Rates Table

The page Rates Table is one of the most important pages of the back-end. This page will let you enter the costs per night for all your Rooms. In order to use this tool, you need to have configured at least one Type of Price and one Room. Bookings will not be allowed if there are no costs defined in this page for the number of rooms requested. For example, a search in the front-end for 7 nights of stay, will produce results only if some rooms have a cost for 7 nights defined in this page.
The pages shows an insert-form for creating the prices per nights as well as a grid with the costs you entered. The costs-creation-form is very simple, you have to enter the number of nights for which you are defining the costs, From and To nights. For example if you want to set a cost of €70 per night up to 7 nights of stay, you should use the form as follows:
- From 1 - To 7 nights, cost per night €70
This way the system will create the costs for 1, 2, 3, 4, 5, 6 and 7 nights of stay, multiplying the cost per night and giving a cost of €490 for 7 nights and so on. From the prices-grid at the bottom of the page you can adjust the costs for each number of nights by using the input values. Remember to separate the decimals with the dot (.) and NOT with the comma (,).
The screen shot below shows an example of how the prices can be entered: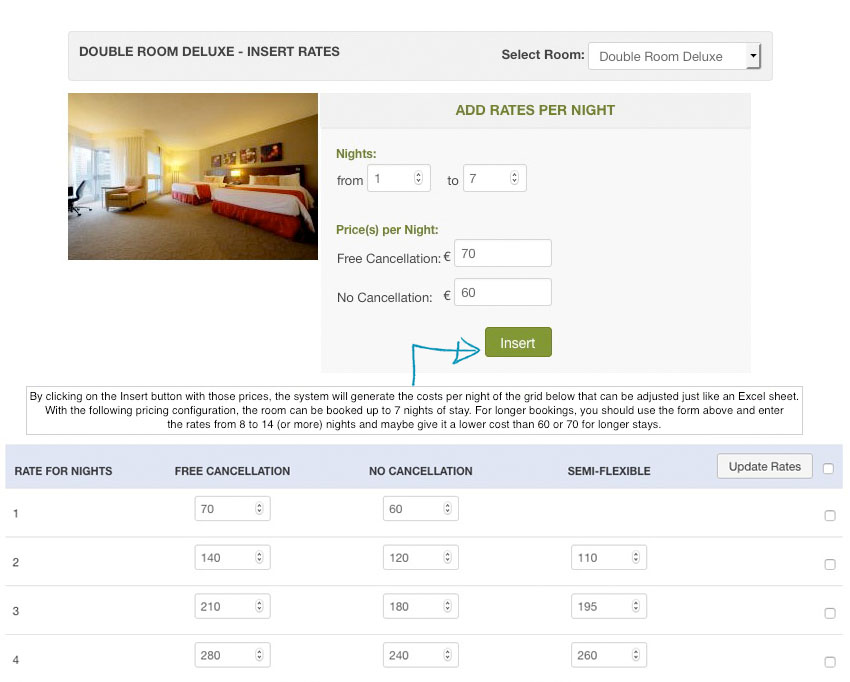
Special Prices

With the Special Prices you can alter the default costs per night to apply charges or discounts on certain dates of the year, seasons, weekends, holidays and any other special occasion where there is a modification to the prices. The Special Prices will modify the default costs per night defined in the Rates Table page.
For creating a Special Price it is necessary to:
- specify the Dates when this must be applied or select some days of the week when the price modification should take place
- choose if a Charge or a Discount on the base rates per night should be applied
- give it a name
- enter the percentage or fixed amount to be added or deducted from the base cost per night
- select the Rooms that will be affected for the price modification
- select the Types of Price that will be altered
You can choose to apply the Special Price on any Year or just on the one selected. Sometimes it is useful to have Special Prices not tied to a certain year only because maybe the year after you will want to apply the same price modifications without needing to load a new price inventory.
The screen shot below shows the creation page of a Special Price that applies a charge for the High Season. The prices are increased by the 50% up to 6 nights of stay while 7 nights of stay or more will have a charge of the 40%.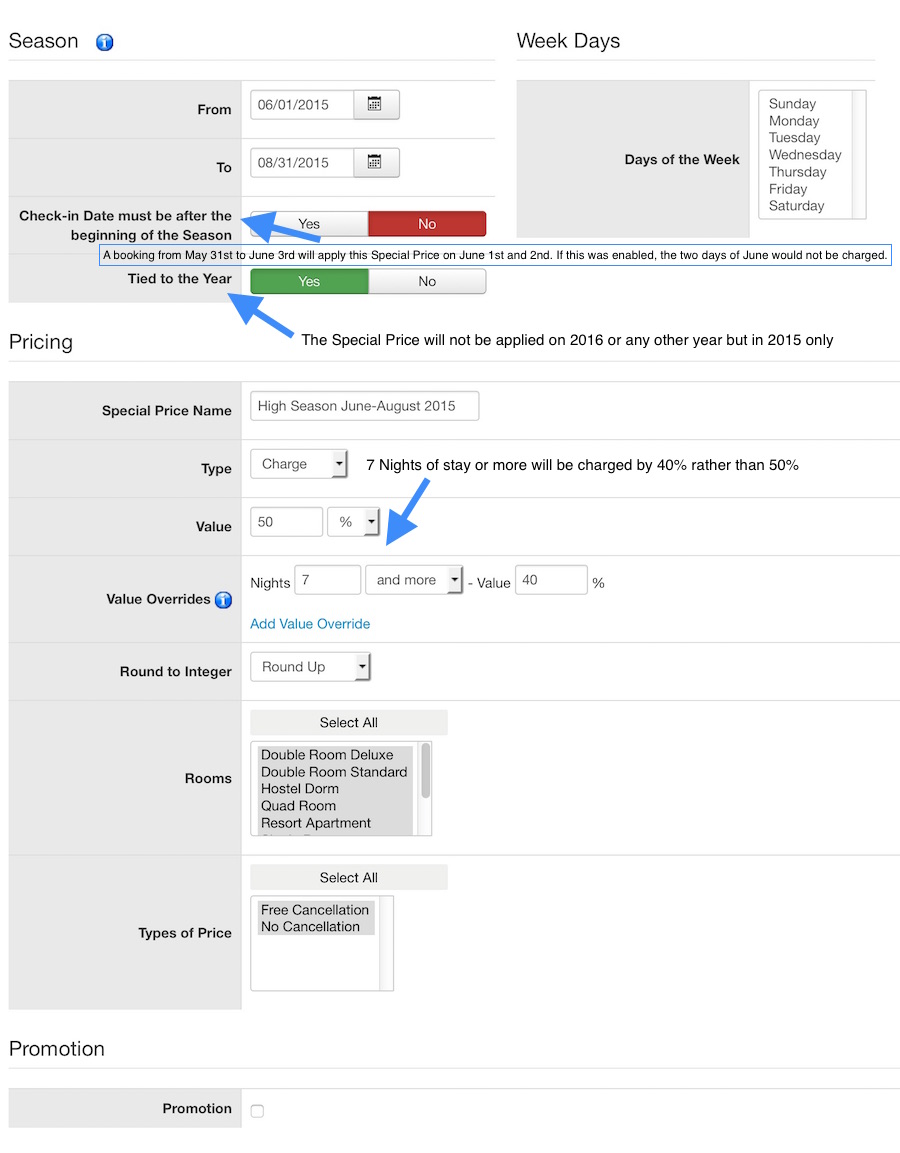
The Special Prices marked as Promotion will be displayed in the front-end, in the view of type VikBooking - Promotions. This function is useful to create special offers on some dates or weekends of the year, maybe by forcing a minimum number of nights to benefit of a discount.
Restrictions

With the restrictions you can limit the minimum length of stay for a specific month of the Year or for a dates range and optionally force the arrival Day of the Week to one or two week days. For example you can create a restriction for your apartment in August, forcing the arrival day to Friday or Saturday and the minimum length of stay to 7 nights, 14 nights etc.. The minimum number of nights will be set to 1 in case it is left empty.
With the setting "Multiply Min Num of Nights" enabled the minimum number of nights will be multiplied every time this is passed. For example if you want to force the Arrival day to Saturday and the Departure day must still be on Saturday, you have to set the Minimum Number of Nights to 7 and if this setting is enabled, 8, 9, 10, 11, 12 and 13 nights of stay will not be allowed but only 14, 21, 28 etc. nights will be allowed. This is useful if you want to give your rooms only for weeks. The Maximum number of Nights is automatically calculated from the Rates Table of each room, infact, if a room does not have a rate for 28 nights, this room will not show up in the results so it will not be available. In case you want the calendar to force the Maximum Number of Nights for this month, set a number of Max Nights.
In case you are forcing the arrival day to two week days, then you can also select the allowed combinations for the arrival-departure day. For example if from the 1st of July to the 30th of September the arrival days allowed are Friday or Monday, you can allow the following combinations: Friday-Monday, Monday-Friday, Friday-Friday.
Restrictions can be applied globally to all the rooms/apartments or just to some of them.
For more details about the booking Restrictions, please visit the Knowledge Base section on this site.
Rates Overview
This page is very useful to have an overview of the rates, seasonal prices and restrictions applied to certain rooms. It has a Rates Calculator tool that will let you check immediately the cost that will be displayed in the front-end for bookings.
The screen shot below shows the details and functions of the page Rates Overview: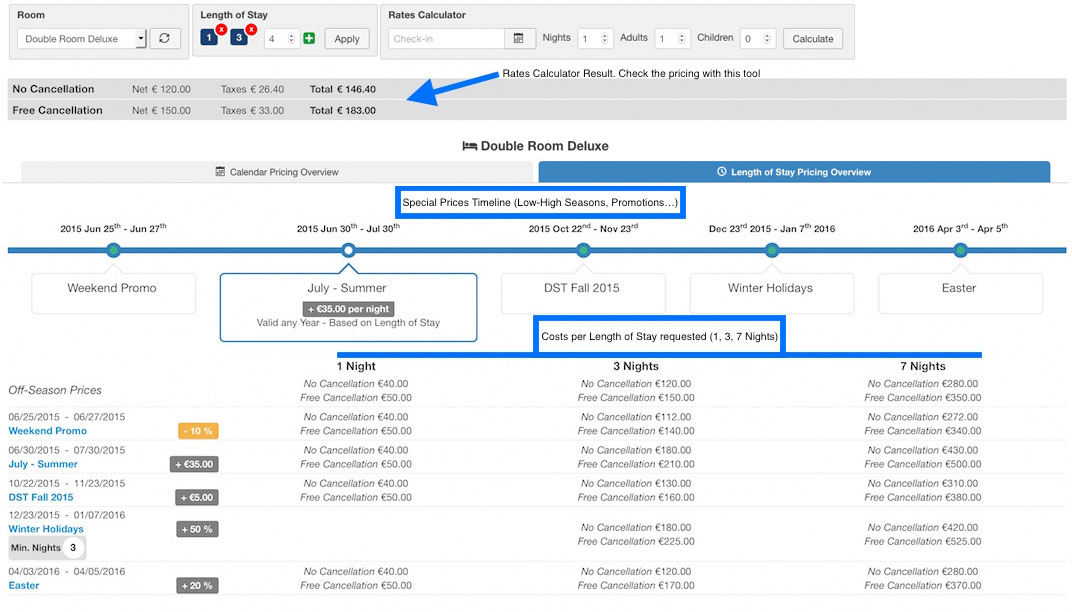
Calendar Pricing
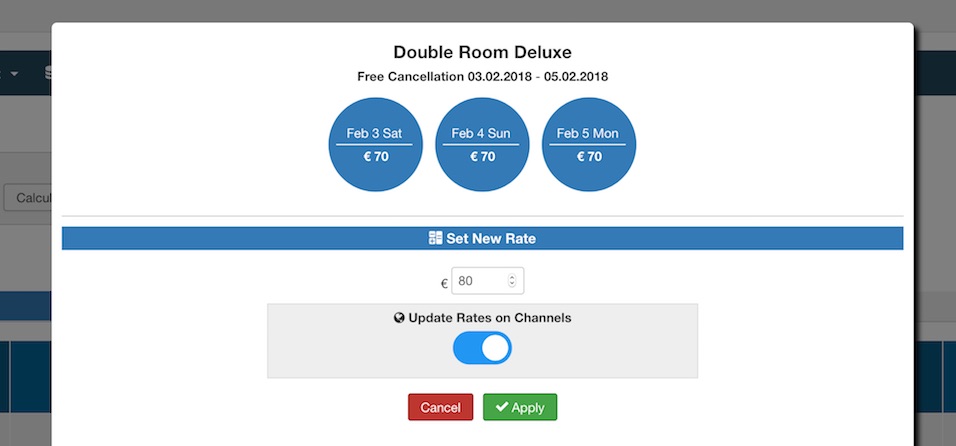
You should use the Calendar Pricing tab to adjust the rates of any date of the year for your rooms. Rather than using the Special Prices, you can easily set the exact rate you want to apply to a room on a specific period.

By making a click on the first date you want to select, the system will highlight all the currently selected days. By clicking again, a pop-up window will be displayed to set the exact rate for all the dates selected. Additionally, you can also use the "Select Period" function for selecting bigger date intervals.
Those who use the Channel Manager will also be able to transfer the new rates to all the channels connected, like Booking.com or Expedia for example.
Bookings
Dashboard
The Dashboard is the main page of the back-end of VikBooking. It is divided into 5 parts:
- Customers Checking-In Today
- Customers Checking-Out Today
- Weekly Overall Availability
- Next Bookings starting from tomorrow's date
- Rooms Currently Locked, waiting to be paid or confirmed
This page is useful for the receptionists of the Hotel to keep track of all the bookings and customers.
Customize Widgets
Starting from version 1.14, the Dashboard of Vik Booking has a new look. It is divided in sections to host custom widgets. Clicking on the Customize Widgets button at the top-right of the page, you will open an edit side of the Dashboard. This interface will let you manage all the elements displayed in your Dashboard through Sections, Containers and Widgets.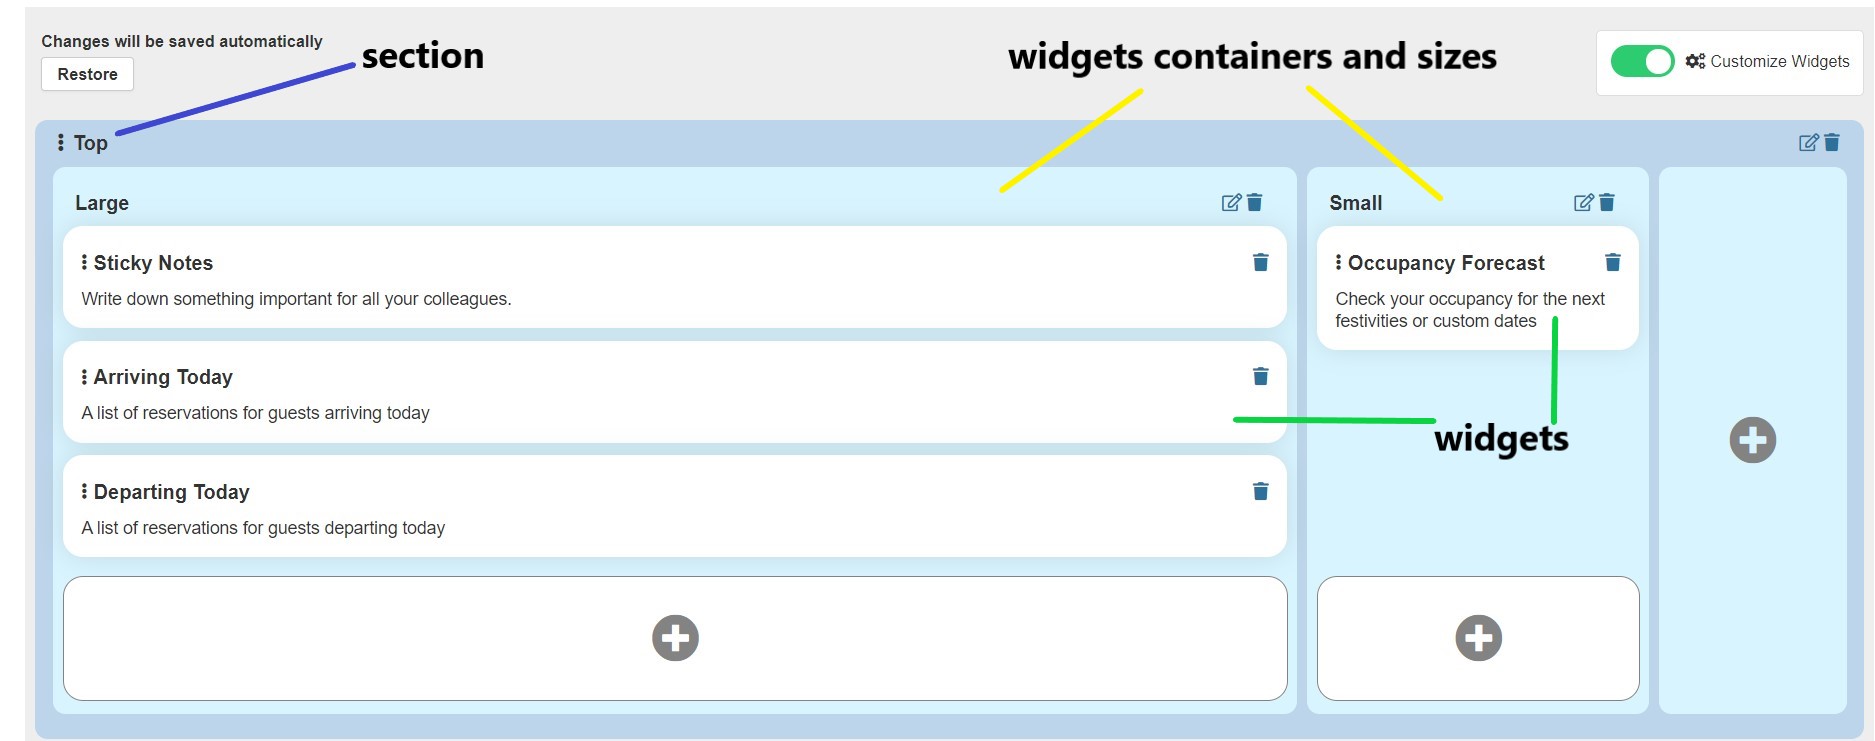
You can add new Sections to better organize your elements, and arrange their position with drag and drop actions, and also add new Containers with a proper size to contain your widgets.
Four sizes are available for the containers:
- Full Width gives a 100% width to the container. Only one container of this type will fit in one row.
- Large gives the container a 75% width. Another small container could fit in the same row next to this size.
- Medium gives the container a 50% width. Another medium container could fit next to it, or even two small containers.
- Small gives the container a width of 25%. One row could fit up to 4 containers of this size.
Look at this sample video: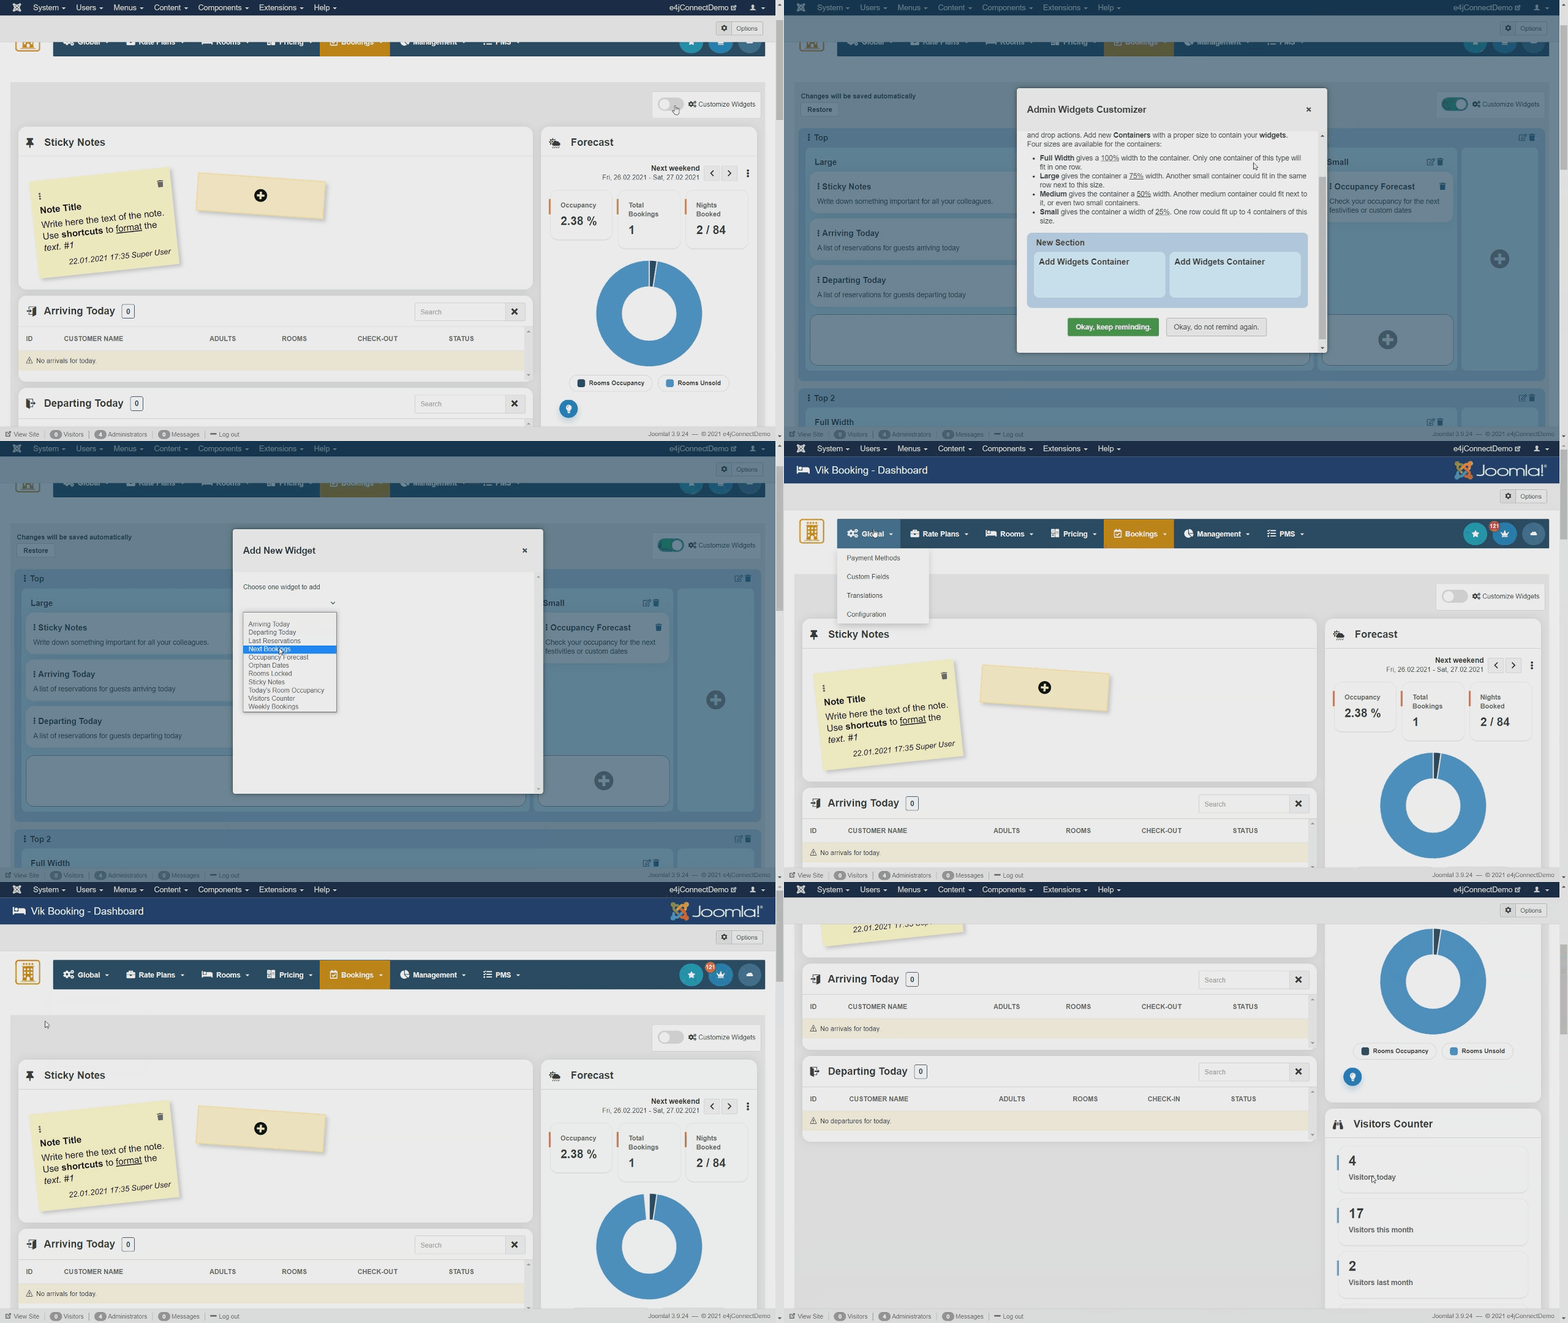
Forecast
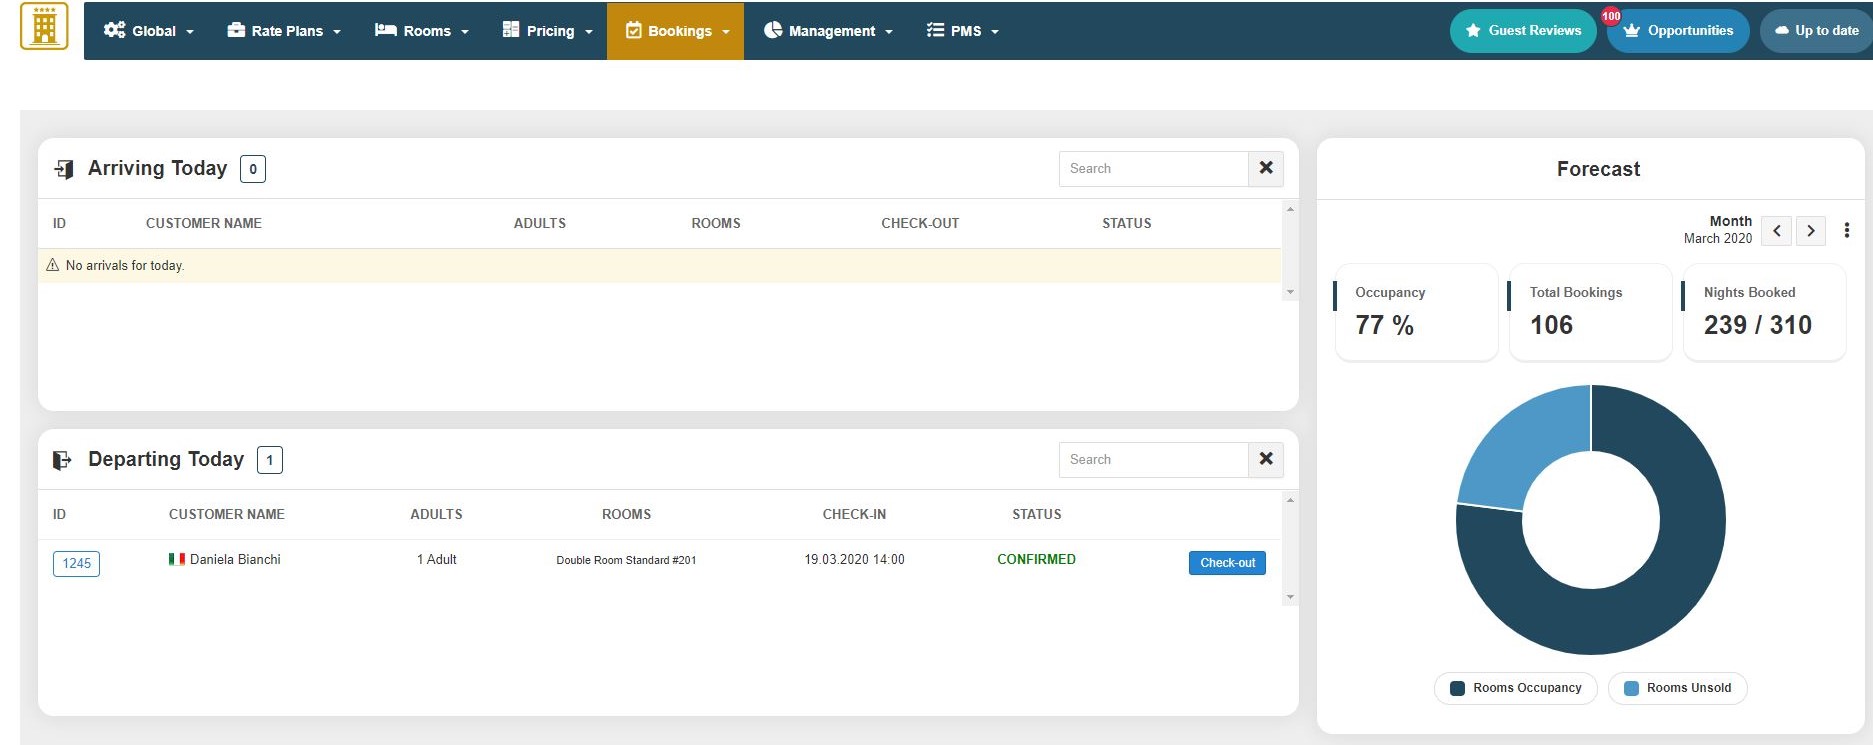
The forecast graph calculates the occupancy trend in a selected range of time, showing you the percentage of the Rooms Occupancy and the Rooms Unsold.
The total number of bookable nights are calculated based on the number of all the rooms you have multiplied per the number of nights of the month analyzed. In the screenshot above we calculated the month of March. We have 31 nights bookable and we 10 rooms in total, so 10x31 = 310.
We had 106 bookings in total that occupies, with the length of stay of each reservation, 239 nights on 310 available for that combination of tot number of rooms x tot nights of the month.
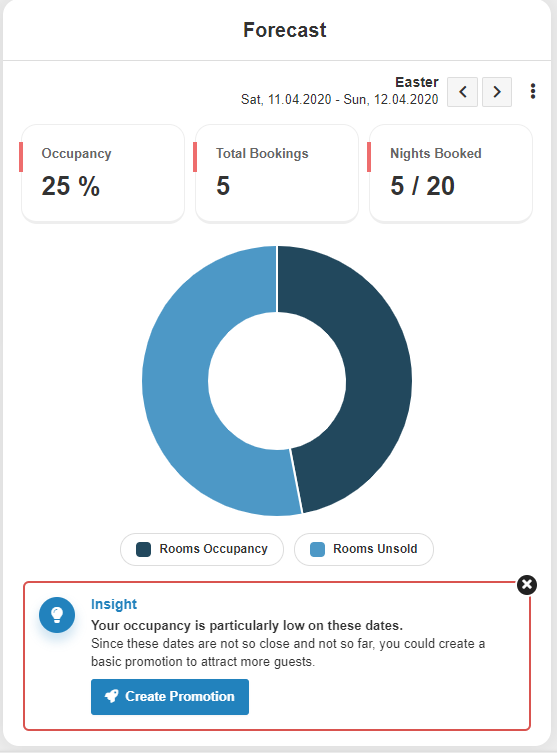
You can choose to analyse a period by month, week or weekdays from the calendar on the right (three bullets menu). Tips to launch a Promotion will appear for the period analyzed.
This function can be used for a global calculation of all your rooms occupancy in the Dashboard, or for a specific Room in the Rates Overview.
The Forecast will also highlight the incoming events, festivities and holidays, if any, so that you can check your occupancy rate for those days and decide how to manage your prices.

Guests Registration
The Guests Registration function allows receptionists to Check customers In or Out, or to mark a reservation as No Show. This is very useful for management purposes, and to speed up the process for creating the Check-in Document. It's good practice to always check the customers in and out. Thanks to the internal notes, the job could be performed by several receptionists at the same time.

For each guest it is possible to store in the database some personal details, such as Name, Last Name, Country of Residence, ID Number, Notes etc..
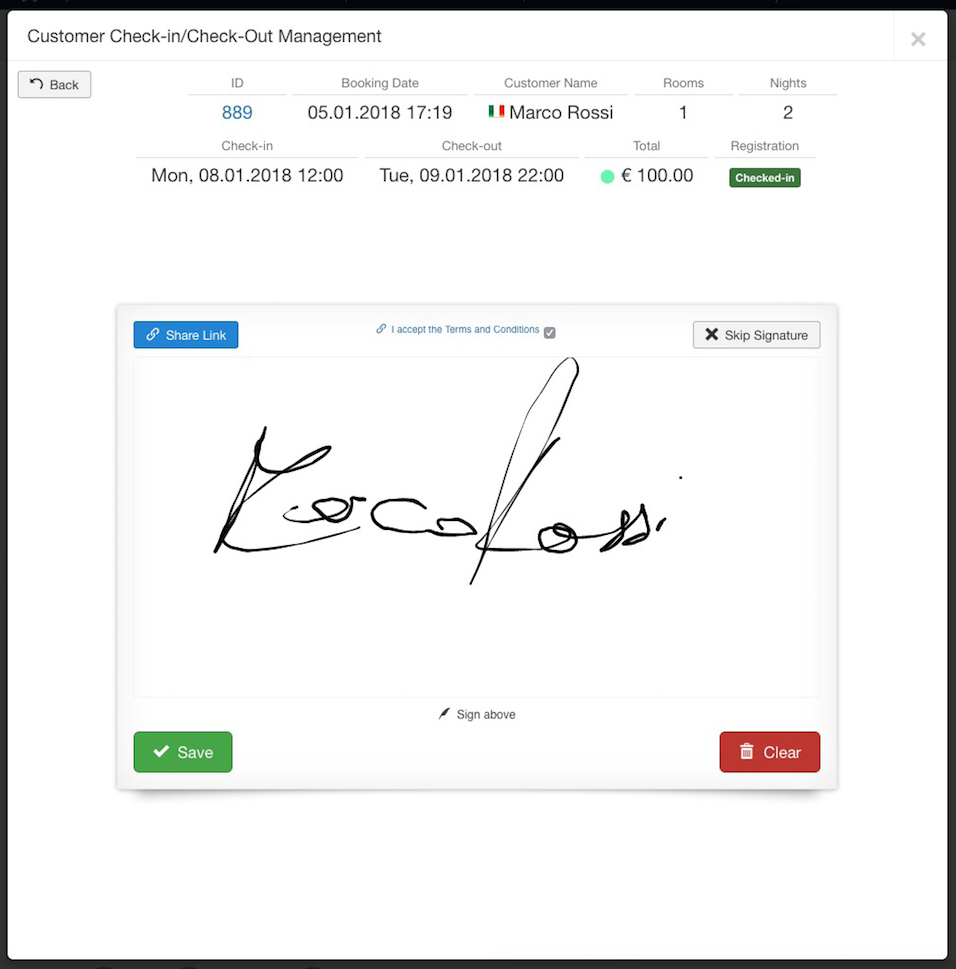
Once the customer has been checked in, it will be possible to generate the Check-In Document in PDF format. For this document, the system allows the customer to sign directly the document through a Signature Pad compatible with any kind of device. It is also possible to send a link to the customer's email address or phone number (through SMS) so that the signature can be placed also from a different device.
Calendar
The page Calendar is useful to get an overview of the bookings of a certain room, as well as for registering walk-in customers or any kind of reservation received over the phone or offline. By creating a new reservation you will reduce the availability of a room on certain dates. The page Calendar also allows to Close a specific room on some dates. By closing a room, the system will book all the units of your room, by making it unavailable. This will generate a special "reservation" just meant to close the availability. The page is divided into two parts:
- Quick Reservation form: for lowering the availability or for registering some bookings that were not received from the website
- Availability Calendars: get a view of up to 12 months from today's date with the bookings and the availability of a room
With the Quick Reservation form you can register some bookings as well as stop the sales (close room) on some dates. If you are registering a booking for a walk-in customer then it is recommended to use the button Fill Custom Fields so that the system can retrieve the email address of the customer as well as the Nominative, the Country and the Phone Number. Instead, if you would like to close the room on some dates and stop the bookings, you should tick the checkbox "Close Room on these Dates". This action will create a special booking that will be displayed as "Room Closed" in the All Bookings page. For re-opening the Room it is sufficient to remove this booking.
Availability Overview
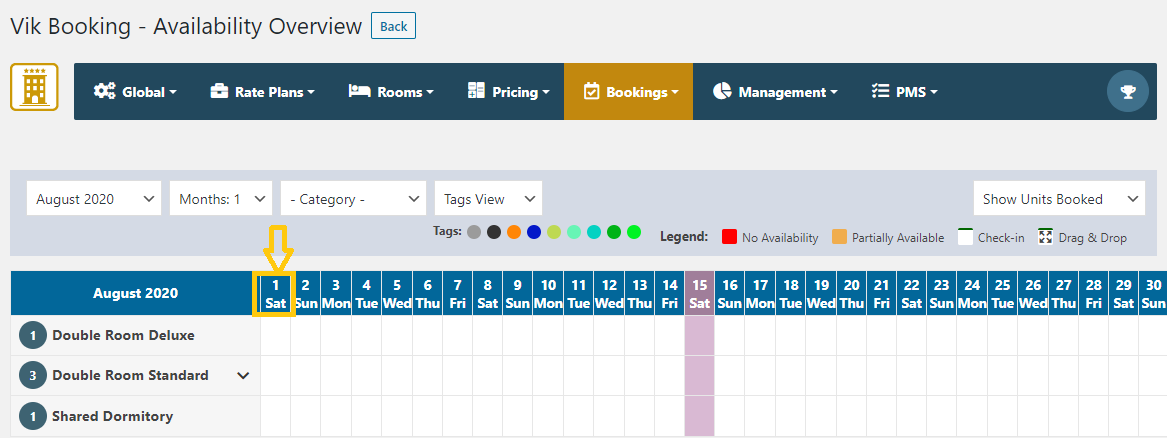
From this task you can have an Overview of the availability of each room for the selected month. The view can be filtered by the next 12 months. The number inside the red cells shows the units that are booked for that day.
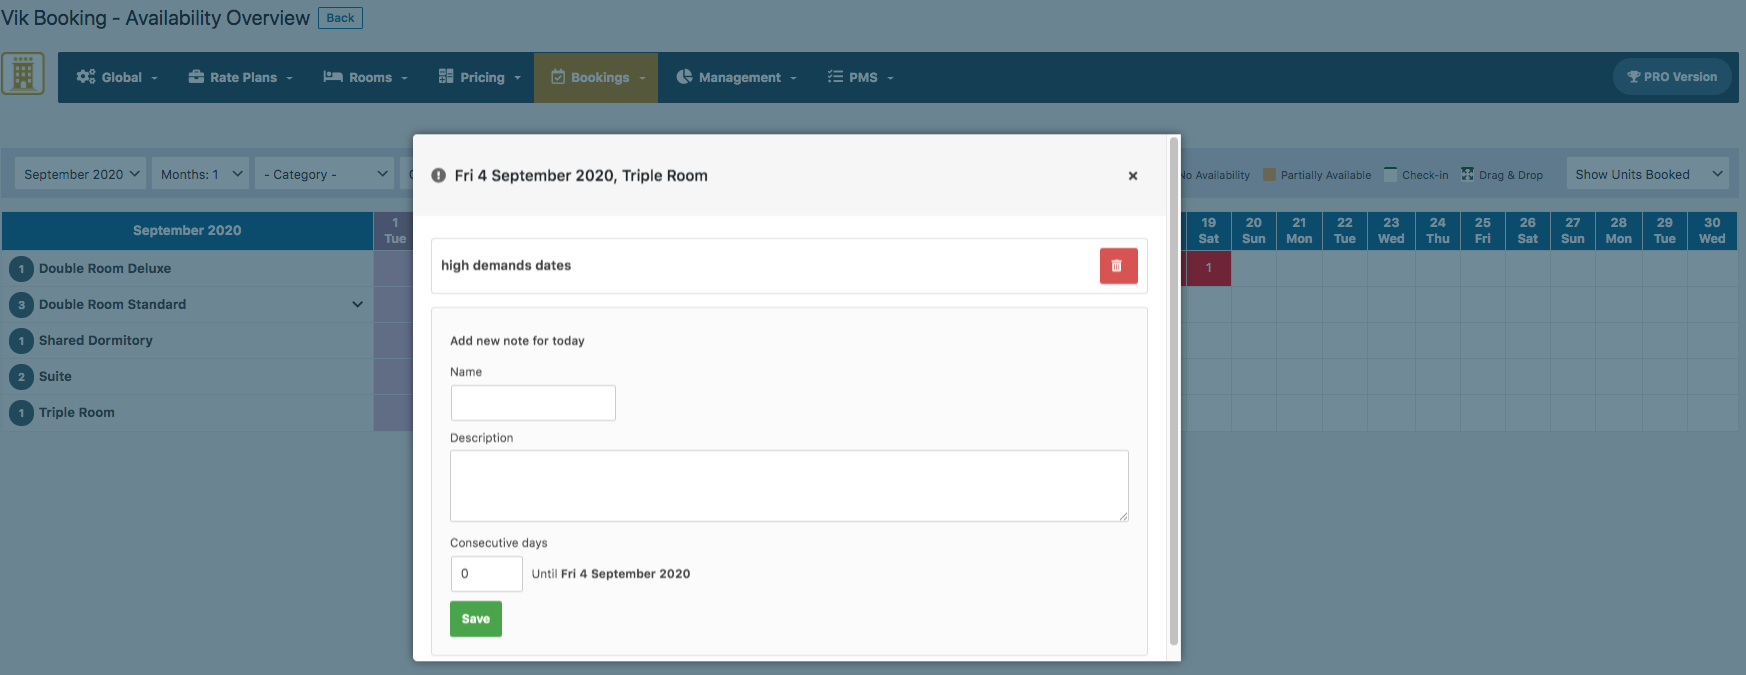
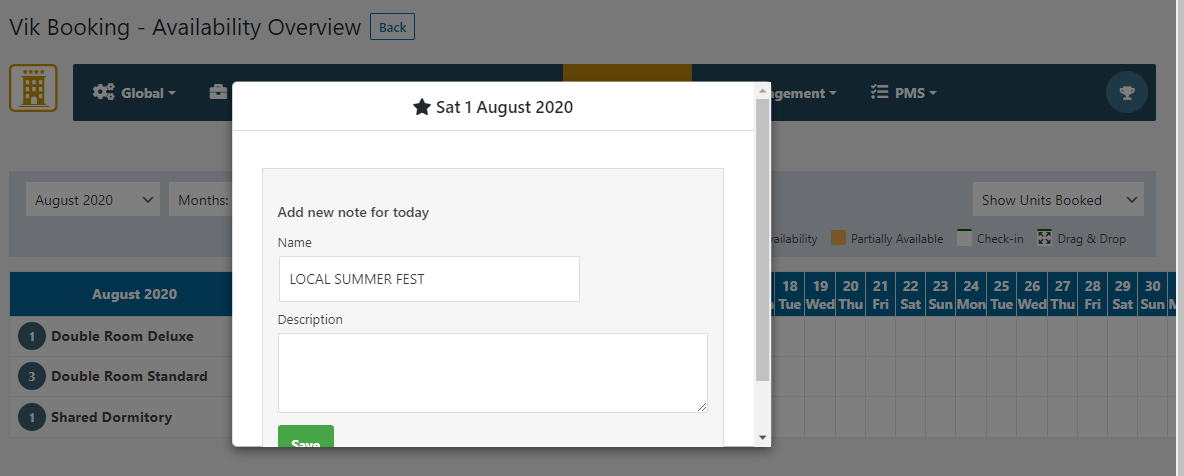
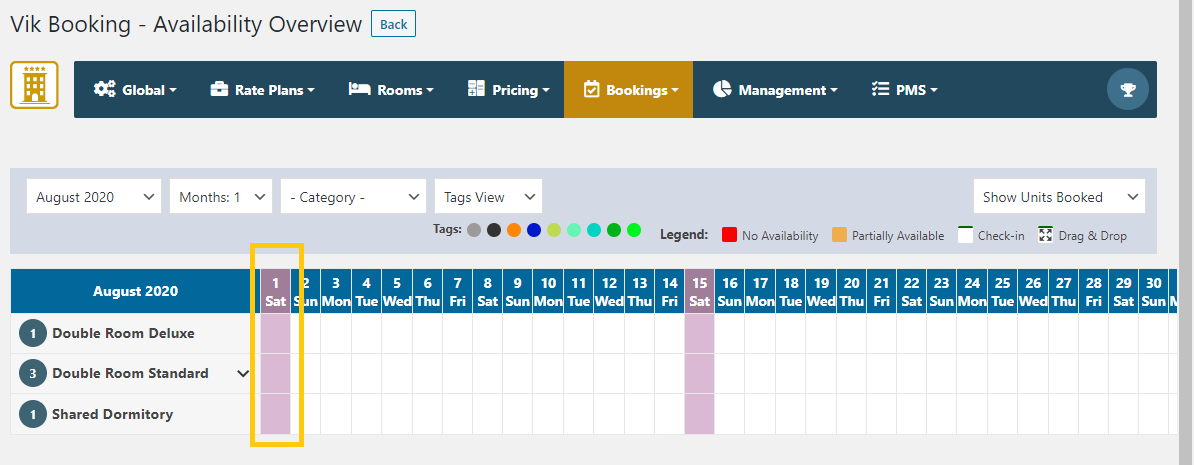
Add rooms daily notes in the Availability Overview
NB. The same festivities created in Availability Overview will be visible also in the Rates Overview, where you can also create new ones.
Sticky Date Header
This parameter can be turned on to disable the left/right swap and have all the days immediately displayed. In order for this parameter to be visible, a total of at least 11 rooms on the screen is necessary. If, for example, you have 3 room-types, it will be necessary to select 4 months to reach the minimum of 11 rooms. Once done the “Sticky Date Headers” parameter will be displayed. Turn that to “ON” and you will have all the days of the current month on the screen.

All Bookings

This page lists all the bookings saved in the database, the ones made by your customers from the front-end, the ones created from the back-end by an administrator as well as the ones received through VikChannelManager when coming from portals.
There are various filtering and ordering types, useful for finding certain bookings. In the Booking ID/Confirmation Number tab, you can also search for Coupon Number to filter all the reservations made by using that coupon code. To search the desired reservations, insert this text 'coupon: numberofcoupon' .So, for example, if our coupon code number is 3333 the research should be coupon:3333
When you remove a booking, the status will be set to Cancelled and the availability of the room will be updated, meaning that the units booked will be available again. However, the booking will be kept in the database and only by removing it again, it will be completely removed from the database.
For creating new bookings or for adjusting the availability of the rooms, use the page Calendar or the channel manager component.
PMS
PMS stands for Property Management System. This section includes several different management functions.
Operators

Operators are special users, usually part of the staff, that can access some dedicated contents via front-end. New Joomla Users with different permission for the back-end can always be created to access certain pages, but the Operators will have their own Dashboard in the front-end section to access the contents that were reserved for them.
An Operator has Name, Last Name, Email and Phone Number as parameters, plus an AUTHENTICATION CODE that the operator will use to access the front-end private dashboard. Optionally, rather than the Authentication Code, an operator can log in to his private front-end section by using a Joomla user. In this case it's necessary to assign the Operator to a specific Joomla user.
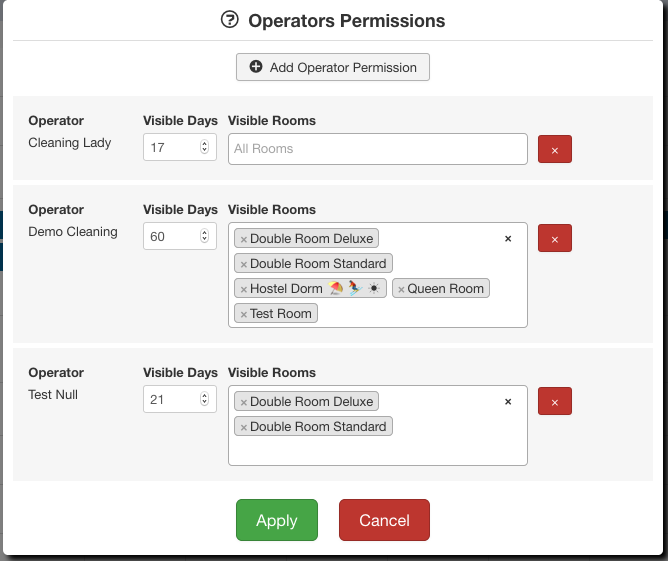
Operator permissions go along with the new function "Tableaux". The permissions regards the view that the operator will have: you can allow the operator to see only some rooms or limit the period of time that they can see. The screen shot below shows how certain Operators can have different permissions to see the bookings of certain rooms, for a specific time frame. The permission tab is available in the "Tableaux" page.
Tableaux

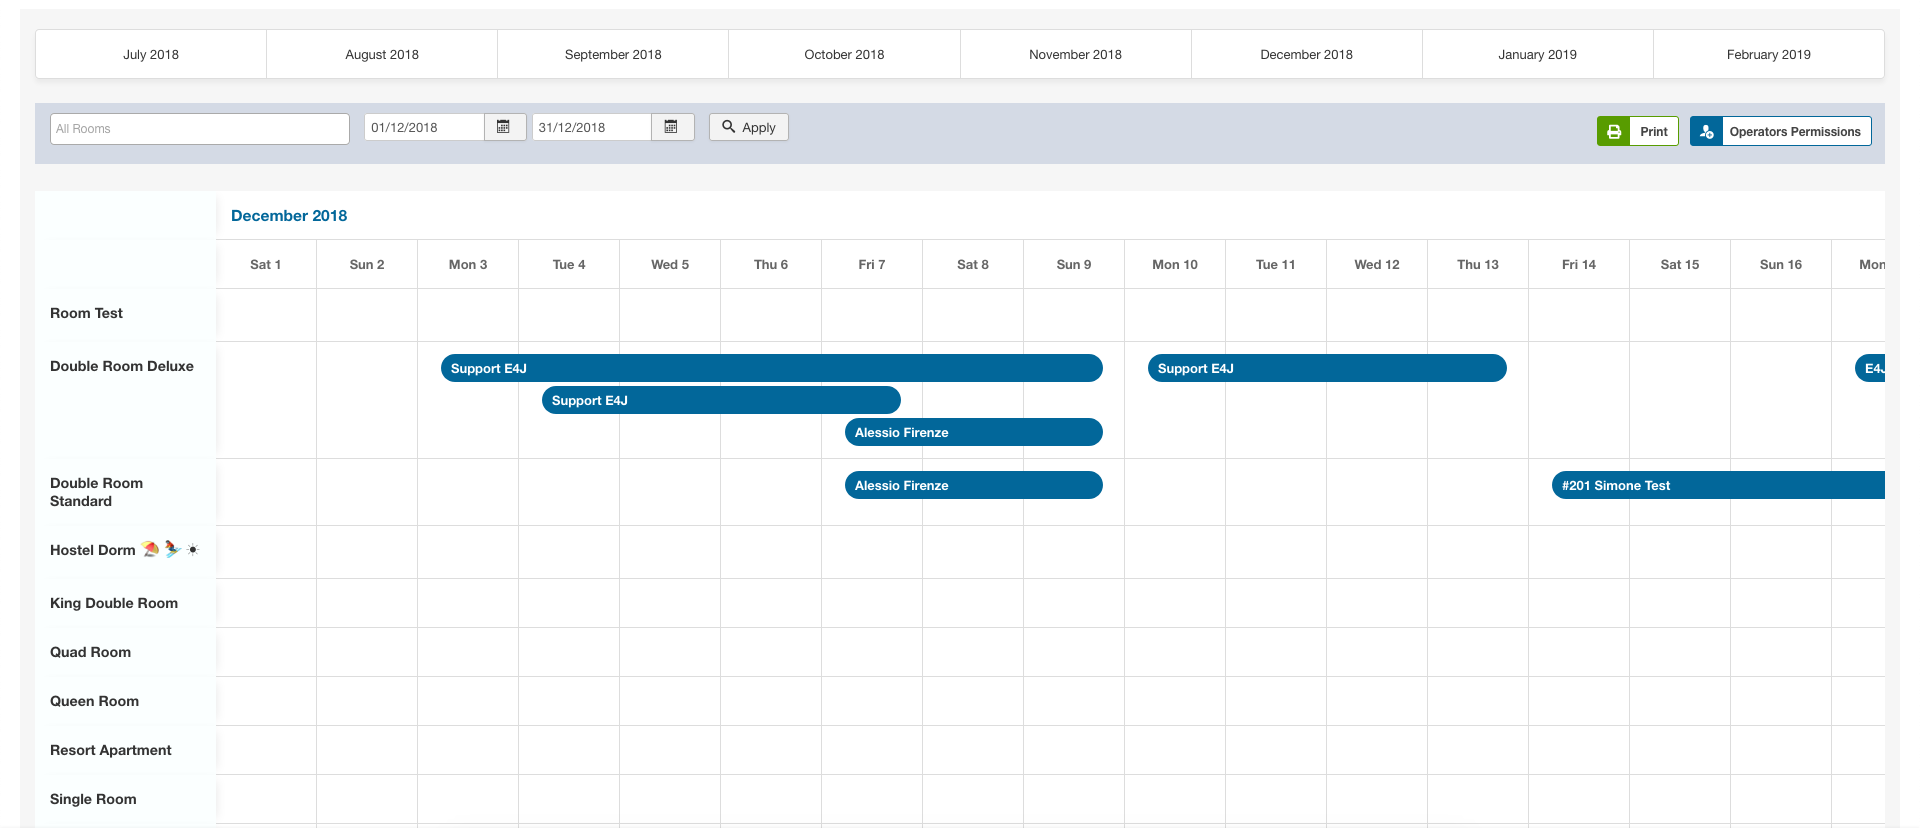
The page Tableaux shows an overview of all confirmed bookings for the various rooms, within a specific time range. The Tableaux can also be made available to the Operators in the front-end, after setting up the Permissions of the various Operators.
- Back-end: the screenshot below shows the administrator interface of the Tableaux, with the possibility of filtering the bookings per month, or by dates. By hovering the booking dates, a tooltip will be displayed with the information of the reservation. The back-end page allows printing functions and the management of the Operator Permissions.
- Front-end: to access this page, you need to create a new Menu Item of type "VikBooking - Operators Login". In this page the operator will see only the rooms allowed by the permissions that were setup in the back-end. In the example below, this operator can only see two rooms because those are the ones assigned to his permissions. To access these page, the operator needs to login by using the personal AUTHENTICATION CODE or the Joomla User login to which the operator is assigned. Clicking or tapping on the booked dates will display some additional details of the reservation.
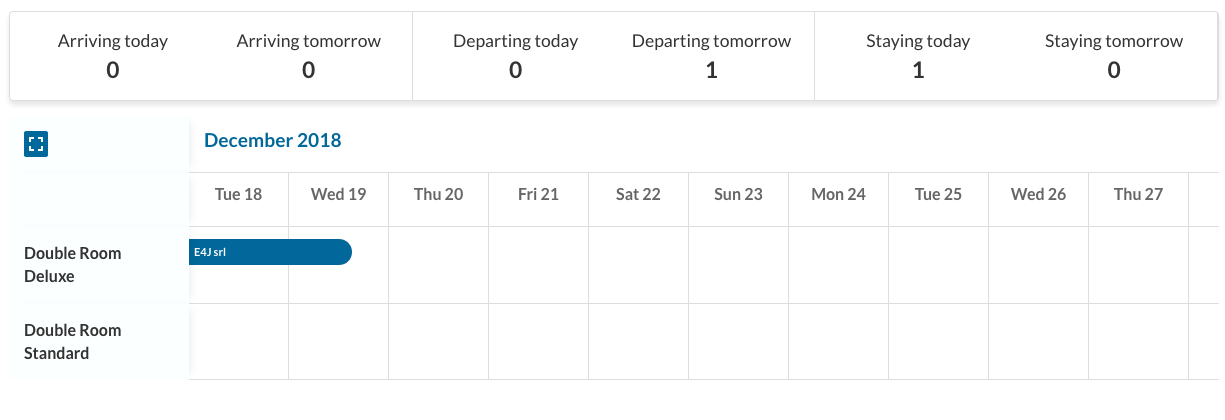
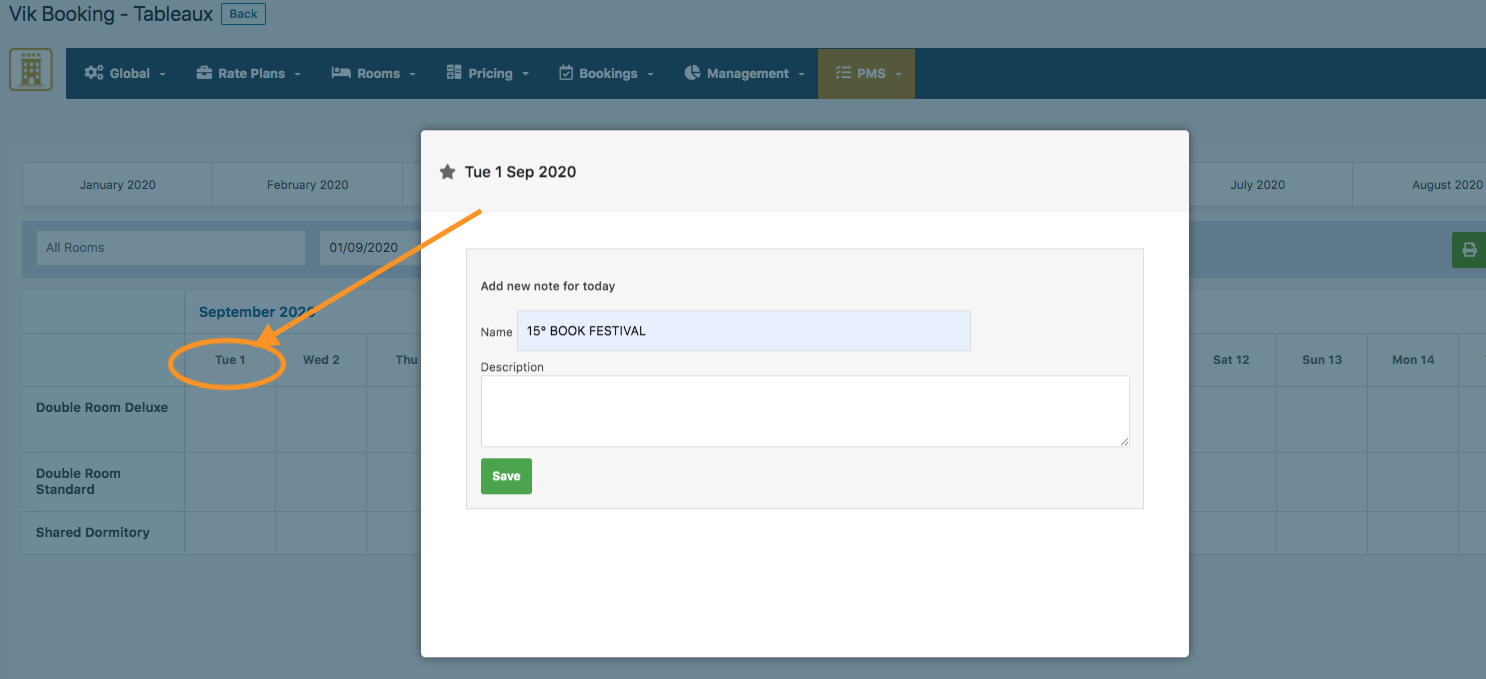
Add daily note to your rooms in the Tableaux
Click on this icon to add your note in the pop-up window that will open up soon.
Once you will have inserted all your notes, you will have a complete overview like this one: 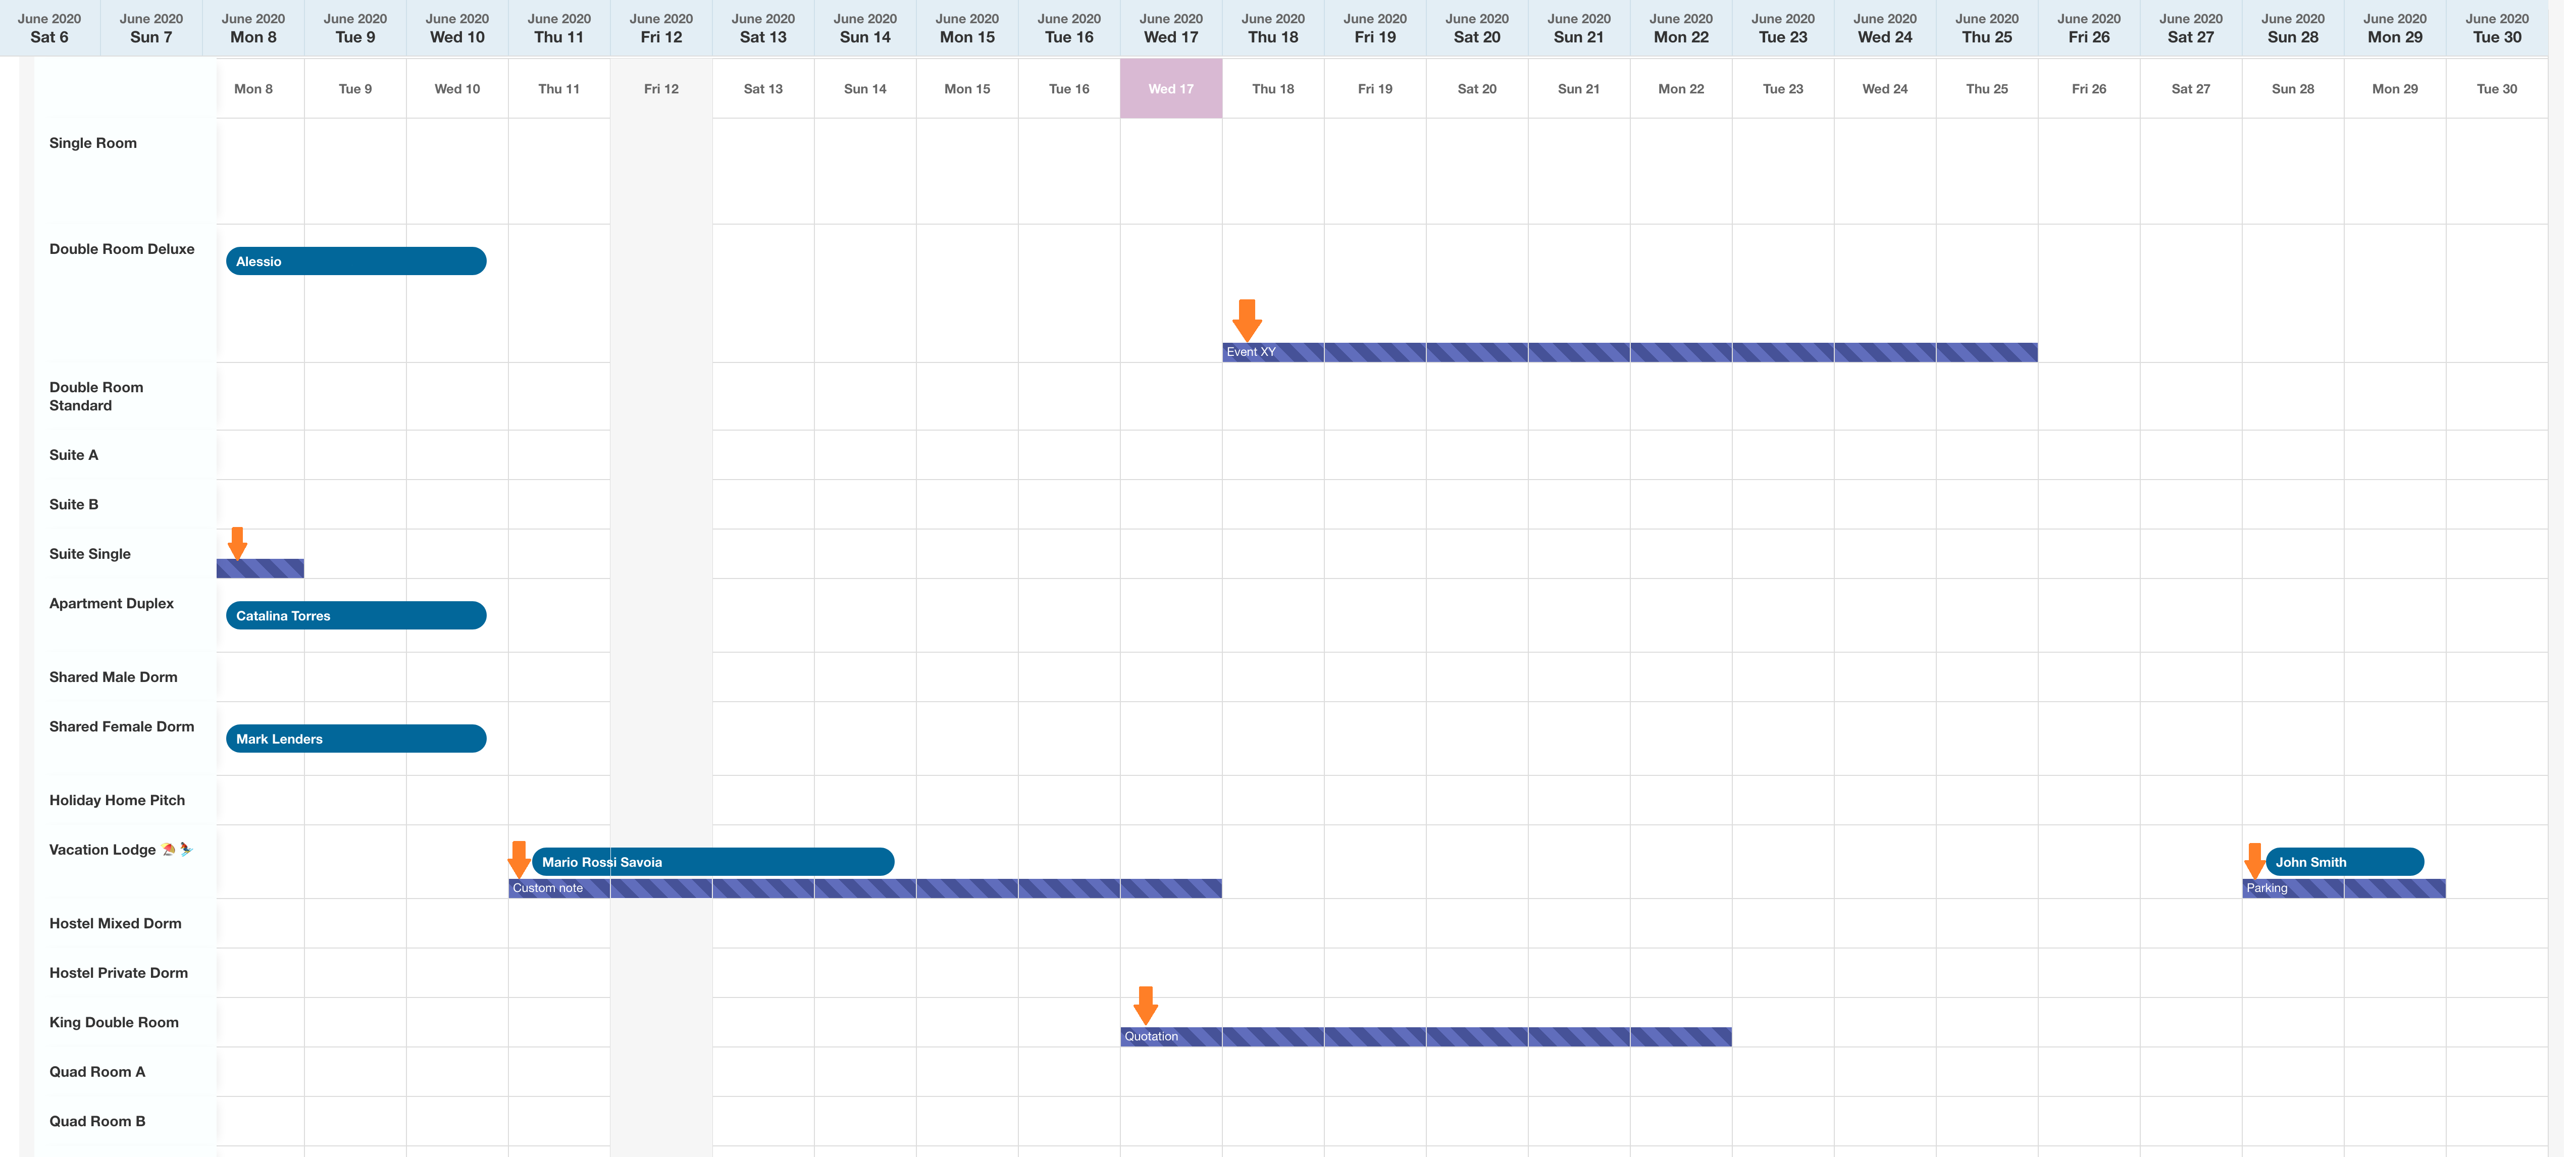
N.B: Tableaux Notes created by the admin will be visible in front-end for a logged operator only in a view mode. No modification function will be allowed for the existing note from the front-end. However they will be able to create new ones.
Add events and festivities from the Tableaux
Reports

The Reports framework is a part of the system that can be extended through the creation of apposite PHP Classes that extend the parent interface. By default, Vik Booking is installed with several types of Reports to generate and/or export data.
Reports are useful to obtain financial statistics as well as to produce calculations of tax/levy. You can also generate and export documents for transmitting them to various institutions in case your country has such mandates.
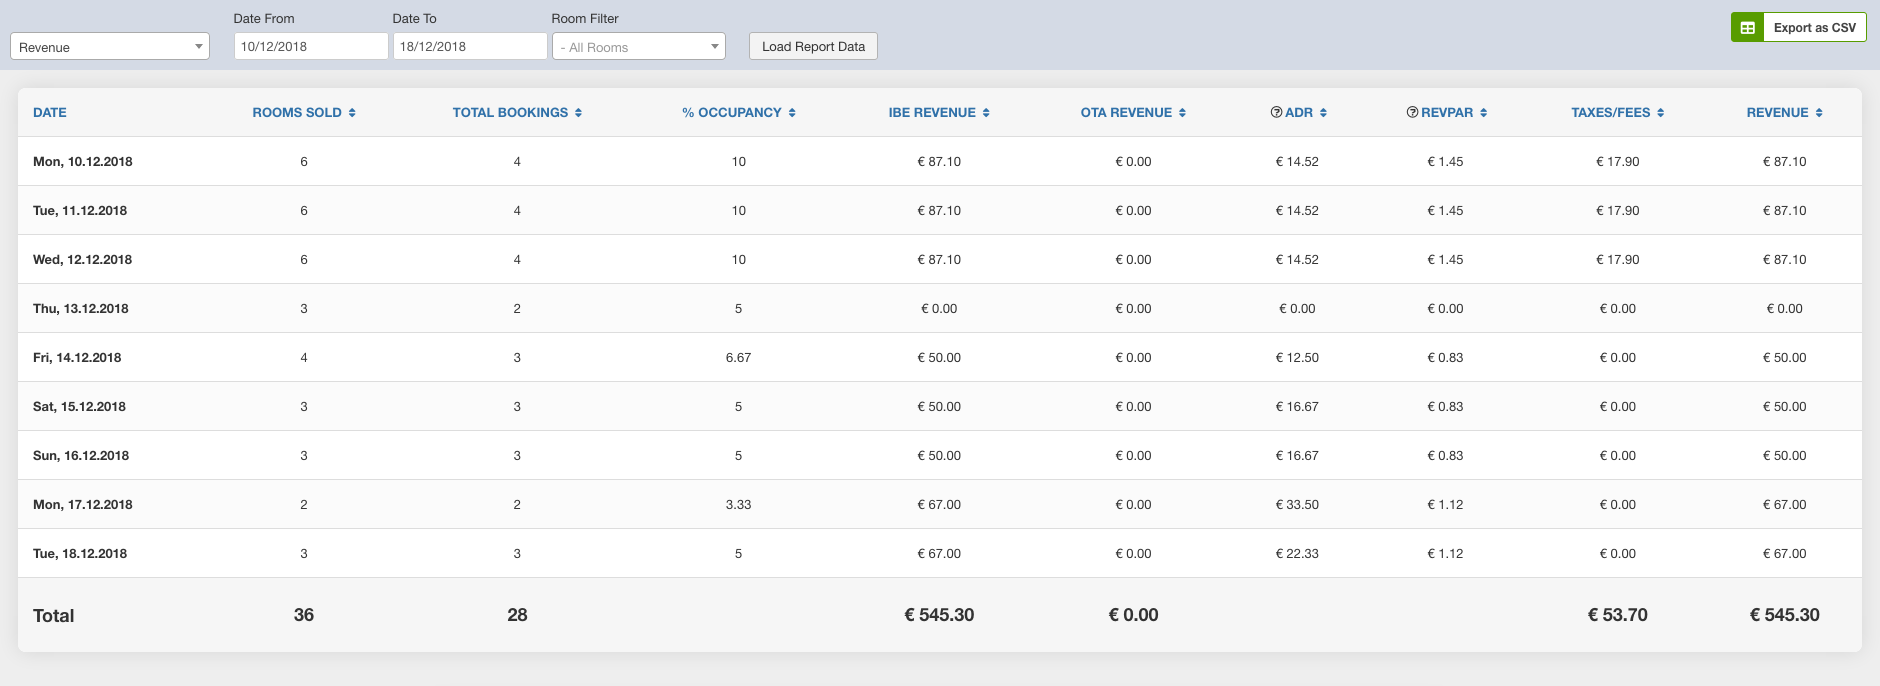
In the screen shot below you can see the calculation of the Revenue obtained on a specific range of dates for the bookings received.
E-invoices

The e-Invoicing system introduces a new way for generating electronic invoices, usually in XML format. Vik Booking provides an extendable framework based on custom PHP Drivers that extend the parent Class. By default, the only Electronic Invoicing Driver that comes with Vik Booking is the one for Italy, for the "Agenzia delle Entrate" institution. Italy is the first country in Europe to introduce mandatory B2B e-invoicing, and this mandate takes place from January 1st 2019.
However, if other countries will make e-invoicing mandatory, adding a new driver to Vik Booking to respect another format will be simple for the future.
*** ONLY FOR ITALIAN CUSTOMERS ***
Il sistema di fatturazione elettronica è stato implementato in seguito agli obblighi imposti a partire dal Gennaio 2019. In questa pagina è presente un riepilogo delle fatture fatte per ogni cliente, ed è possibile sia generarle che spedirle direttamente al Servizio di Interscambio dell'Agenzia delle Entrate mediante l'uso della propria casella di posta certificata (PEC). Solo per il primo invio della prima fattura, si deve usare un indirizzo PEC generico (
L'interfaccia mostra diverse funzioni, tutte con un commento per descriverne l'utilizzo.
Nel pulsante "Driver Settings" sono contenuti i parametri da riempire per generare correttamente i file da inviare, con tutte le spiegazioni annesse spostando il cursore del mouse su "?".
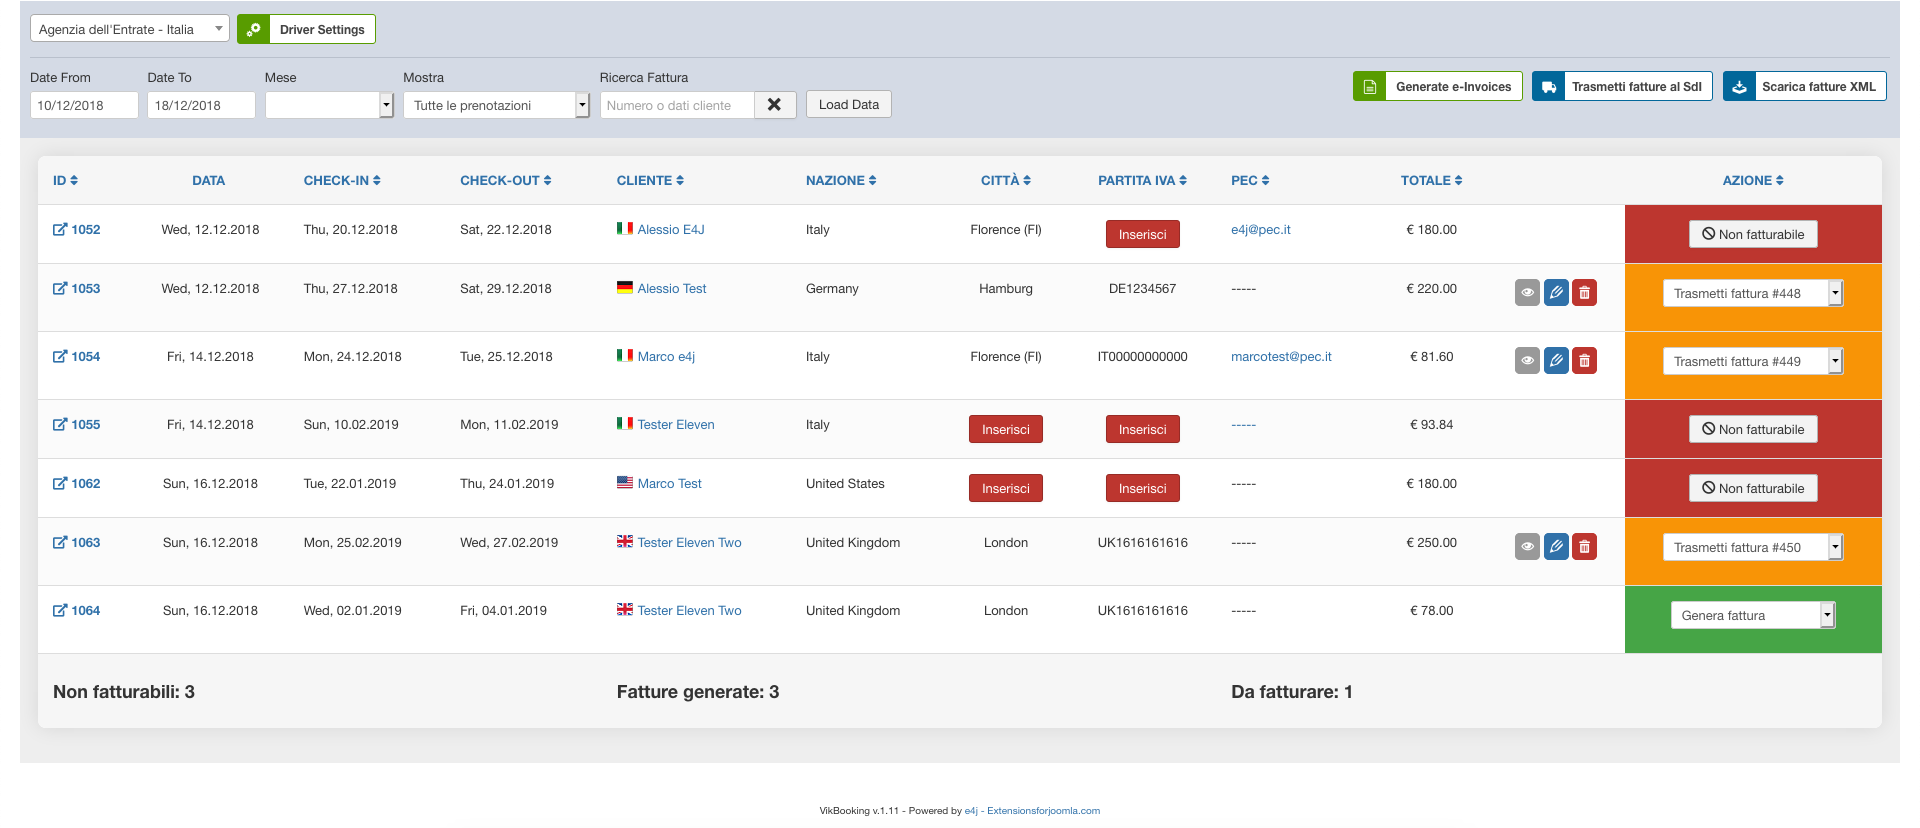
Come potete vedere, verrà visualizzata a schermo una tabella come quella sottostante, che stampa tutti i dati della prenotazione del cliente con lo stato della fattura all'ultima colonna. La stato della fattura può essere:
- Da generare: la colonna sarà di colore verde. La fattura deve essere generata cliccando sul pulsante in alto "Generate e-invoices". Una volta generata, sarà anche disponibile per il download attraverso il pulsante in alto.
- Da trasmettere: la colonna sarà di colore giallo. La fattura deve essere trasmessa attraverso il pulsante " Trasmetti fatture al SdI"; se la fattura è una sola, allora trasmetterà un file XML, se sono più di una allora trasmetterà un file zip di tutte le fatture da trasmettere.
- Trasmessa: la colonna sarà blu, non è necessaria nessuna azione ulteriore.
- Non fatturabile: la colonna sarà rossa. La fattura assume questo stato in caso ci sia qualche dato obbligatorio mancante.
La fattura può anche essere vista e/o modificata a mano via XML attraverso i pulsanti nella penultima colonna. Inoltre, essa sarà rigenerabile in caso di modifica.
Per generare la prima fattura elettronica occorre prima controllare le impostazioni del driver, per ciò che riguarda anche le impostazioni della vostra casella PEC. Inserendo le date in cui sono state ricevute le prenotazioni, il sistema carica i dati cliccando sull'apposito tasto.
Come elencato sopra, le fatture generabili, ovvero per quelle prenotazioni comprensive di tutti i dati obbligatori, avranno uno sfondo verde. Cliccando sul tasto Genera Fatture, il sistema creerà semplicemente il file della fattura elettronica in formato XML (salvandolo nel database, non in un file, quindi in maniera sicura). Le fatture generate e pronte per essere trasmesse, avranno uno sfondo arancione. Per inviarle via PEC al Sistema di Interscambio dell'Agenzia delle Entrate (il driver di Vik Booking si occupa dell'invio telematico), è sufficiente fare clic sull'apposito tasto "Trasmetti Fatture al SdI".
Per la prima trasmissione di fattura elettronica è importante selezionare una sola fattura che deve essere inviata all'indirizzo PEC predefinito dell'Agenzia delle Entrate. Così facendo, il loro sistema vi assegnerà un indirizzo PEC specifico alla quale trasmettere le fatture. Una volta ricevuto, assicuratevi di aggiornare le impostazioni del driver cambiando l'indirizzo PEC del SdI. A quel punto potete trasmettere anche 50-100-200 fatture alla volta, ed il sistema si occuperà della trasmissione in formato ZIP, nel caso ci siano più fatture da trasmettere.
MODALITÀ DI TEST: se la Fatturazione Elettronica dovesse spaventarti, ti basta cambiare dalle Impostazioni del Driver l'indirizzo PEC del SdI (Sistema di Interscambio), inserendo magari un tuo indirizzo email, non per forza di tipo PEC. Così facendo, il sistema trasmetterà le fatture elettroniche all'indirizzo email specificato, piuttosto che all'Agenzia delle Entrate. Così potrai visualizzare i contenuti e testare il sistema. Ovviamente serve sempre un indirizzo PEC configurato correttamente per l'invio dei messaggi. Una volta appurato il funzionamento, puoi cambiare l'indirizzo PEC del SdI ed iniziare a trasmettere dati reali.
Task Manager
The Task Manager was introduced in version 1.8 of Vik Booking. To access this feature, both Vik Channel Manager and an active E4jConnect subscription are required.
This tool enables you to create and manage multiple boards, helping you organize operational tasks more efficiently across different departments or areas.
When you open the Task Manager page for the first time, you will be taken to a welcome screen indicating that no Projects/Areas have been created yet.
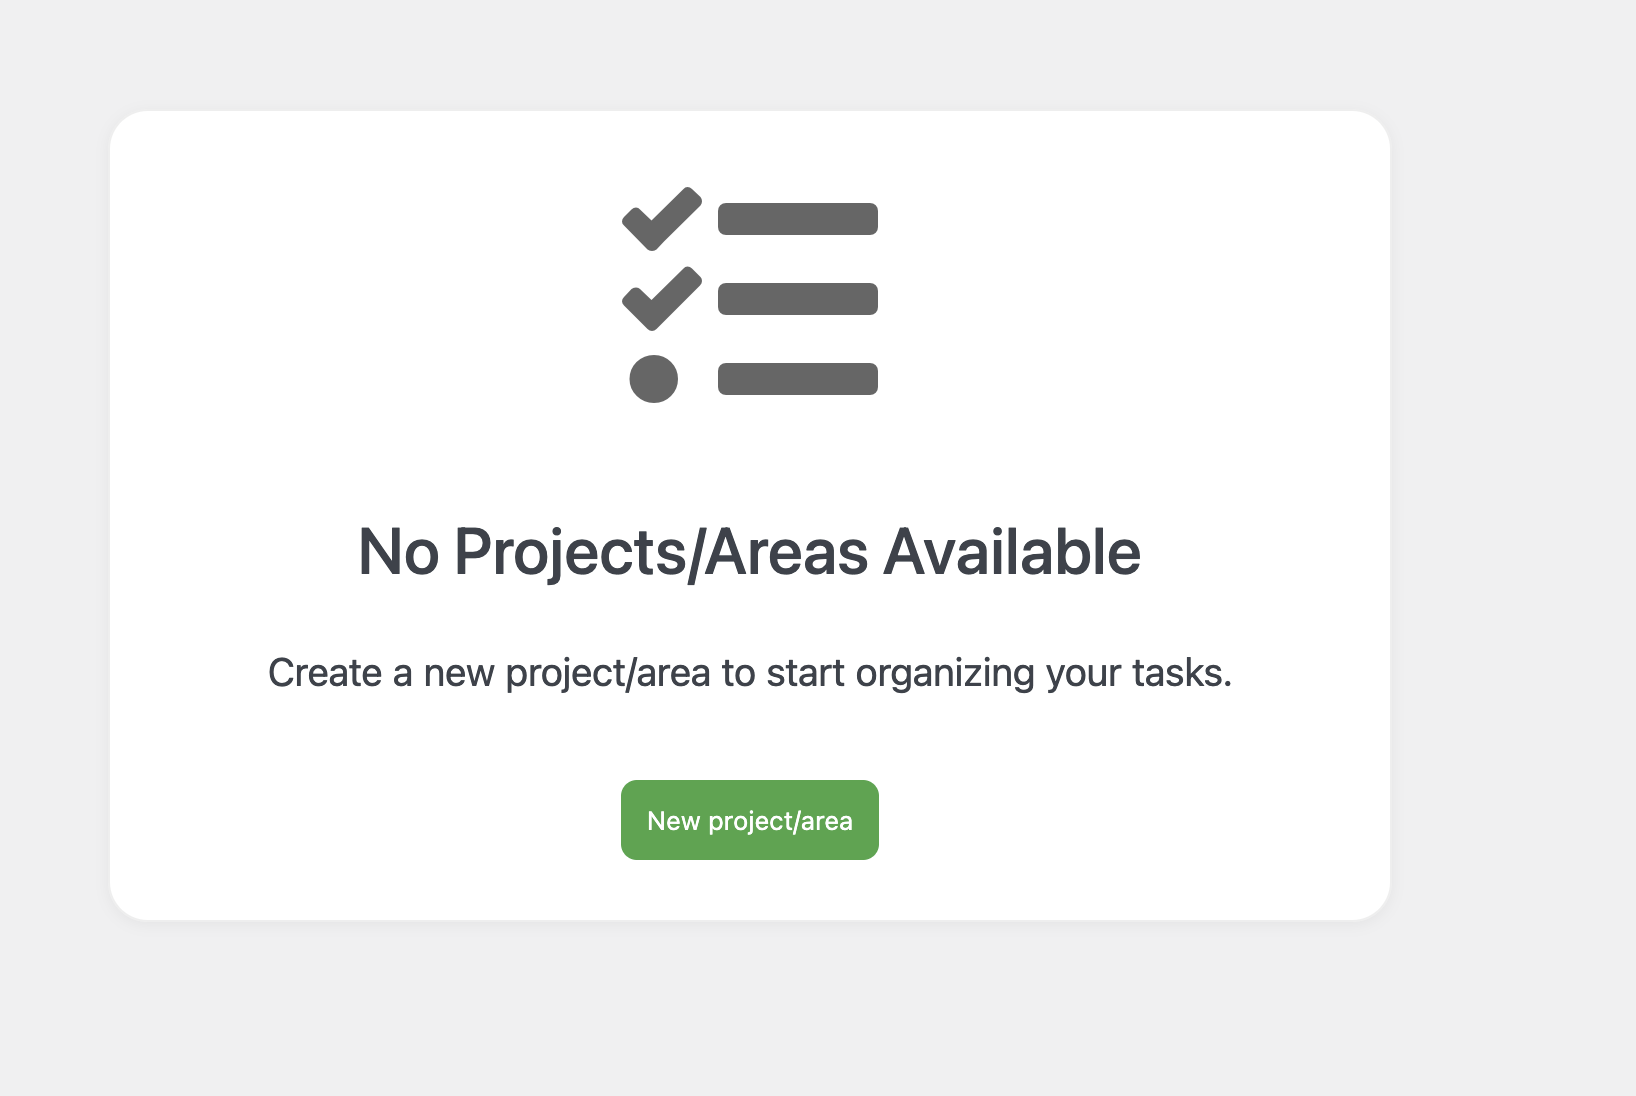
New Project/Area
Creating a new Project/Area is quick and intuitive. Simply click the green button labeled “New Project/Area”. A modal window will appear, allowing you to configure the settings of your new board.

Following a short description of each parameter:
- Type: Select the type of project/area based on its purpose. This helps keep different workflows separated and well organized. Available types include: Housekeeping & Cleaning, Maintenance and Sprint Board. Details about each type will be provided later in this guide.
- Name: Choose a name for the project/area. This can be anything that helps you identify it easily.
- Tags: Tags allow you to categorize tasks and improve task filtering and prioritization. The system includes a few default tags, such as: High-priority, Deep Cleaning, Guest Request, Change Linens etc. You can create custom tags as needed and assign multiple tags to a single task.
- Task Statuses: Define the statuses that tasks within this board can have. These statuses represent the progress of each task (e.g. Not Started, Pending, In Progress, Completed, etc.).
- Description: Optionally, you can add a description for the Project/Area. This field is for internal reference only and has no functional impact.
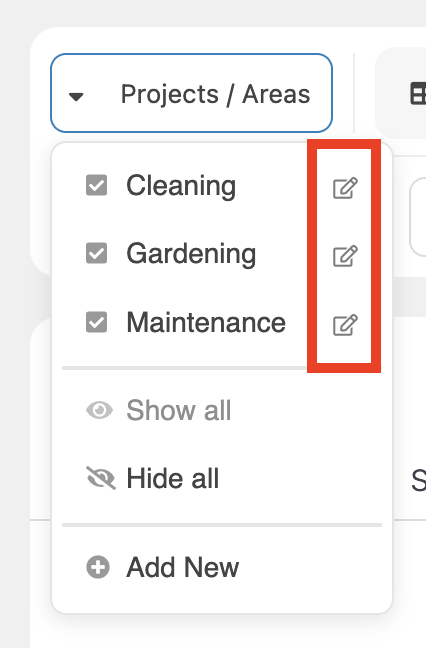
Once you have added your first Project/Area, you can create additional ones by clicking the dedicated “Add New” button, as shown in the screenshot below.

You can modify the configuration of each Project/Area at any time by clicking the edit button near the name of the Project/Area.
Types Overview
As mentioned earlier, there are three distinct Project/Area types, each designed for specific operational needs and equipped with tailored functionalities and parameters. The available types are: Housekeeping & Cleaning, Maintenance and Sprint Board.
Let’s take a closer look at each of them.
Housekeeping & Cleaning
As the name suggests, this Project/Area is designed to assist in the management of the cleaning duties. This project type is equipped with dedicated parameters to optimize cleaning workflows and the assignment of tasks.

These projects include a set of parameters specifically designed to automate and simplify the management of cleaning tasks. In details:
- Automatic Scheduling: As the name suggests, this option enables the automatic creation of cleaning tasks based on the frequency defined in the setting below
- Scheduling/Frequency: Defines how often cleaning tasks should be generated. You can choose from six available options: Turnover (at every check-out), Daily, Every two days, Every three days, Weekly and Monthly.
- Automatic Assignment: Automatically assigns cleaning tasks to operators. The first available operator will be immediately assigned as soon as the task is created.
- Operators: Select the operators responsible for cleaning duties. Operators must be created in advance via the "PMS > Operators" section in Vik Booking.
- Listings: Specify whether the project/area applies to all listings or only to a selected group of properties.
- Default Task Duration: Set the estimated duration of each cleaning task. This value is used by the Task Manager to calculate operator availability and manage automatic task assignments.
The Housekeeping & Cleaning project focuses on the automatic creation and assignment of the tasks. Once properly configured, the entire process is handled automatically, requiring little to no manual effort.
Maintenance
Maintenance contents
The “Maintenance” Project/Area type includes a few essential parameters that make it suitable for a wide range of general-purpose tasks. As shown below, it features three key settings: Operators, Listings, and Default Task Duration.

Here’s a detailed breakdown:
-
Operators: Select the operators eligible for the tasks. Operators must be created in advance via the "PMS > Operators" section in Vik Booking.
-
Listings: Specify whether the project/area applies to all listings or only to a selected group of properties.
-
Default Task Duration: Set the estimated duration of each cleaning task. This value is used by the Task Manager to calculate operator availability.
Sprint Board
The main feature of the Sprint Board is the ability to create hidden tasks. The board can be set to “Private”, which restricts access to Administrators only, hiding both the project and its related tasks from other Operators.

Projects/Area Management
The Task Manager offers a variety of tools to help manage multiple Projects/Areas efficiently.
From selecting which Projects/Areas to display, to switching between different viewing modes, and applying dedicated filters — everything is designed to make task navigation easier and more intuitive.
-
Project/Area display selection
By clicking on the “Projects/Areas” field at the top of the page, a drop-down menu will appear. Here, you can use the checkboxes next to each Project/Area to select the ones you want to view. Multiple Projects/Areas can be selected at the same time for a combined view.

-
Project/Area Visualization
You can choose between 4 different visualizations for your Projects/Areas: Board, List, Calendar and Booking.
Board: This is the classic view. The different Projects/Areas will be displayed separately
List: The List view displays an organized list of all available tasks.Each task includes a dedicated field that indicates its associated Project/Area.
Calendar: The Calendar view displays tasks organized by day, providing a clear overview of which tasks are scheduled for each date.
-
Bookings
This view will take you back to the “Availability Overview” page of Vik Booking. By using the “Action” button at the top, you can select which Projects/Areas to display. Below each room type, a dedicated field will show the tasks scheduled for that room on the selected date.

Creating new Tasks
After creating your Projects/Areas, you can create new tasks by clicking the dedicated “New Task” button. This will allow you to select the Project/Area for which you want to create the task.

Additionally, each view includes its own quick “Add New” button, making it faster and easier to create tasks directly from the current layout.
Creating a new task is a straightforward process.
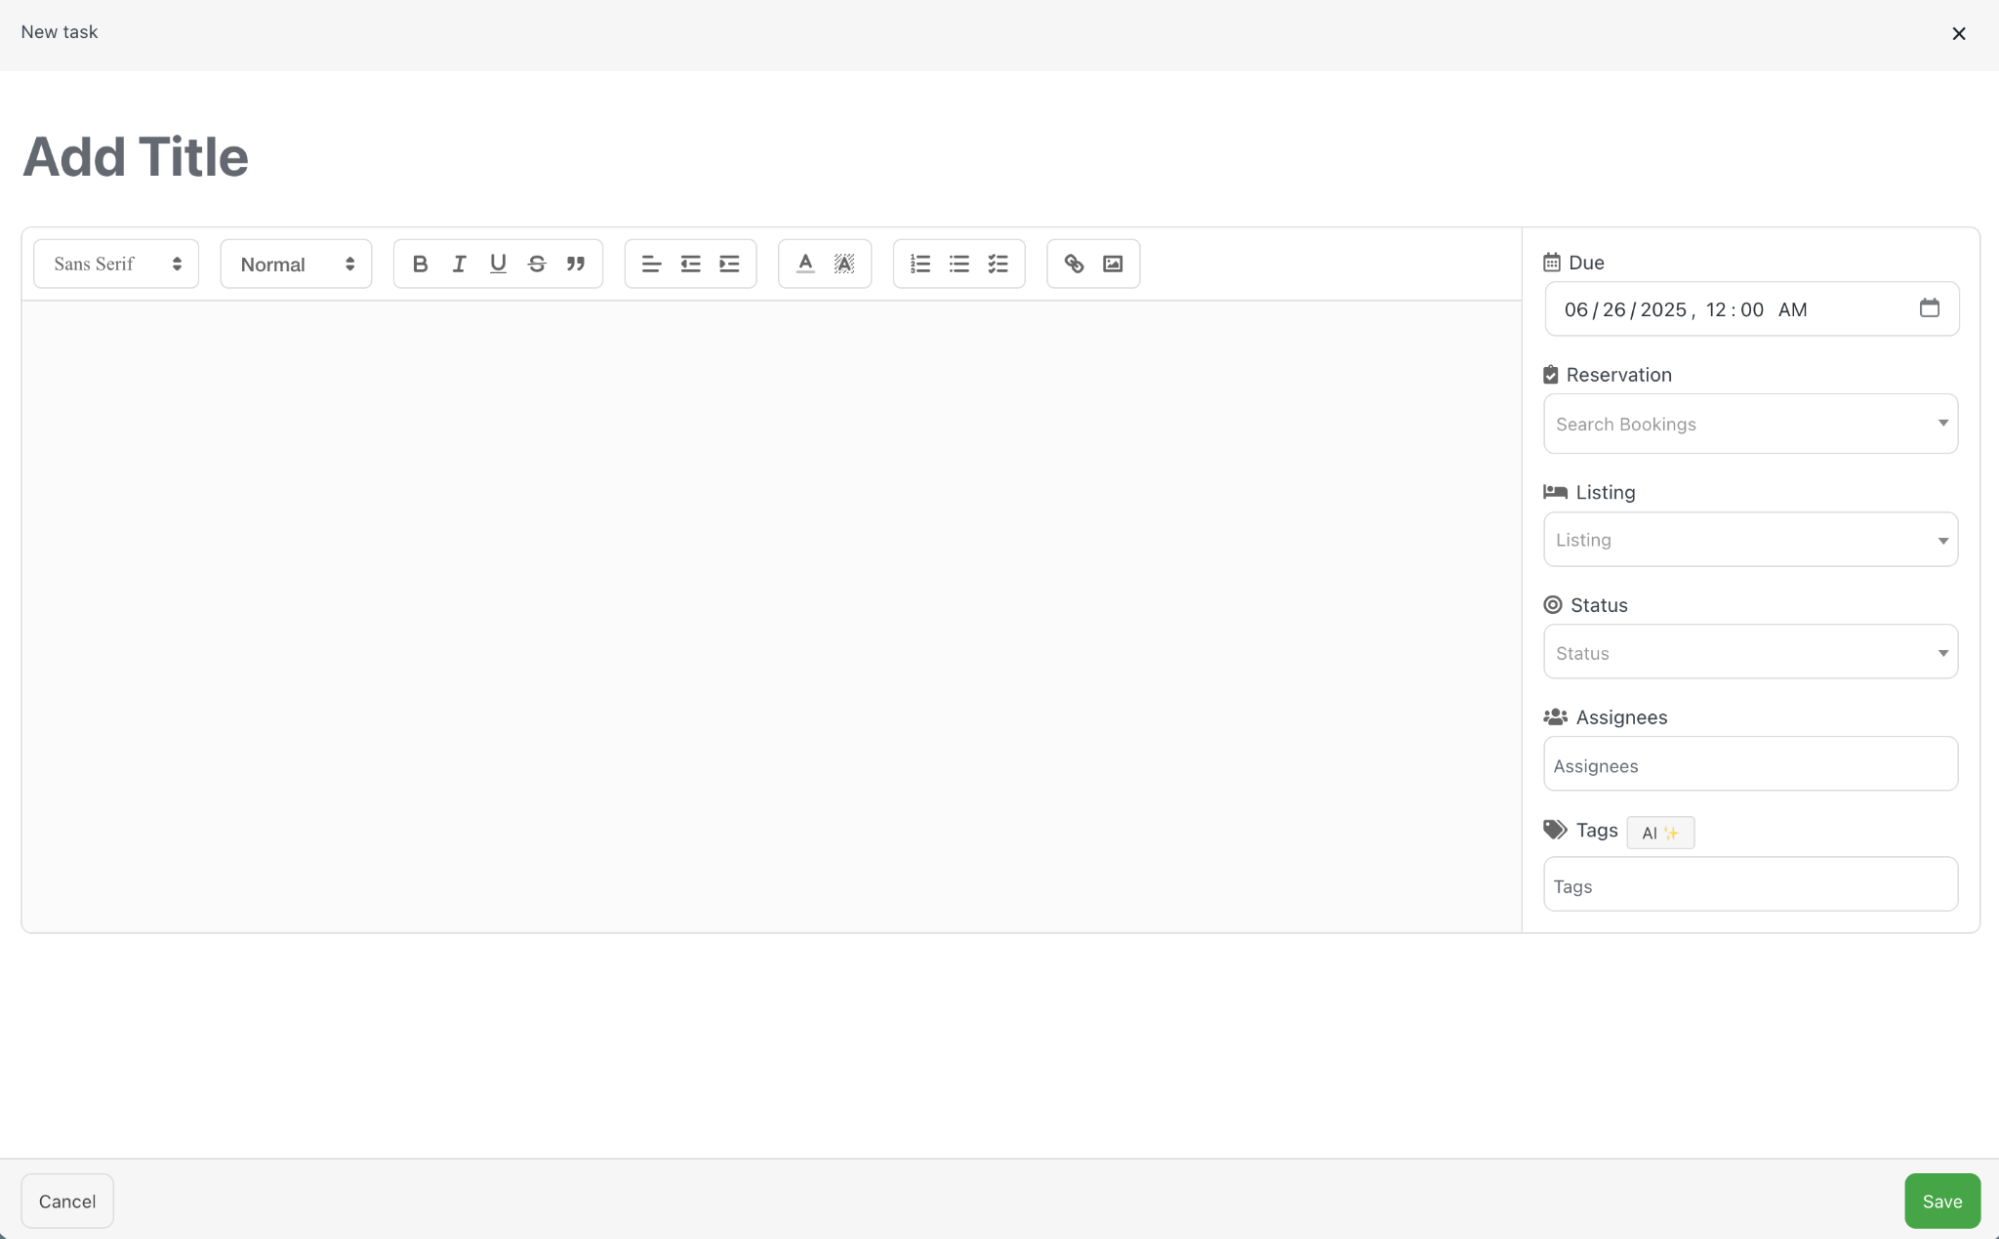
Start by adding a title, which will be used to identify the task. You can then enter additional details or instructions in the description field below, if needed.
On the right side of the screen, you’ll find several parameters that can be configured:
-
Due: Set a specific date and time for when the task should be carried out.
-
Reservation: Choose whether the task is linked to a specific reservation or left unrelated.
-
Listings: Select the listing(s) the task applies to.
-
Status: Set the current status of the task (e.g. Unassigned, Pending, Completed).
-
Assignees: Manually assign the task to a specific available operator. The list of displayed operators depends on those assigned to the selected Project/Area when the task was created. If left unassigned, all operators linked to the Project/Area will be able to see the task on the Front-end and accept it.
-
Tags: Assign one or more tags to the task. Tags are used solely for categorization and convenience — they do not impact the task itself.
Finally, click the “Save” button to create and schedule the task
The Project/Area of type “Project” includes a unique feature that allows the creation of to-do lists.
These to-do lists can be checked off and updated both from the backend and the frontend, ensuring seamless task tracking across the two.
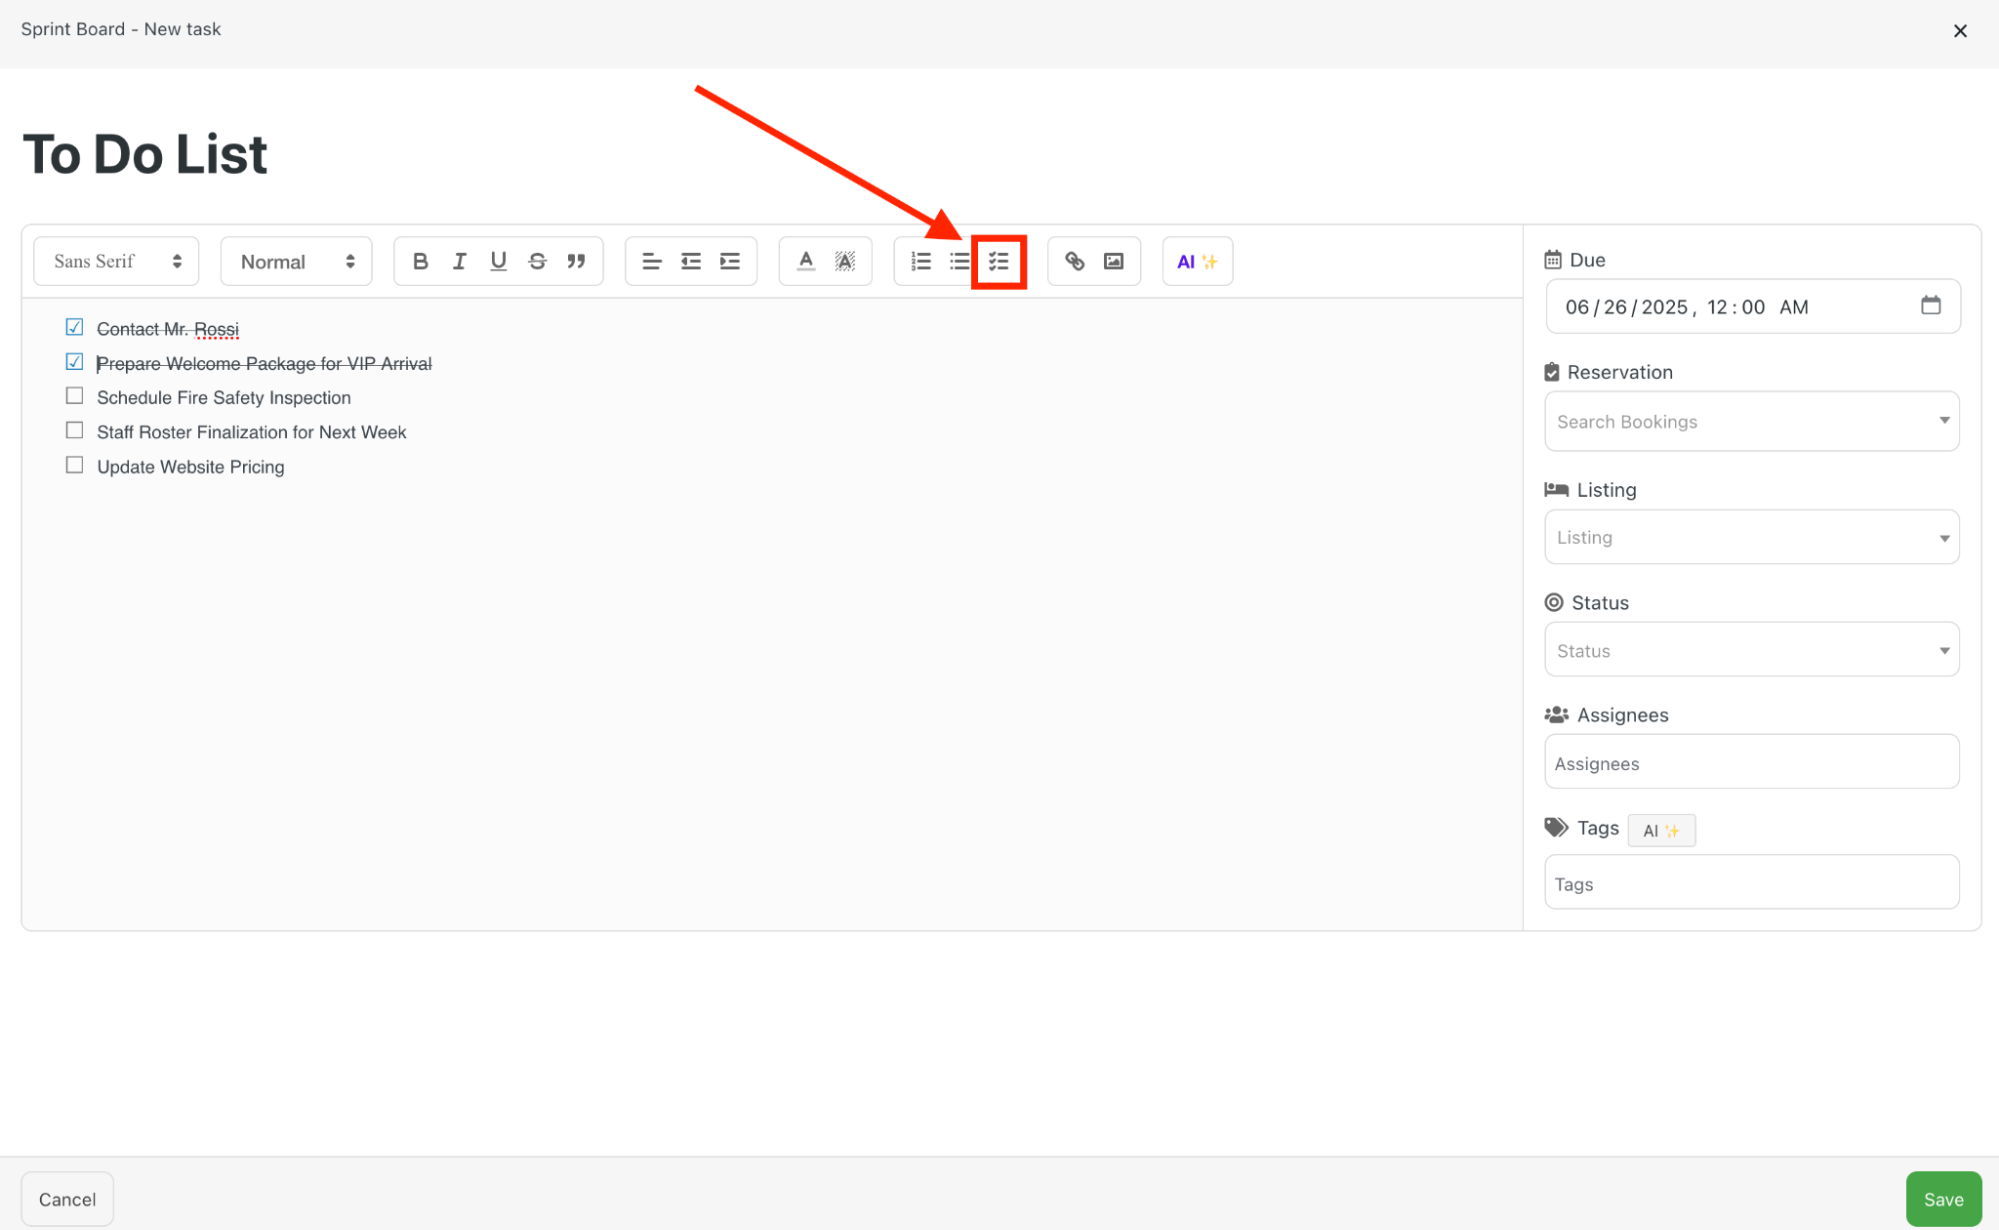
Operator’s Login Area - Front End
All tasks available in the Task Manager will be visible in the front-end Operator login area, based on each operator’s assignments and permissions — with the exception of "Private" Projects/Areas, which remain hidden.
By default, each Area has specific operators assigned to it. Tasks can either be assigned to a specific operator within that Area or left unassigned, allowing all operators linked to the Area to view and access the task.
Operators
Operators can be created from the “PMS > Operators” section in Vik Booking.
When adding a new operator, the system will prompt you to fill in several fields — however, only First Name, Last Name, and Email are mandatory.
Below is an example of how to create a new operator, named “Operator 1”.

An Authentication Code will then be generated automatically.
This code can be used by the operator to log in through the front-end page rendered by the “Operator Login” shortcode.
On the right side of the screen, you can manage the operator’s permissions, as well as their working days and any exceptions such as holidays or additional working days.
It’s important to configure the Permissions Management section at least once to grant the operator access to the Task Manager.
To do so:
-
Click the “Manage” button located under the “Permissions” tab.
-
Navigate to the “Task Manager” section.
-
A yellow notification will appear, indicating that the selected operator has not yet been granted access to the Task Manager.
-
Make sure the “Accept Task” permission is set to “Yes”, then click “Save” to apply the changes.
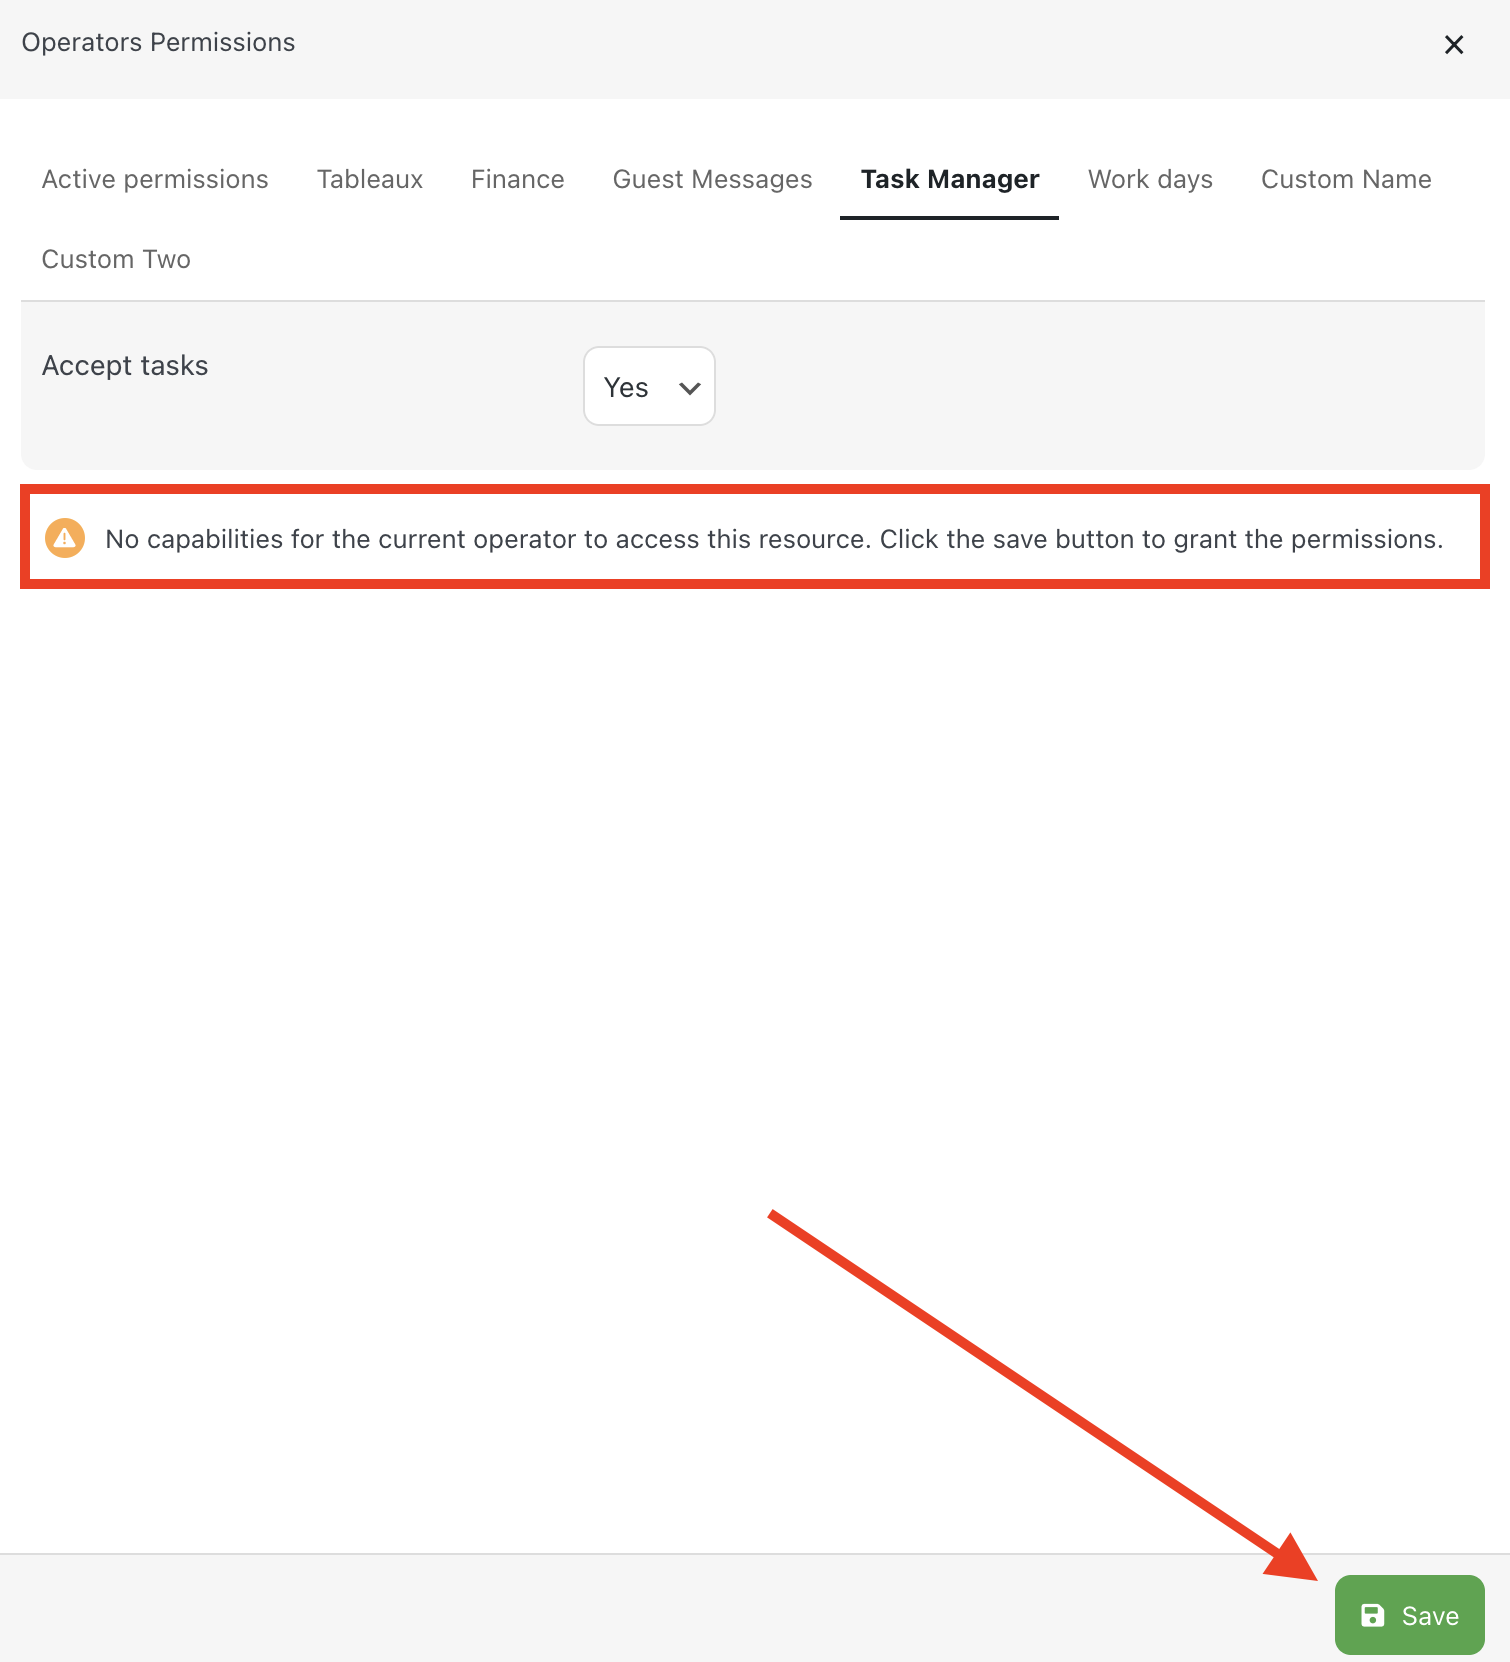
If everything has been configured correctly, the “Task Manager” will appear in the first tab, “Active Permissions”, confirming that the operator has been granted access.

Front-end Operator’s Login page
Operators created in Vik Booking can use their assigned Authentication Code to log in through the “Operator Login” page, where they can access the tools and sections they've been granted permissions for.
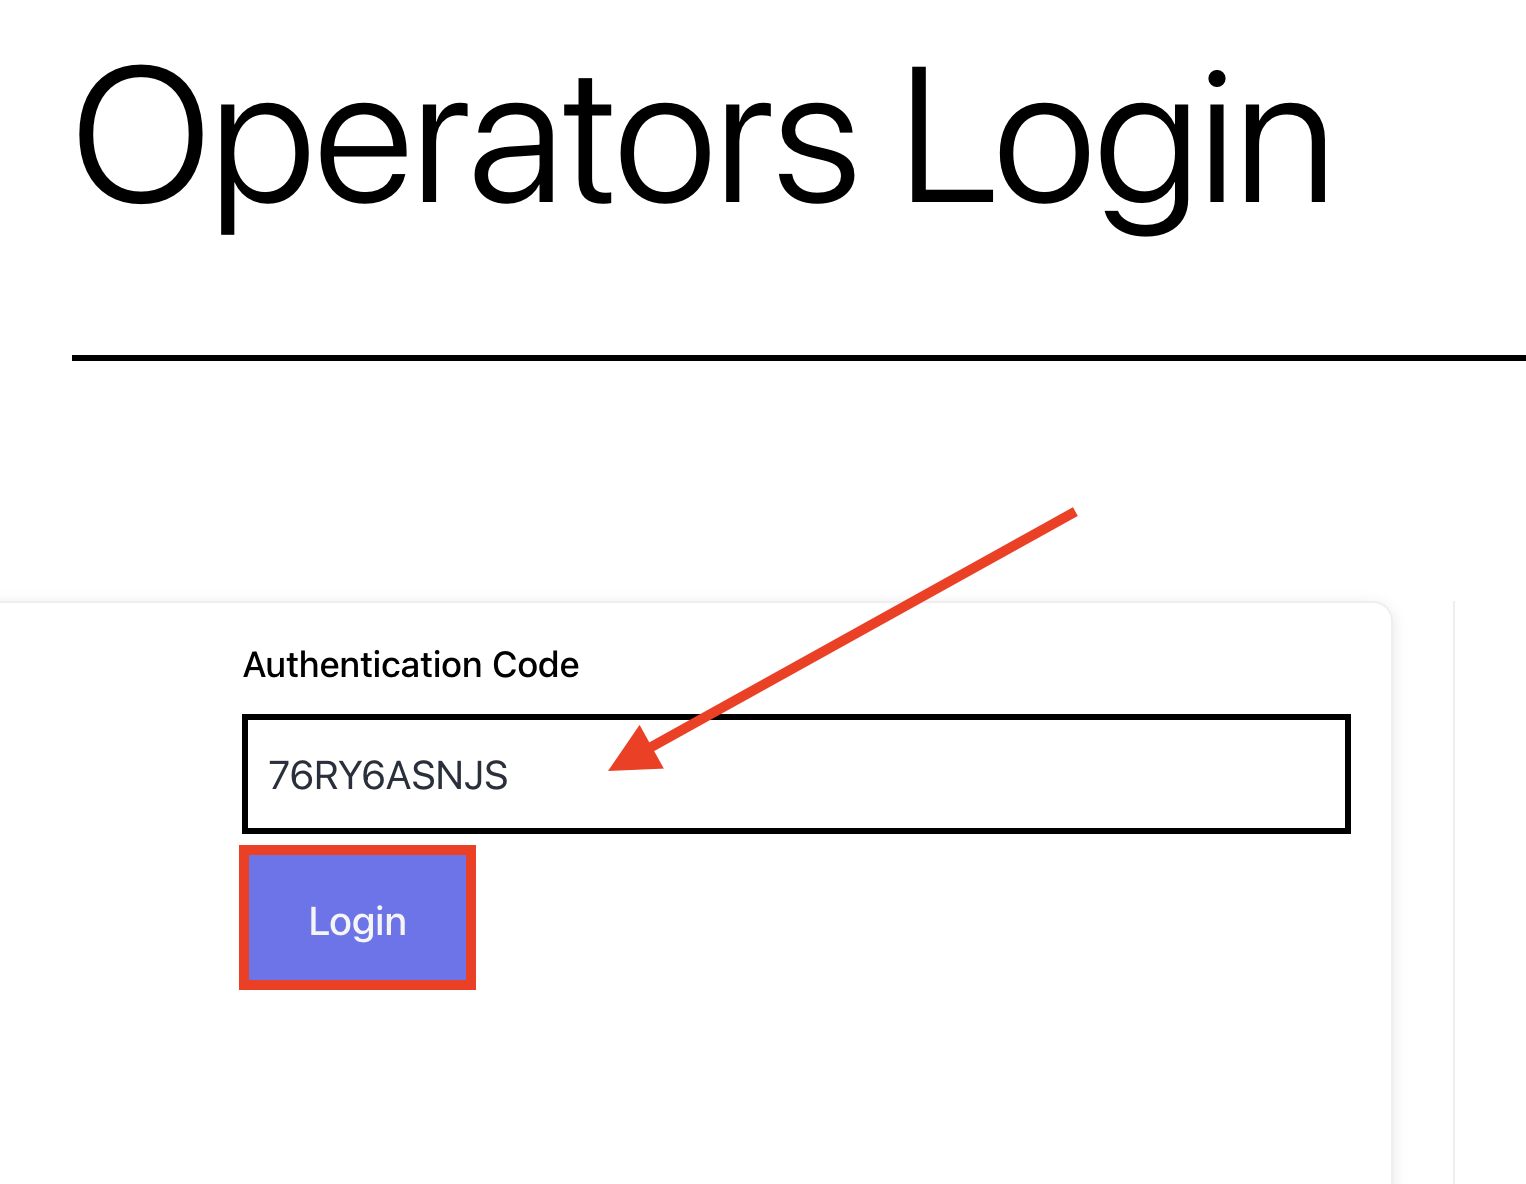
Continuing with the previous example, Operator 1 is now able to access the Task Manager.
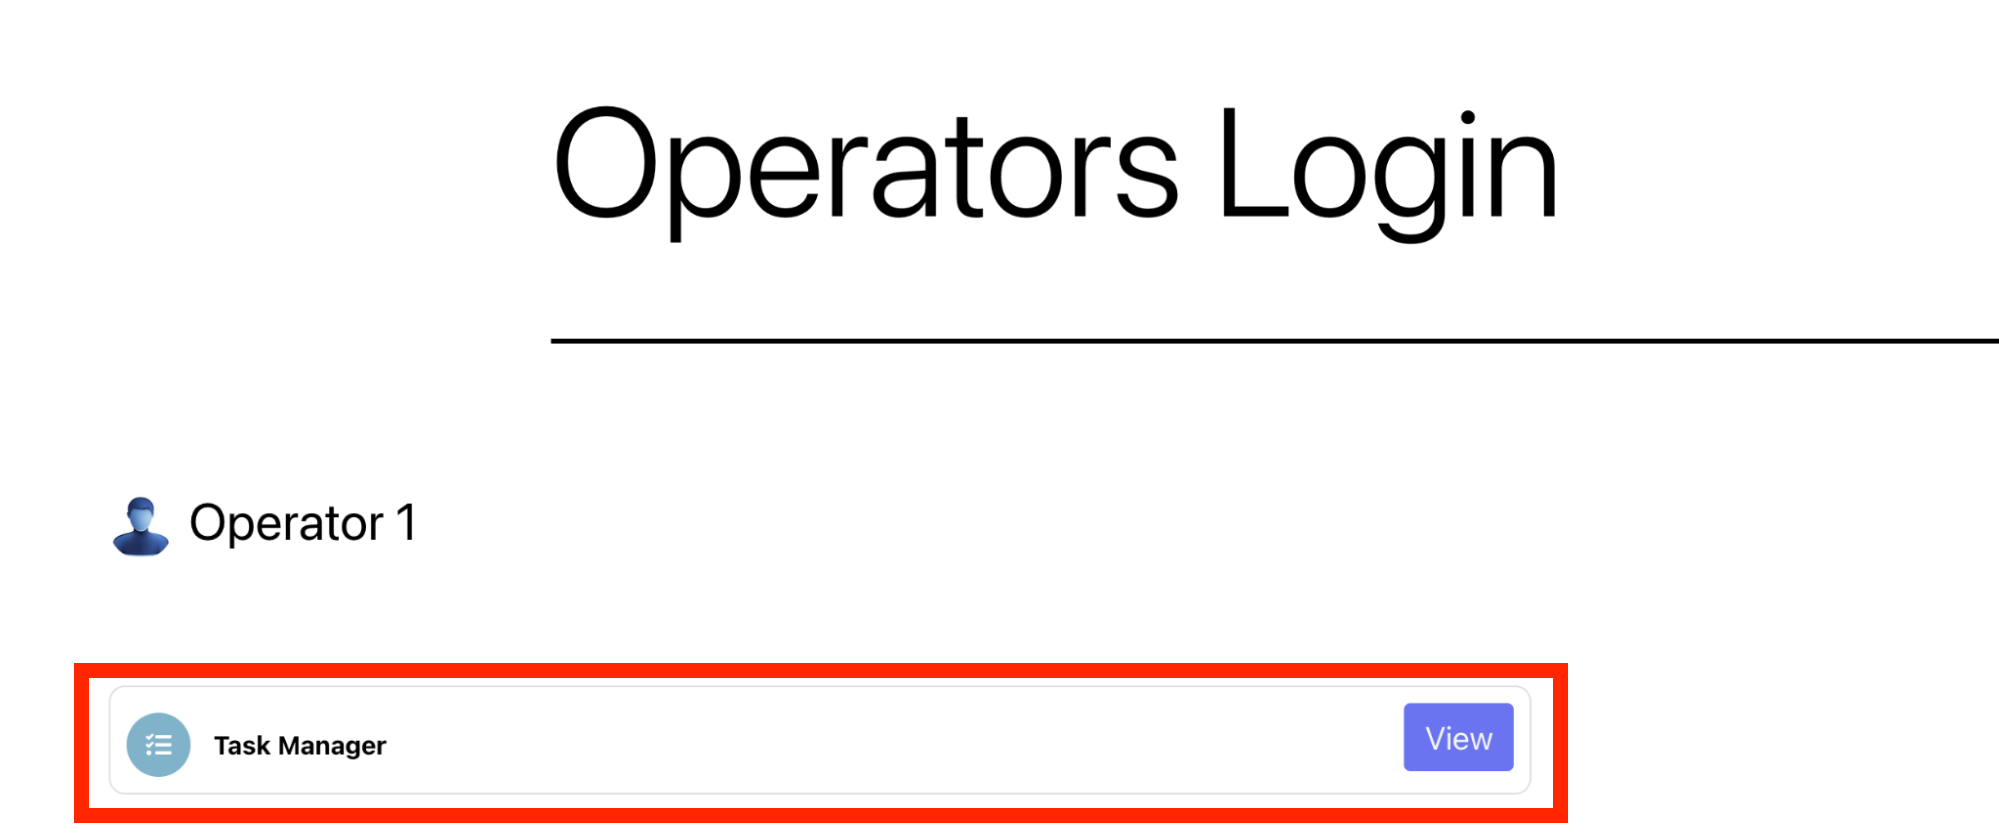
Task Visualization in front-end
Let’s look at an example by creating a task (status “Not started”) that we will leave unassigned.

Let’s now log into the Operator Area as Operator 1 to see how the unassigned task appears. Obviously, tasks that are assigned manually will only be visible to the specific operator they were assigned to.
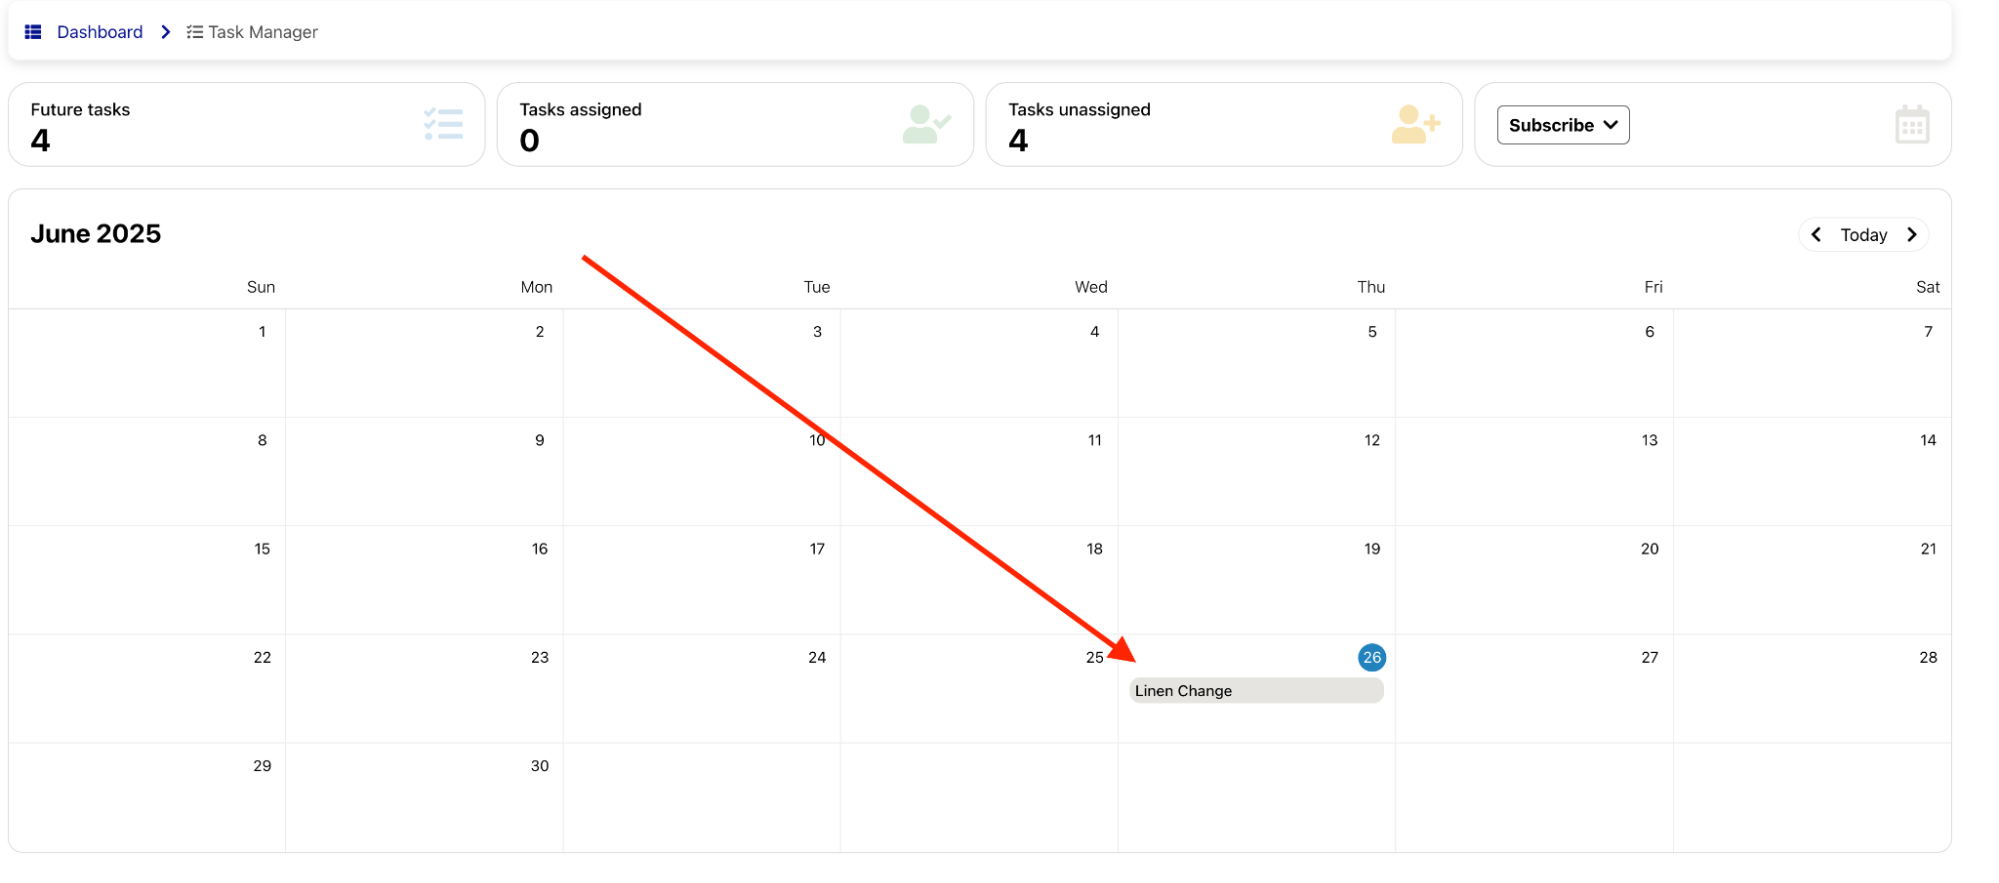
Unassigned tasks will be visible to all operators assigned to the corresponding Area. Any operator can click on a task to view its details.

By clicking on the status, operators can change it.
Setting it to “Accepted” or “Ongoing” will automatically assign the task to themselves.
On the right side of the screen, a chat panel is available for communication with the administration. The chat also allows operators to upload photos, if needed (3 dots icon).

When the status is updated, the task is automatically synced with the backend.
In the overview, the new status will be immediately visible, along with a message icon if there are any unread messages in the task's chat.

Opening the task will display all its details. The operator who accepted the task will appear as the assignee (1), and the “Started” field (2) will indicate the exact time the task status was updated. Finally, the message balloon icon (3) at the top can be used to open the task's chat panel.
![]()
Finally, once the operator has completed the task and updated the status to “Completed”, the “Finished” field will be automatically populated with the corresponding date and time.
Notification Center - Operator’s Tab
The Notification Center has been enhanced with a new tab called “Operator”, which displays all updates related to the Task Manager.
This includes status changes, new messages, and, when applicable, errors—allowing you to keep track of all relevant task activity in real time.
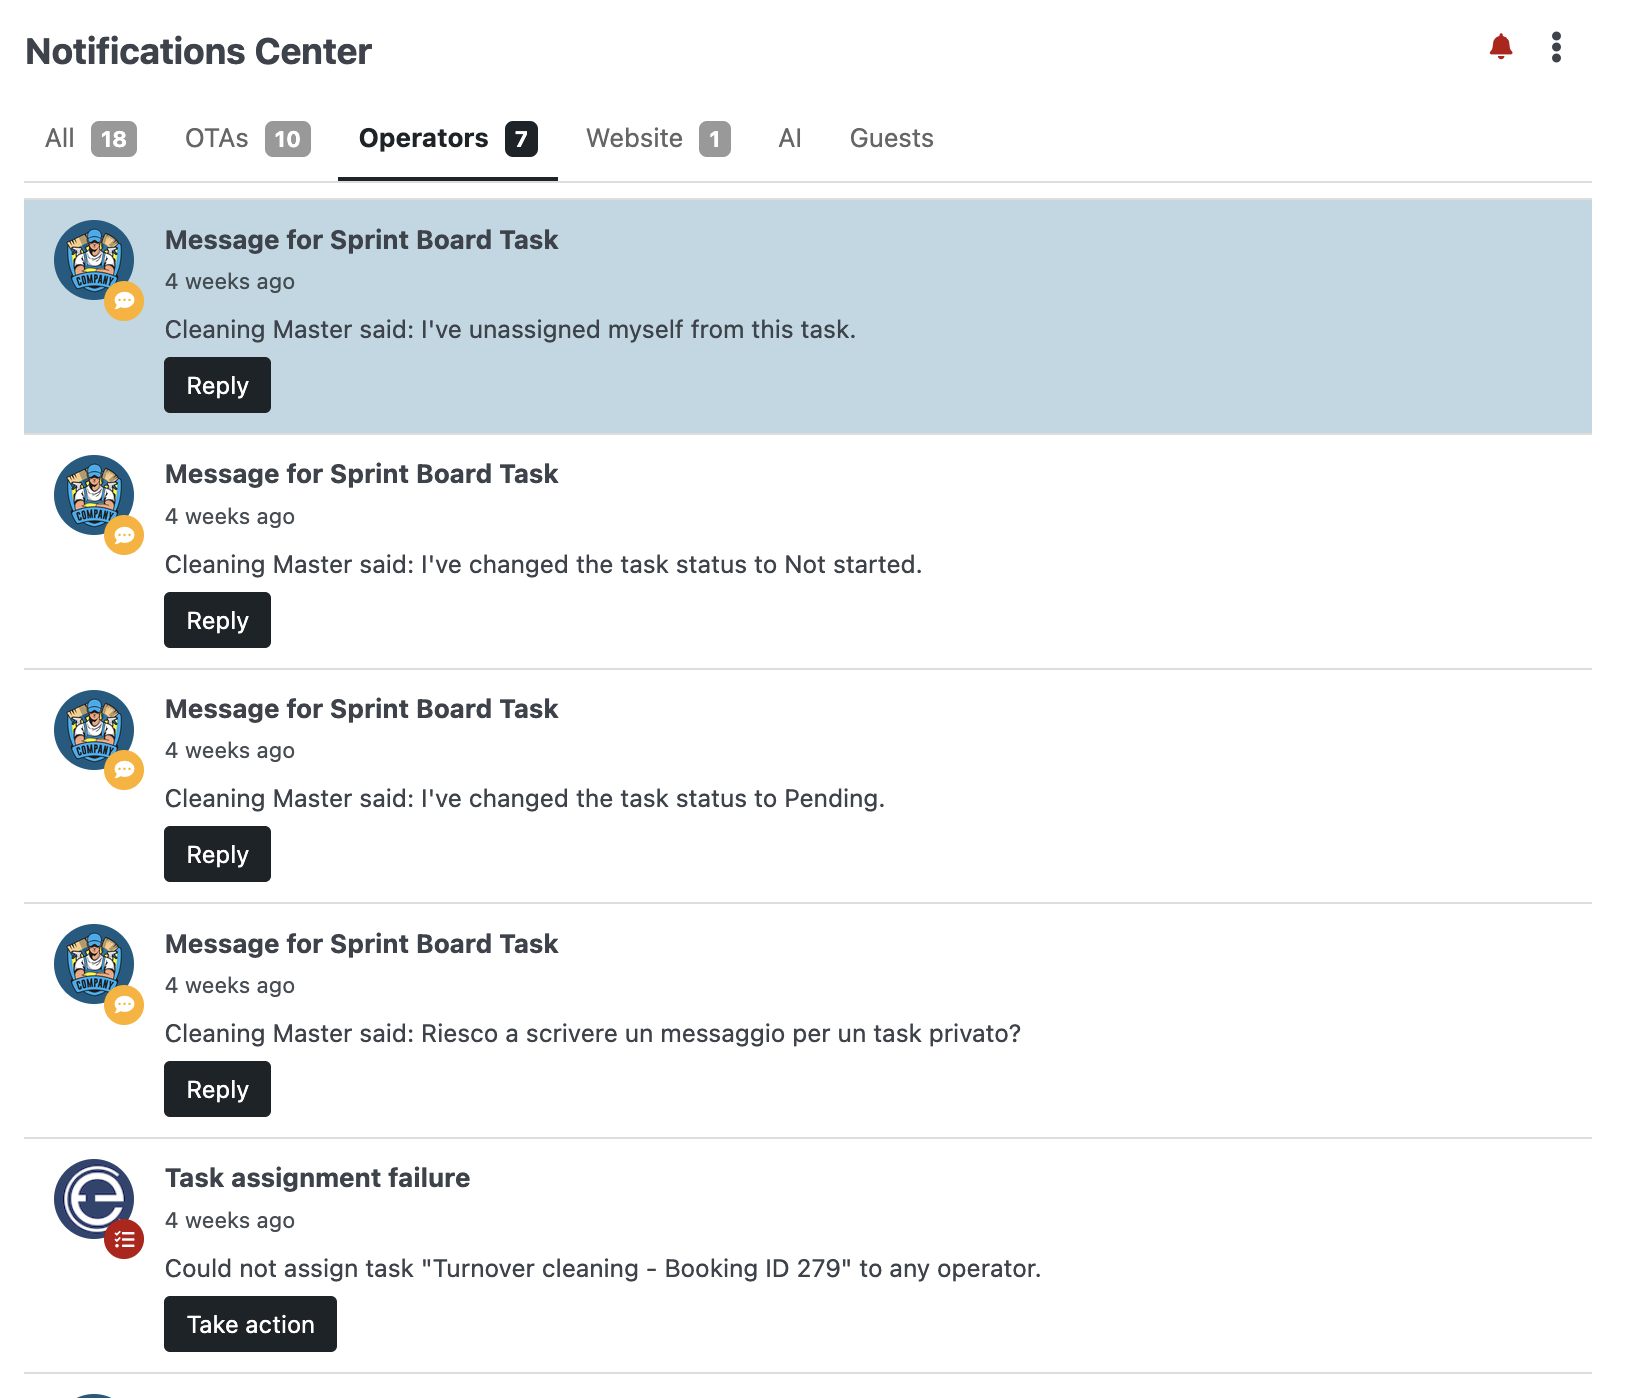
iCal Calendars
Once logged into the Task Manager, operators can access an export function to sync their tasks with external calendars via iCal.
Integration options are available for Apple Calendar, Google Calendar, and other third-party systems that support the iCal format.
Additionally, a download button is available to export an “.ics” file manually.

Management
The Management section includes various functions, such as Customers, Invoices, Graphs, Statistics Tracking and Cron Jobs.
Please visit the Knowledge Base section for a complete documentation of these functions.
Statistics Tracking
The function “Statistics Tracking” will calculate the conversion rates, that is the relation between visitors and confirmed reservations. It will track the traffic of Visitors, Customers and the Referrals. A Referral is the web source that brings you visitors on your website.
You will be able to filter the tracking results for a specific range of date, type of date, country and Referrals.
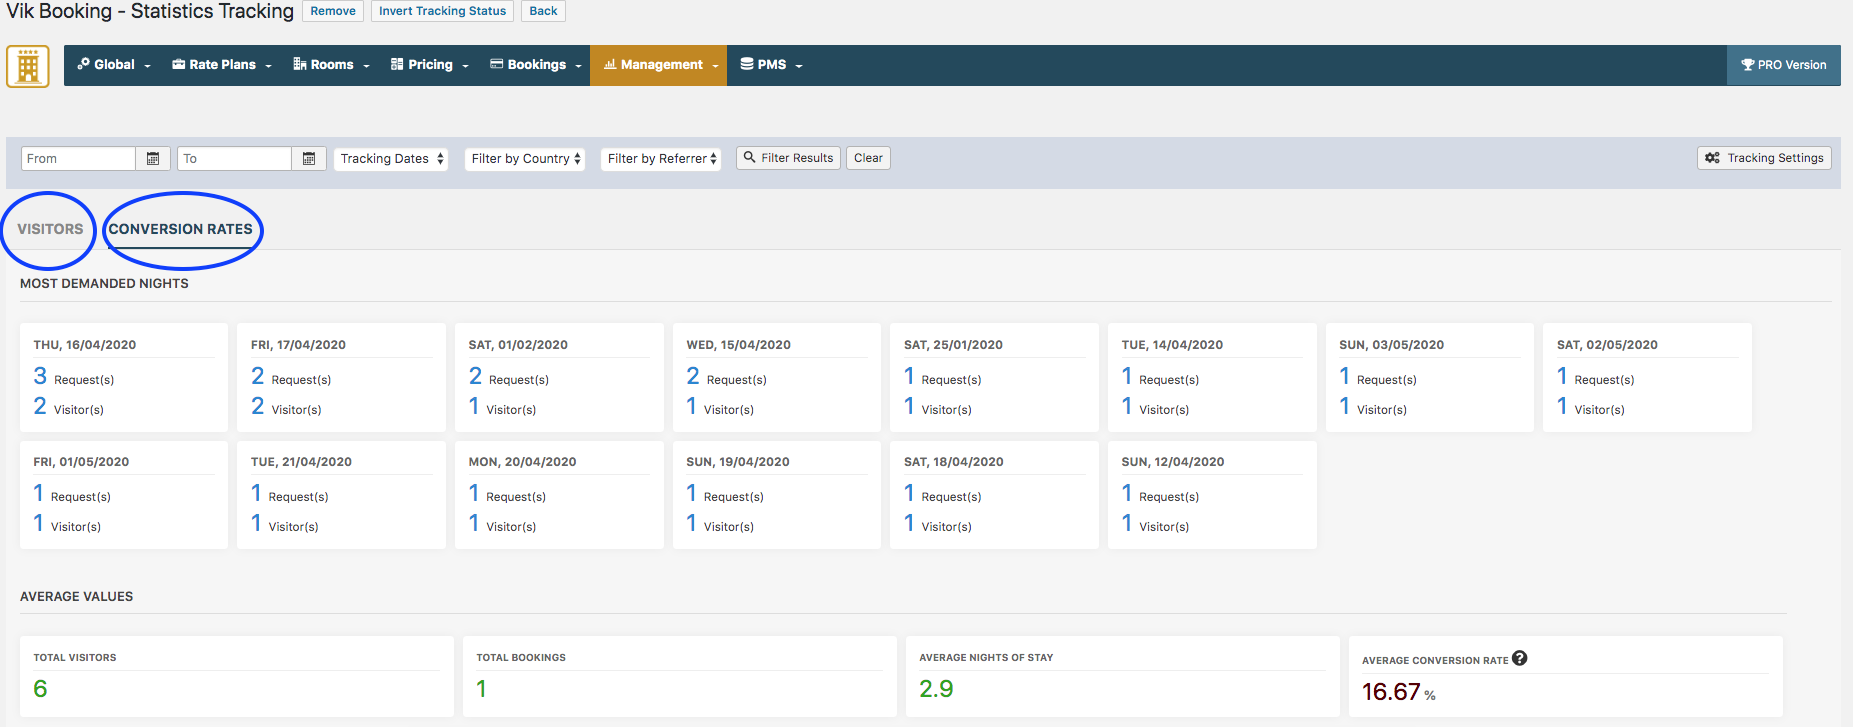
Thanks to this function, you can also create custom tracking campaigns:
Click on the “Tracking Settings” button to specify your tracking parameter.
![]()
![]()
Customers
In this section you can find customers records and their booking history. The required data to save and correctly store a customer record are: First Name, Last Name, E-mail and Country. Also, from here, you can edit or fill in all the additional guests information to keep them up to date.
Invoices
From here you will have access to a panel containing all your booking invoices. You can choose to filter the results for different criteria (i.e. Name, email or Month). Also, you will be able to download the invoices using the apposite button “Download selected invoices”.
Scheduled Cron Jobs
From here you can create or manage the already existing Cron Jobs. A Cron Job is a task that should be executed repetitively at regular intervals. It is an action that only your server is capable of scheduling. VikBooking comes with 3 default Cron Jobs Schedulers: Email Reminder, SMS Reminder, Invoices Generator, but you can create as many as you want through this apposite section. For more details on how to schedule and manage Cron Jobs please refer to our guidelines in the Knowledge Base.
Languages
How to translate VikBooking
VikBooking only comes in English, before you start translating the program into another language make sure you have checked that a translation for that language is not available in the Extensions AddOns page of the Answers Area.
VikBooking can be translated by simply creating a .ini language file. Follow these steps for creating the .ini language file:
Let's say we want to translate VikBooking into Spanish.
1. Copy the file /language/en-GB/en-GB.com_vikbooking.ini into the folder /language/es-ES/
2. Rename the file as /language/es-ES/es-ES.com_vikbooking.ini
3. Open the file es-ES.com_vikbooking.ini and translate all the English definitions into Spanish
4. Save the changes.
The INI file structure has changed since Joomla 1.6, make sure you respect the syntax INSTRUCTION="Definition" by opening and closing the quotes.
In case we also want to translate the Administrator side of VikBooking, we have to do the same thing but the files are located in /administrator/language/
We might also want to translate the search Module of VikBooking to change words like "Check-In Date".
The module language file is: /language/en-GB/en-GB.mod_vikbooking.ini and also here we have to duplicate the file in the same way as above.
Multilanguage website with VikBooking
If you have installed multiple languages in your Joomla website, you can use the Translations tool in the administrator section of VikBooking to translate the names and the descriptions of the rooms, the categories, the rate plans and much more.
Please notice that there is a configuration setting for enabling the Multilanguage translations.
F.A.Q.
Please remember to visit the Knowledge Base section of VikBooking to find some extra information.
Javascript Conflicts
The Calendar is not working
If the jQuery UI Calendar is not working on your website then it's because your page has a Javascript Conflict.
A Javascript file is responsible of this "conflict". Since this file could be called by either the template, a module or a plugin, a manual debug of the source code is always required in order to understand the reason of this problem.
If you are using some modules of E4J that came along with VikBooking, the first thing that you should do is disabling the setting "Load jQuery" from the Module Manager in the Administrator section.
If the problem persists we need to debug the source code of the page that is not showing the calendar.
The calendar is generated by jQuery UI, a javascript library that implements the standard functions of the javascript framework jQuery. In order to make the Calendar work, in the souce html code of the page, after the library jQuery UI another jQuery library cannot be called otherwise jQuery will be reset and your browser will "forget" the functions needed to render the Calendar.
Usually these problems are caused by Modules or Plugins because they are rendered after the component so, if they use jQuery, the file will be called after the jQuery UI library making the calendar not work.
This is an example of a correct source code that renders the jQuery UI Calendar correctly:

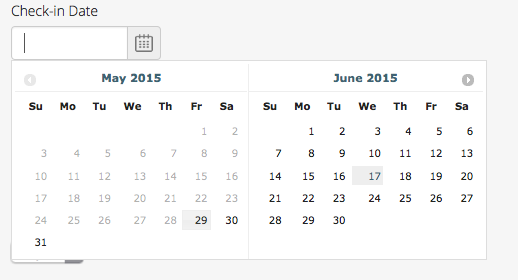
You can see that after the library jquery-ui-1.10.1.custom.min.js no more jQuery libraries are called so the browser is able to render the calendar correctly.
Here is an example of an incorrect source code that generates a Javascript error in your browser console:

Another jQuery library is called after the file jquery-ui-1.10.1.custom.min.js and this way the browser will forget how to render the calendar because jQuery has been reset.
No Results/Availability
No Results/Availability on some dates
If you are getting an error message saying something like "No room is available for booking for 14 Nights, 2 Adults, 1 Child" when making a search for a booking then it means that the rooms were not configured correctly.
These are some scenarios that could be causing the availability error and you should check the configuration in the administrator section of VikBooking:
- All the Rooms have been booked for those dates. Use the page Availability Overview to get a list of the remaining availability on those dates.
- The remaining Rooms could be temporarily set as "Locked" because a customer tried to make a booking without paying for it. This means that the status of the booking is "Stand-By" and the rooms will be kept as locked for the amount of minutes defined in the Configuration page. Remove the pending booking from the All Bookings page or use the Dashboard to unlock the rooms.
- None of the rooms is configured for accepting 2 Adults and 1 Child in this example. Please check the minimum and maximum number of Adults, Children and Total People (Adults + Children) from the Rooms List page.
- The page Rates Table doesn't have a cost for 14 nights for any of the rooms in this example. The system requires to have a cost for any number of nights allowed. If there isn't a cost for the number of nights requested (14 in this example), bookings will not be possible.
One or more of the above scenarios must be causing such error messages.
PDF Invalid Characters
Text Encoding Problems: in case the PDF file is showing some strange character, you need to use a different font for the PDF. The default font used is Helvetica, a light font but that doesn't support all the languages. Inside the full package archive of VikBooking that you downloaded there's a folder called Dejavusans_PDF_Font. Upload all the files contained in that folder (not the folder, just the files inside) onto the following directory of your server:
/components/com_vikbooking/helpers/tcpdf/fonts/
This way VikBooking will use the font Dejavusans and every character will be encoded correctly. The reason why the program doesn't come with this font pre-installed is because it weighs about 5MB, too much for a Joomla installer.
Development
This section shows how the payment framework of VikBooking can be extended to support any kind of payment gateway.
How to develop a payment processor
The payment framework of VikBooking can be extended by creating a PHP file declaring the VikBookingPayment class.
The created file must be placed via FTP onto the directory: /administrator/components/com_vikbooking/payments/
In order to develop the class VikBookingPayment please follow the code example below.
<?php

defined('_JEXEC') OR die('Restricted Area');

class VikBookingPayment {

	private $order_info;
	private $params;

	public static function getAdminParameters() {
		return array();
	}

	public function __construct($order, $params=array()) {
		$this->order_info = $order;
		$this->params = $params;
	}

	public function showPayment() {
		/** See the code below to build this method */
	}

	public function validatePayment() {
		/** See the code below to build this method */
		return array();

	}

	public function afterValidation($esit = 0) {
		/** See the code below to build this method */
	}
}
?>
Parameters Constructors
The parameters form for the administrator section can be built through the getAdminParameters() static method. This is useful to fill in private data or credentials, required for the creation and the validation of the payment/transaction. A Merchant ID and a Signature Key are an example of parameters that should be visible as well as editable in the back-end.
The parameters of the form are returned as an array with the following structure:
[
	"param_1" : [
		"label" : "Label 1",
		"type" 	: "text",
	],
	"param_2" : [
		"label" : "Label 2",
		"type" 	: "select",
	],
]- param_1 - is one key of the array that must be unique (required).
It represents the name of the parameter to use. - label - indicates the text to assign for the parameter in the administrator section (optional).
By placing a double slash (//) after the label, the text after will be displayed as a tip next to the field of the parameter (like "Merchant ID//this is a tip to display..."). - type - is used to render the right type of input field in the administrator section (required).
The values allowed for the type are the followings: custom, select, text. - html - will be used only when the type of the parameter is custom (optional).
- options - is an array containing all the possible values to use in the dropdown (required only when the type is select).
public static function getAdminParameters() {
	$logo_img = JURI::root().'administrator/components/com_vikbooking/payments/mypay/mypay-logo.jpg';
	return array(
		'logo' => array(
			'label' => '',
			'type' => 'custom',
			'html' => '<img src="'.$logo_img.'"/>'
		),
		'merchantid' => array(
			'label' => 'Merchant ID',
			'type' => 'text'
		),
		'testmode' => array(
			'label' => 'Test Mode',
			'type' => 'select',
			'options' => array('Yes', 'No'),
		),
	);
}
The code above will generate a parameters form in the administrator section as follows.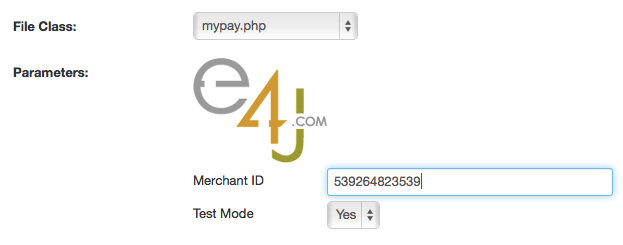
If your form doesn't come up, probably there is a syntax error on your file.
When you fill in the admin form, the parameters are stored in the array $params and you are able to get the values with the instructions below:
$merchant_id = $this->params['merchantid']; /* returns "539264823539" */
$test = $this->params['testmode']; /* returns "Yes" */
Order Info Object
The $order_info object is a mapped key/val array with the order information needed to complete the payment process. You can see below all the available keys of the array.
| Param | Type | Description |
|---|---|---|
| details | array | Array containing sub-parameters for the record of this reservation. |
| custmail | alphanumeric | The email address of the customer. |
| transaction_currency | char(3) | The currency of the amount (3-letter ISO 4217 code). The default is EUR. |
| return_url | string | The return url to come back to your shop from the bank on successful transactions. |
| error_url | string | The error url to come back to your shop from the bank on failed transactions. |
| notify_url | string | The notification url to validate the transaction data sent from the bank. This URL invokes the validatePayment method of your gateway. |
| total_to_pay | decimal | The total amount to pay as decimal (ex. 135.50). |
You can retrieve the information of the $order_info array with the example below.
$uniq_id = $this->order_info['details']['sid']."-".$this->order_info['details']['ts'];Show Payment
The method showPayment() of the object VikBookingPayment is invoked every time a user visits the page of a reservation with PENDING Status. Here you need to echo the HTML form that points to the payment creation url of your bank gateway.
In this method it is also possible to make calls via cURL to retrieve tokens or to self submit the form to receive additional info to send to the bank.
public function showPayment() {

	$merchant_id = $this->params['merchantid'];

	$action_url = "https://yourbankgateway.com/";
	if( $this->params['testmode'] == 'Yes' ) {
		$action_url = "https://test.yourbankgateway.com/";
	}

	$form='<form action="'.$action_url.'" method="post">';
	// put here all the required fields of your gateway
	$form.='<input type="hidden" name="your_post_data_merchantid" value="'.$merchant_id.'"/>';
	$form.='<input type="hidden" name="your_post_data_amount" value="'.$this->order_info['total_to_pay'].'"/>';
	$form.='<input type="hidden" name="your_post_data_notifyurl" value="'.$this->order_info['notify_url'].'"/>';
	$form.='<input type="hidden" name="your_post_data_description" value="'.$this->order_info['transaction_name'].'"/>';
	// print a button to submit the payment form
	$form.='<input type="submit" name="_submit" value="Pay Now!" />';
	$form.='</form>';

	echo $form;

}
Validate Payment
The validatePayment() method is used to validate the transaction details sent from the bank. This method is invoked by the system every time the NotifyURL is visited (the one described in the showPayment() method). Usually the data are sent via POST method, and you can access them by simply using the $_POST super-global variable. Some gateways require a signature validation to make sure the transaction wasn't corrupted. The signature validation can be created only following the instructions on the official documentation of your bank.
This method must return a key/value array with the status of the transaction. The possible keys of the array are the followings.
| Param | Type | Description |
|---|---|---|
| verified | boolean | The status of the transaction. 1/true in case of success, otherwise 0/false. |
| tot_paid | decimal | The real amount paid by the customer, should be returned by the Gateway (ex, 102.75). |
| log | string | A log message sent to the administrator in case of failure. The log can contain any value returned from the Bank and it should be as specific as possible. When not empty, the system will store the logs in the db and they will be visible from the order details page of the back-end. |
Any different values in the returned array will be completely ignored during the validation of the transaction.
public function validatePayment() {
	$array_result = array();
	$array_result['verified'] = 0;
	$array_result['tot_paid'] = ''; /** This value will be stored in the DB */

	/** In case of error the log will be sent via email to the admin */

	$status = $_POST['status'];
	/** Process your gateway response here */
	if($status == 'success') {
		$array_result['verified'] = 1;
		/** Set a value for $array_result['tot_paid'] */
		$array_result['tot_paid'] = $_POST['amount'];
	} else {
		$array_result['log'] = "Transaction Error!\n".$_POST['error_msg'];
	}

	/** Return the array to VikBooking */
	return $array_result;
}
After Validation
The afterValidation($esit) method is generally used to display a message and to redirect the gateway to the order summary view in case of success or failure. Please notice that this method should be in your Class only in case the Bank Gateway will not redirect the user to the ReturnURL. Also, this method, if it exists in the Class, will be invoked by the system after the validatePayment(). The $esit argument is a boolean value that represents the status of the transaction. In case of success (1/true) you should print a positive message and redirect the gateway to the return_url address, otherwise (0/false) you should print an error message and redirect the gateway to the error_url address. Remember also to put an exit or die rule at the end of the method to completely stop the flow.
public function afterValidation($esit = 0) {

	$mainframe = JFactory::getApplication();
	//Build the URL to the order details page
	$redirect_url = 'index.php?option=com_vikbooking&task=vieworder&sid='.$this->order_info['sid'].'&ts='.$this->order_info['ts'];

	if($esit < 1) {
		JError::raiseWarning('', 'The payment was not verified, please try again.');
		$mainframe->redirect($redirect_url);
	} else {
		$mainframe->enqueueMessage('Thank you! The payment was verified successfully.');
		$mainframe->redirect($redirect_url);
	}

	exit;
	//
}
You can get HERE the complete code of this example gateway.
SMS Gateways
SMS Schema
The SMS gateways for VikBooking can be extended by creating a PHP file containing the VikSmsApi class.
The generated file should be uploaded via FTP onto the following directory:
/administrator/components/com_vikbooking/smsapi/
Follow the schema below to see the structure of the Class File:
<?php
defined('_JEXEC') OR die('Restricted Area');

class VikSmsApi {

	private $order_info;
	private $params;
	private $log = '';

	public static function getAdminParameters() {
		return array();
	}

	public function __construct($order, $params=array()) {
		$this->order_info=$order;
		$this->params = ( !empty($params) ) ? $params : $this->params;
	}

	public function sendMessage( $phone_number, $msg_text ) {
		/** See the code below to build this method */
		return new stdClass;
	}

	public function estimate( $phone_number, $msg_text ) {
		/** See the code below to build this method */
		return new stdClass;
	}

	public function validateResponse($response_obj) {
		/** See the code below to build this method */
		return true;
	}

	public function getLog() {
		return $this->log;
	}

}

?>
Parameters Building
The parameters form for the administrator can be built through the getAdminParameters() static method, to fill in private data required to the creation and validation of the payment, like API Key and API Secret.
The parameters of the form are returned as an array with the following structure:
[
	"param_1" : [
		"label" : "Label 1",
		"type" 	: "text",
	],
	"param_2" : [
		"label" : "Label 2",
		"type" 	: "select",
	],
]- param_1 is the key of the array and have to be unique (required).
It represents the name of the parameter to use. - label indicates the text to assign for the parameter in the administrator section (optional).
By placing a double slash (//) after the label, the next text will be displayed as a tip near the field of the parameter (like "Sender//max 11 characters"). - type is used to render the right type of input in the administrator section (required).
The assumed value can be only one of the followings: custom, select, text. - html will be used only when the type of the parameter is custom (optional).
- options is an array containing all the possible values to use in the dropdown (required only when the type is select).
public static function getAdminParameters() {
	return array(
		'apikey' => array(
			'label' => 'API Key',
			'type' => 'text'
		),

		'apisecret' => array(
			'label' => 'API Secret',
			'type' => 'text'
		),

		'sender' => array(
			'label' => 'Sender Name//max 11 characters',
			'type' => 'text'
		),

		'sandbox' => array(
			'label' => 'Sandbox',
			'type' => 'select',
			'options' => array('NO', 'YES')
		)
	);
}
The code above will generate a parameters form in the administrator section as follows.
If your form doesn't show up, then you probably have a syntax error in your file.
After filling in the Gateway parameters, they will be available in the array $params and you will be able to access these values through the code below:
$api_key = $this->params['apikey']; /* returns "TS8KJSGV20E7SG2K" */
$api_secret = $this->params['apisecret']; /* returns "ks03bsoaqsdlew83hdswlsn2ie7d2hndmwq" */
$sender_name = $this->params['sender']; /* returns "e4j.com" */
$sandbox = $this->params['sandbox']; /* returns "NO" */
Send Message
The method sendMessage($phone_number, $msg_text) of the object VikSmsApi is invoked every time an order becomes CONFIRMED, like after a payment.Through this function, you should submit via POST (probably) all the necessary variables for the authentication on the Gateway and the content of the message, including the recipient phone number. Generally, cURL is the safest method to submit variables to a remote Gateway but this depends on the requirements of the gateway you are working on.
The sendMessage function requires 2 arguments:
- $phone_number - (string) the phone number of the recipient. This value must be validated before sending the message, as it could be missing the prefix or it could contain invalid characters (like @ or /)
- $msg_text - (string) the full text to send to the customer. A lot of providers allow to send max 160 characters per message, please keep this limit in mind.
The code below is just an example of how a cURL Request could establish the connection with the SMS gateway and send the message.
public function sendMessage($phone_number, $msg_text) {
	$phone_number = $this->sanitizePhoneNumber($phone_number);

	if( $this->params['sandbox'] == "NO" ) {
		$this->params['sandbox'] = 0;
	} else {
		$this->params['sandbox'] = 1;
	}

	$request = array(
		"apikey" => $this->params['apikey'],
		"apisecret" => $this->params['apisecret'],
		"from" => $this->params['sender'],
		"to" => $phone_number,
		"msg" => $msg_text,
		"sandbox" => $this->params['sandbox']
	);

	$json = json_encode($request);

	$curl_opts = array(
                CURLOPT_POST => true,
                CURLOPT_POSTFIELDS => $json,
                CURLOPT_RETURNTRANSFER => true,
                CURLOPT_HTTPHEADER => array(
                        'Accept: application/json',
                        'Content-Type: application/json;charset=UTF-8',
                        'Content-Length: '.strlen($json)
                ),
                CURLOPT_VERBOSE => true,
        );

	$ch = curl_init('https://secure.sms.fakeprovider.com/send');
	curl_setopt_array($ch, $curl_opts);
	$response = curl_exec($ch);

	return json_decode($response);
}
Sanitize Phone Number
The sanitizePhoneNumber function used above is not a native function of the VikSmsApi class, so you would have to write this method on your own code.
This is just an example to see how a phone number could be parsed and sanitized:
protected function sanitizePhoneNumber($phone_number) {
	$str = '';
	for( $i = 0; $i < strlen($phone_number); $i++ ) {
		if( ($phone_number[$i] >= '0' && $phone_number[$i] <= '9') || $phone_number[$i] == '+' ) {
			$str .= $phone_number[$i]; // copy only numbers and plus character
		}
	}

	$default_prefix = '+1'; // US, Canada phone prefix

	if( $phone_number[0] != '+' ) {
		// $phone_number doesn't contain the phone prefix. Checking if it starts with 00 would be smart as well
		$str = $default_prefix.$str;
	}

	return $str;
}
Validate Response
The validateResponse($response_obj) method is used to validate the object returned by the gateway during the sending of the message. Some gateways return an object containing a short error message and the http status code.
{
	"httpcode" : 200,
	"errmsg" : "",
}
{
	"httpcode" : 401,
	"errmsg" : "BAD_CREDENTIALS",
}
{
	"httpcode" : 402,
	"errmsg" : "BAD_CREDIT",
}
While, sometimes, the object returned is a simple boolean value (true/false).
In this method you have to return only a boolean value (true/false) to tell the framework whether the message was sent. By returning TRUE, no errors will be raised or notified, the error will be sent via e-mail to the administrator otherwise. Please notice that the errors to be returned, must be placed in the $log attribute.
//in this example, the method requires an object as first and only argument
public function validateResponse($response_obj) {
	if( $response_obj->httpcode == 200 ) {
		return true;
	}
	$this->log .= $response_obj->errmsg;
	return false;
}
Estimate Credit
The estimate($phone_number, $msg_text) is an optional method used to retrieve the remaining credit from the back-end of the extension. It is not a mandatory method and the class could not have it. Not every provider (SMS Gateway) allows such a request.
$phone_number and $msg_text are only used as example from the gateway.
The returned value of this function must be a string that will be displayed in the back-end.
Most of the times, the structure of the estimate function is similar to the sendMessage method, it usually makes a call with some different variables to the SMS Gateway of the provider.
public function estimate($phone_number, $msg_text) {
	$fixedResponse = '----';
	$phone_number = $this->sanitizePhoneNumber($phone_number);

	$request = array(
		"apikey" => $this->params['apikey'],
		"apisecret" => $this->params['apisecret'],
		"from" => $this->params['sender'],
		"to" => $phone_number,
		"msg" => $msg_text,
	);

	$json = json_encode($request);

	$curl_opts = array(
                CURLOPT_POST => true,
                CURLOPT_POSTFIELDS => $json,
                CURLOPT_RETURNTRANSFER => true,
                CURLOPT_HTTPHEADER => array(
                        'Accept: application/json',
                        'Content-Type: application/json;charset=UTF-8',
                        'Content-Length: '.strlen($json)
                ),
                CURLOPT_VERBOSE => true,
        );

	$ch = curl_init('https://secure.sms.fakeprovider.com/estimate');
	curl_setopt_array($ch, $curl_opts);
	$response = curl_exec($ch);
	$response = json_decode($response);

	if(is_object($response)) {
		$fixedResponse = (float)$response->credit;
	}

	return $fixedResponse;
}
Custom Cron Jobs
Cron Jobs Development
This section is only for PHP experts. The documentation below shows the requirement of the Class File to extend the Cron Jobs Framework of the extension. By creating a PHP file that declares the class below, you will gain access to the whole framework and you will be able to do any sort of operation by executing queries on the database and by launching commands directly from your own PHP file.
The Jobs that can be executed by VikBooking, after scheduling them with your Cron Server Utility, must be placed in the directory below:
/administrator/components/com_vikbooking/cronjobs/
Follow the schema below to see the structure of the Class File:
Cron Jobs Schema
<?php
defined('_JEXEC') OR die('Restricted Area');

class VikCronJob {

	public $cron_id;
	public $params;
	public $debug;
	private $checktype;
	private $cron_data;
	private $flag_char;
	private $exec_flag_char;
	public $log;

	/**
	* This method defines the parameters of the job for the back-end setup
	*/
	static function getAdminParameters () {
		return array(
				'cron_lbl' => array('type' => 'custom', 'label' => '', 'html' => '<h4><i class="vboicn-mail4"></i><i class="vboicn-alarm"></i>Your Custom Cron Job</h4>'),
				'checktype' => array('type' => 'select', 'label' => 'Execution Type:', 'options' => array('checkin', 'payment', 'checkout')),
				'remindbefored' => array('type' => 'number', 'label' => 'Remind Type://Days in Advance from Check-in/Check-out', 'default' => '2', 'attributes' => array('style' => 'width: 60px !important;')),
				'subject' => array('type' => 'text', 'label' => 'Subject:', 'default' => 'eMail Subject'),
				'tpl_text' => array('type' => 'textarea', 'label' => 'Message:', 'default' => 'Dear Customer,'."\n".'This is an automated message to remind you...', 'attributes' => array('id' => 'tpl_text', 'style' => 'width: 70%; height: 80px;')),
		);
	}

	/**
	* The constructor method requires two arguments: the ID and the parameters array of the job coming from the back-end setup
	* VikBooking will do everything by itself but this method must have a similar structure to this example
	*/
	public function __construct ($cron_id, $params = array()) {
		$this->cron_id = $cron_id;
		$this->params = $params;
		$this->debug = false; //debug is set to true by the back-end manual execution to print the debug messages
		$this->checktype = $params['checktype'] == 'payment' ? 'payment' : ($params['checktype'] == 'checkout' ? 'checkout' : 'checkin');
		$this->cron_data = array();
		$this->flag_char = array();
		$this->exec_flag_char = array();
		$this->params['remindbefored'] = intval($this->params['remindbefored']);
	}

	/**
	* This method must always exist. It's the main method called by the framework
	*/
	public function run () {
		$dbo = JFactory::getDBO();
		if(!($this->params['remindbefored'] > 0)) {
			$this->log = 'Days in Advance: empty or invalid';
			return false;
		}
		//Set the cron job data in the class variable $this->cron_data
		$this->getCronData();
		//do your queries
		//.......

		//output debug messages for the manual execution from the back-end
		if($this->debug) {
			echo '<p>The job is running</p>';
			echo '<span>my command is ....</span>';
		}

		//Set logs for the Execution Logs
		$log_str = '';
		$log_str .= 'No bookings found....';
		if(!empty($log_str)) {
			$this->log = $log_str;
		}
		//you do not need to return anything, just execute what's necessary
		return true;
	}

	/**
	* This method must always exist. It's called after the cron has been executed so after the run() method
	*/
	public function afterRun ($extra = array()) {
		$dbo = JFactory::getDBO();
		$log_str = '';
		if(strlen($this->log) && count($this->cron_data) > 0) {
			$log_str = date('c')."\n".$this->log."\n----------\n".$this->cron_data['logs'];
		}
		//this variable could be populated from other class-variabled set by the run() method.
		//Useful to store information in JSON format about some Booking IDs that were notified by this execution
		$new_flag_str = '';

		//update cron record
		$q = "UPDATE `#__vikbooking_cronjobs` SET `last_exec`=".time().(!empty($log_str) ? ", `logs`=".$dbo->quote($log_str) : "").(!empty($new_flag_str) ? ", `flag_char`=".$dbo->quote($new_flag_str) : "")." WHERE `id`=".(int)$this->cron_id.";";
		$dbo->setQuery($q);
		$dbo->Query($q);
	}

	/**
	* This method is optional but this example uses it in the run() method
	* Useful to get the flag_char from previous executions
	*/
	private function getCronData() {
		$dbo = JFactory::getDBO();
		$q = "SELECT * FROM `#__vikbooking_cronjobs` WHERE `id`=".(int)$this->cron_id.";";
		$dbo->setQuery($q);
		$dbo->Query($q);
		if($dbo->getNumRows() == 1) {
			$this->cron_data = $dbo->loadAssoc();
			if(!empty($this->cron_data['flag_char'])) {
				$this->flag_char = json_decode($this->cron_data['flag_char'], true);
			}
		}
	}

	/**
	* Build here any other needed method. You have full access to the whole framework
	*/

}

?>
Customization Tips
Please visit the Knowledge Base Section to find some useful tips for the most common customizations (CSS, Language Definitions, HTML Structure).
