Your cart is empty!
Restaurant
The Restaurant section of VikRestaurants contains the Rooms, the Tables, the Tables Maps, the Menus, the Products and the Reservations.
All the features contained in this section are used to build and manage the reservation system of your restaurant.
Rooms
Here it is possible to manage all the rooms/areas that a restaurant might have. Even if you want to disable the choice of the rooms during the booking process, you still have to create at least one room.
It is possible to sort the rooms by dragging them from the handle.
Any rooms translations can be made by clicking the flag of a record, under the Languages column.
The list lets you search the rooms by name. In addition, it is possible to filter the rooms with the following fields.
- Active - filter the rooms by status (currently active or closed).
Here's a list of supported parameters.
- Name - the name of the room (translatable).
- Description - the extended HTML description displayed within the search page, during the booking process (translatable).
- Published - this option must be enabled if you want to receive reservations for the tables assigned to this room.
- Image - the rooms can have a background image. The image will be displayed only whether the program allows the customers to choose a table. Otherwise, it will be displayed only within the tables map page in the back-end.
Rooms Closures
The Rooms Closures are used to automatically unpublish some rooms on certain periods of the year. In example the "Garden" area could be closed from 21st September to 21st March.
The rooms can be also closed on a single day for some hours only. This function is usually used to block reservations on certain rooms when they are almost full.
The closures can be managed by clicking the Manage Closures buttons from the Restaurant > Rooms page.
It is possible to filter the closures with the following fields.
- Room - filter the closures by room.
- Date - take only the closures with a period that intersects the selected date.
Here's a list of supported parameters.
- Room - the room to close.
- Closed From - the starting date-time to close the room. Specify date, hours and minutes.
- Closed To - the ending date-time to close the room. Specify date, hours and minutes.
Tables
This page lets you create the tables of your restaurant in a non-graphic way. You can create tables only whether exists at least one room. Even if you want to disable the possibility to choose tables during the booking process, you have to create all the tables of your restaurant in order to build a correct availability system.
The tables created from this page will be placed on the map following a grid layout.
The list lets you search the tables by name. In addition, it is possible to filter the tables with the following fields.
- Room - take only the tables that belong to the selected room.
- Status - filter the tables by status (published or unpublished).
Here's a list of supported parameters.
- Name - the name of the table.
- Minimum Capacity - the minimum number of people that this table can host.
- Maximum Capacity - the maximum number of people that this table can host.
- Can be Shared - multiple reservations will be accepted for this table at the same date and time. If this option is enabled, the table will be available for a number of people smaller than the Maximum Capacity minus the current number of people.
- Published - enable this option whether the table can be booked from the front-end. Even if this option is disabled, the table is still bookable from the back-end.
- Room - the room/area to which this table belongs. This option cannot be empty.
- Cluster - a list of tables to which this table can be merged, in order to form a larger table.
Clusters
The tables that belong to a cluster gives you the possibility to receive reservations that couldn't be taken by any single table. The minimum capacity of the cluster is represented by the sum of the minimum capacity of the 2 smallest tables. The maximum capacity is represented by the sum of all the tables that belong to the cluster instead.
In example, if we have a cluster built with the following tables:
- t1 - min = 2, max = 4;
- t2 - min = 2, max = 4;
- t3 - min = 4, max = 8;
The resulting minimum capacity will be equals to 4 (2+2) and the maximum capacity will be equals to 16 (4+4+8). Obviously, even if the tables are used to form a cluster, they are still available for being booked singularly.
The cluster mentioned in the previous example will be able to host all the following groups (not simultaneously):
- 2-3 people (t1 or t2);
- 4 people (t1, t2 or t3);
- 5-6-7-8 people (t3 or t1 + t2);
- 9-10-11-12 people (t3 + t1 or t3 + t2);
- 13-14-15-16 people (t1 + t2 + t3);
The system always tries to find the most optimal combination that can handle the required number of people. Among a cluster with a waste of 2 seats (10 seats of 12) and a cluster with a waste of 4 seats (10 seats of 14), the first one will be taken. In case of a tie in terms of wasted seats, the method will take the cluster with the lowest number of used resources (tables). Among a cluster that uses 3 tables to reach a capacity of 12 seats and a cluster with 2 tables to reach the same capacity, the second one will be taken.
Tables Maps
The Tables Maps page can be used to design the layout of the rooms and of the tables and to have a graphic overview of the reservations.
It is possible to edit the design of a room by clicking the EDIT button from the Joomla toolbar. Obviously, only the selected room will be edited. For further details about the management of the layout, please refer to our dedicated documentation:
https://extensionsforjoomla.com/documentation/vik-restaurants-tables-map
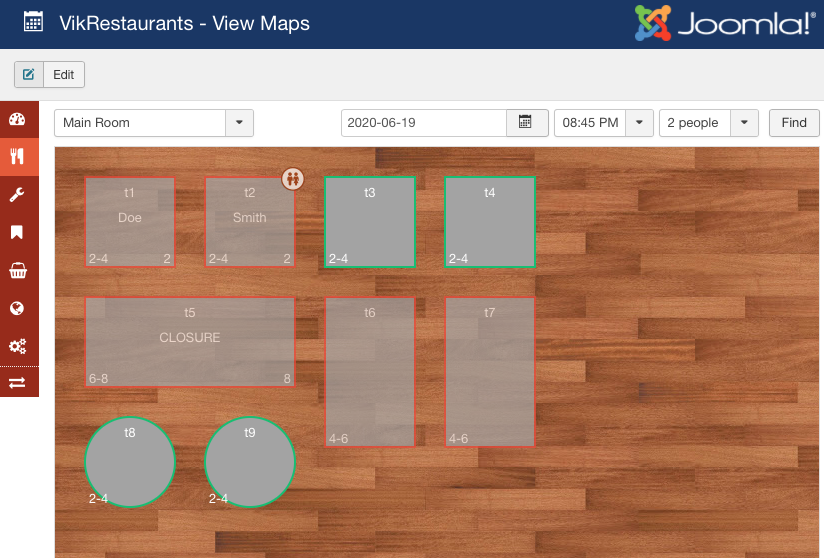
Availability Overview
This page gives you an availability overview only for one room per time. It is possible to switch room from the apposite dropdown on the top-left corner. The selected room will be kept within the user state for the whole session long. This means that, even if you leave the page, the last selected room will be auto-selected again.
The search bar on the top-right corner can be used to check the availability overview of a specific moment. By default the system will use the current date and time. The people dropdown can be used to check what are the tables available for being reserved for the selected date and time.
Any tables with a green border mean that they are compatible with the searched arguments. Empty tables with red borders mean exactly the opposite. Red tables with a text inside mean that they are already reserved for the selected date and time.
The dashboard auto-refresh its contents after 30 seconds of inactivity.
Reservations Management
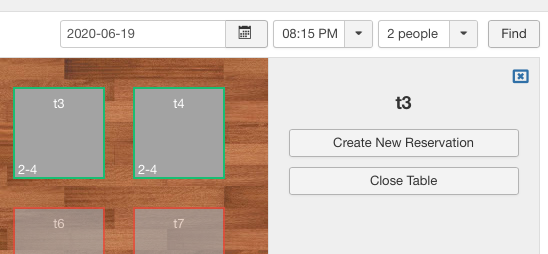
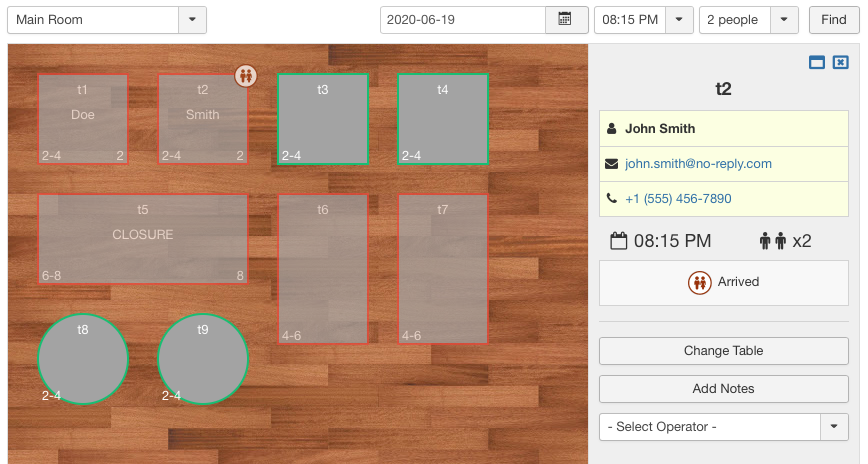
Any interactions with the map might trigger a specific event for the management of the reservations.
When clicking a table without any assigned reservation, an inspector will be shown on the right-side, which lets you creating a new reservation or a closure. In both the cases, a new record will be created according to the selected date, time, number of people and table.
The button can be used to close the inspector.
When clicking a table that is no more available, the same inspector will report a short summary of the assigned reservation. In case of shared tables with multiple reservations assigned at the same date and time, the inspector will report a list of reservations.
The button can be used to open a modal box containing all the details of the reservation. It is possible to click the EDIT button placed within the footer of the modal to start editing the details of the reservation.
Here's a list of details reported within the inspector.
CUSTOMER
The name of the customer, its e-mail address (if specified) and an optional phone number. Both the e-mail and phone number fields can be clicked to respectively send an e-mail or start a call (only for devices that support it).
CHECK-IN
The check-in time and the number of participants. In case the customers of the reservation are currently at the restaurant for being served, the inspector will show also the remaining time to the expiration. This is time is based on the Average Stay Time setting. When editing a reservation it is possible to increase its Stay Time.
STATUS CODE
Below the check-in details is located a box represented the current status code of the reservation. By clicking that box it is possible to select a new status code. The textarea at the bottom of the list can be used to include some custom notes.
CHANGE TABLE
The Change Table button can be used to quickly assign a reservation to a different table. After clicking that button it is possible to select a different free table to change the assignment. The action can be cancelled by pressing ESC from the keyboard.
NOTES
The Add Notes button can be used to include some notes about the reservation. After typing some notes, the previous button will change its text into Save Notes, which have to be clicked to register the typed text.
OPERATOR
This dropdown can be used to assign the reservation to a specific operator. This is really helpful for the Operators Area in the front-end. After assigning a reservation to an operator, any other operators won't be able to see that reservation anymore (except for "master" operators). Refer to the operators configuration for further details.
Products
The available meals/dishes on your restaurant. The created products can be used to build the menus of your restaurant.
These products can be also added to the bill of the restaurant reservations.
It is possible to sort the products by dragging them from the handle.
Any products translations can be made by clicking the flag of a record, under the Languages column.
The list lets you search the products by name. In addition, it is possible to filter the products with the following fields.
- Status - filter the products by status (published, unpublished or hidden).
- Tag - retrieve all the products assigned to the specified tag.
- Menu - retrieve all the products that belong to the specified menu.
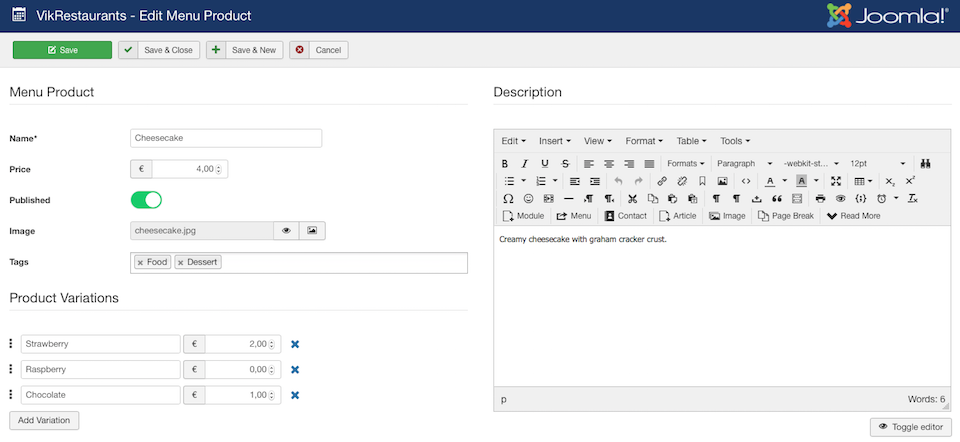
Here's a list of supported parameters.
- Name - the name of the meal (translatable).
- Description - an optional HTML description of the meal (translatable).
- Price - the base price of the meal.
- Published - enable this option in case the product should be visible by the customers in the front-end.
- Image - an optional image of the meal.
- Add Variation - click this button to add a new variation of the meal. It is required to fill the variation name and its cost. The variation cost is always summed (or subtracted in case of negative amounts) to the base cost of the product.
Hidden Products
The system supports also the hidden products, which can be used to create temporary (or custom) items, such as service costs or daily dishes.
These products cannot be assigned to any menus. Their aim is to be simply added within the bill of the reservations.
It is possible to create new hidden products by selecting the "Hidden" option first from the Status filter. Then, after clicking the NEW button, the system will display the form used to create hidden products.
Tags
The tags can be used to group the products under one or more sub-categories. In example, a "Cheesecake" dish could be assigned to the Food and Dessert tags.
In addition to improve the search of the products, the tags can be used to limit the visibility of the dishes that certain operators can see within the Kitchen page (Operators Area). Refer to the operators configuration for further details.
It is possible to create or edit a tag from by clicking the Manage Tags button, located on the top-right side of the Restaurant > Products page.

Menus
All the menus created here could be seen by the customers in the front-end.
It is possible to sort the menus by dragging them from the handle.
Any menus (and sections) translations can be made by clicking the flag of a record, under the Languages column.
You can insert the meals in a menu only if you have already created some products first.
The list lets you search the menus by name. In addition, it is possible to filter the menus with the following fields.
- Status - filter the menus by status (published or unpublished).
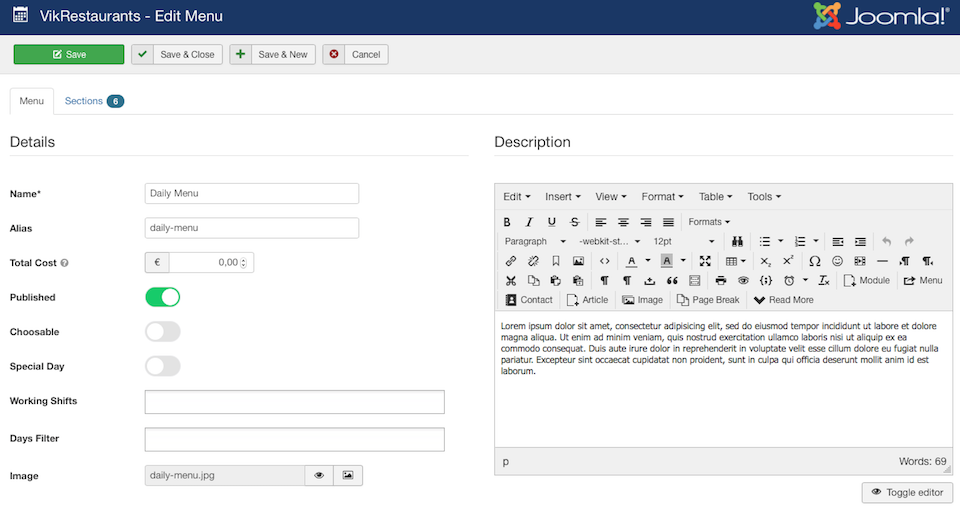
Here's a list of supported parameters.
- Name - the name of the menu (translatable).
- Alias - an alias of the menu to be used within SEF URLs (translatable). Leave empty to let the system generates an alias based on the selected name. Both Search Engine Friendly URLs and Use URL Rewriting Joomla settings must be turned on.
- Description - an optional HTML description of the menu (translatable).
- Total Cost - In case the menu can be selected during the booking process, the total cost specified here will be added to the bill of the reservation, multiplied by the total number of participants that chosen it.
- Published - enable this option if you want to make this menu accessible from the front-end.
- Choosable - enable this option if you want to allow the customers to pre-select this menu during the booking process.
- Special Day - enable this option in case this menu is visible only for certain special days. In this case it won't be possible to assign any working shift(s) or day(s), because they can be configured by the parameters of the related Special Days.
- Working Shift(s) - select here all the working shifts for which the menu should be available (only if the Opening Time Mode setting is set to Shifted). Leave empty to make the menu available for any working shift.
- Day(s) Filter - select here all the days of the week for which the menu should be available. Leave empty to make the menu available for any days.
- Image - an optional image of the menu. If you don't specify an image, a default image will be always used.
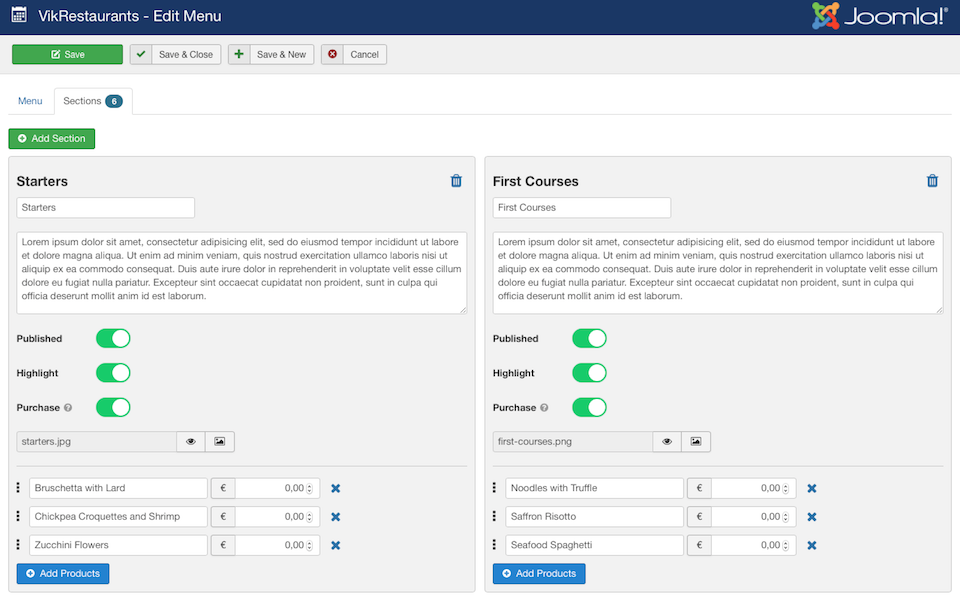
Sections
The sections are used as subcategories of the menus. Before to insert any product, you have to create at least one section. It is possible to manage the sections of a menu by clicking the apposite button from the navigation bar. The number within the Sections button indicates the total number of sections that are currently assigned to this menu.
- Name - the name of the section (translatable).
- Description - an optional HTML description of the section (translatable).
- Published - enable this option if you want to show the section (and all the related products) in the front-end.
- Highlight - enable this option if you want to insert a "quick link" to this section within the menu breadcrumb.
- Purchase - in case the dishes of the restaurant can be sold online, turn on this value if you wish to allow the customers to purchase the products assigned to this section. Even if a section is unpublished, customers will still be able to see the section for the purchase.
- Image - an optional image of the section.
It is possible to delete the sections by clicking the button. In order to permanently delete a section, it is also mandatory to press the SAVE button.
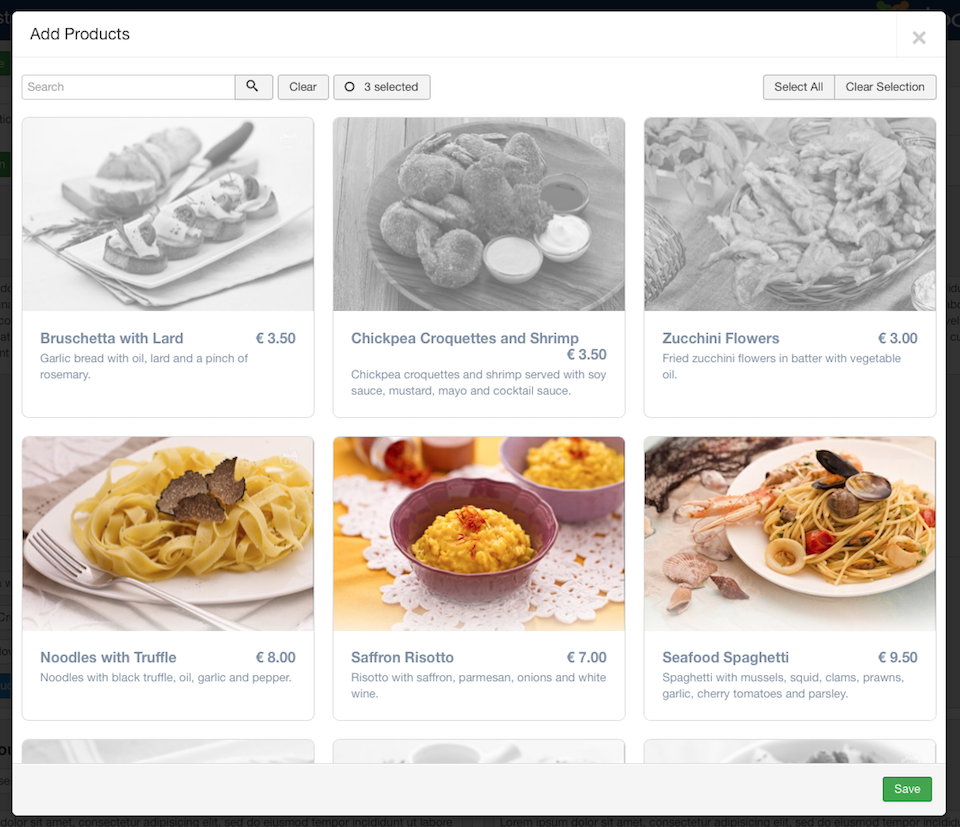
Add Products
By clicking the Add Products button it is possible to assign one ore more dishes to the related section. After clicking that button a modal box will be opened. The modal displays a grid containing all the existing products. Products with grey tones mean that they are not currently assigned to this section.
It is possible to select/deselect a product by clicking it.
The search bar can be used to filter the products by name or description. The button that indicates the total number of selected products can be used to toggle all the dishes that haven't been selected yet. In summary, only the selected products will be shown.
It is mandatory to press the SAVE button located within the footer of the modal in order to commit the selected products.
After saving the changes, a list containing the selected products will be shown within the section block. The price field next to the product name is the charge of the dish. If you want to use a different price for the same product in different menus, you can specify here a negative/positive charge to apply to the base cost of the product. In example, Seafood Spaghetti may have a base cost of 6.50 €. You can add this product to the lunch menu without charge and then you can add the same product to the dinner menu with a 3.50 € additional charge, so that for dinner it will cost 10.00 €.
It is possible to change the ordering of the products by dragging the handle.
It is possible to detach the products from the section by clicking the button. In order to permanently detach a product, it is also mandatory to press the SAVE button.
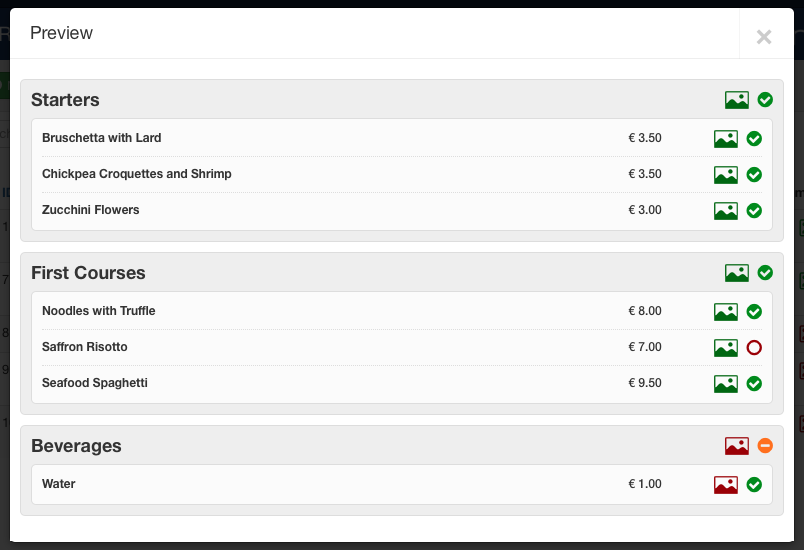
Preview
In case the menu details page in the front-end seems to be a bit strange, make sure the sections and the products of the menu have been published correctly.
You can check the status of a menu by clicking the button under the Preview column, from the Restaurant > Menus page in the back-end. This button will open a modal box containing the status (published or not) of each section and product assigned to this menu.

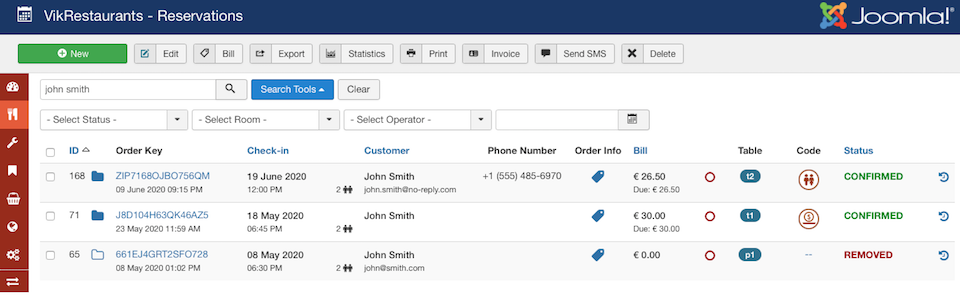
Reservations
When customers book a table from the front-end the system creates a new reservation record. Here it is possible to apply any changes related to the details of the reservation, such as the information of the customers or the check-in date. The reservations are mandatory in order to keep the availability of the tables up-to-date. Any reservations received through a different channel (such as via telephone or e-mail) MUST be registered here.
Deleting a reservation will immediately unlock the availability of the assigned table(s).
The list lets you search the reservations by customer name, e-mail, phone number, coupon code, order key and order number (by prepending id: before the number).
In addition, it is possible to filter the reservations with the following fields.
- Status - filter the reservations by status (confirmed, pending, removed, cancelled or closure).
- Room - retrieve only the reservations assigned to tables that belong to the selected room.
- Operator - retrieve only the reservations assigned to the selected operator.
- Date - filter the reservations by check-in date.
- Shift - filter the reservations by check-in time (only after selecting a check-in date).
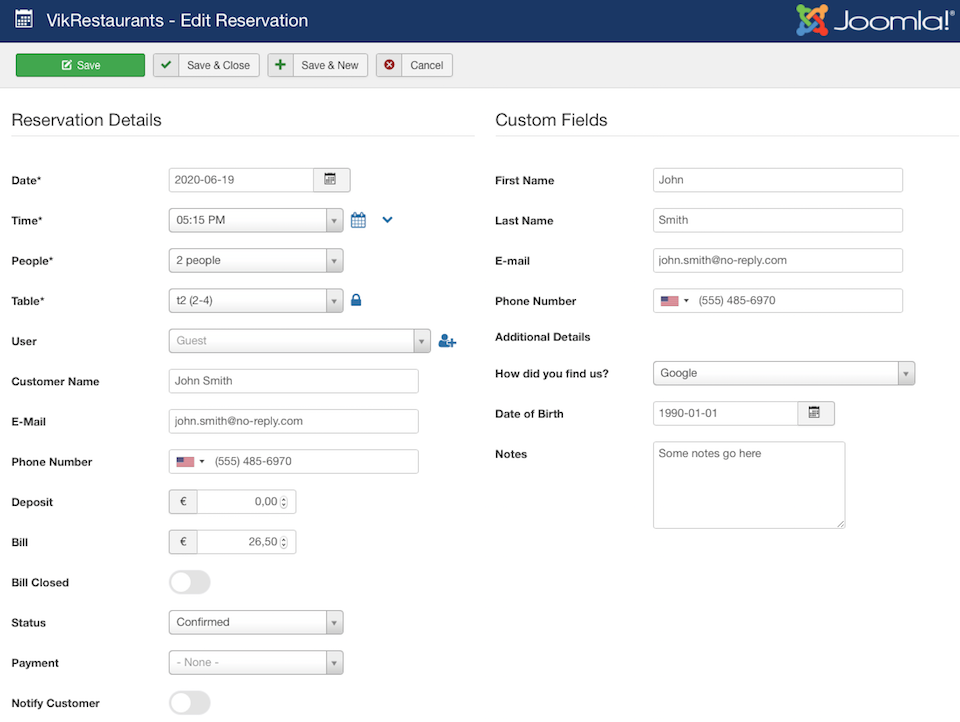
Here's a list of supported parameters.
- Date - the check-in day of the reservation. After the selection of the date, the system will automatically re-calculate the available times.
- Time - the check-in time of the reservation. Click the icon next to this option to check all the closest reservations. Click the icon to increase/decrease the time of stay for this reservation. By default the time of stay is given by the apposite setting in the configuration.
- People - the number of participants.
- Table - the table of the reservation. Depending on the selected search parameters, the system will disable all the tables that are not available (you will find a short description next to the table name). It is possible to press the icon to temporarily re-enable all the tables that were considered as not available, so that you can force a table to host a reservation.
- User - if the user of the reservation is a registered customer of VikRestaurants, it will be used to auto-fill in its details. Click the icon to quickly create a new customer without leaving the page.
- Customer Name - insert here the purchaser nominative. This nominative is used to display the name of the customer within the reservations list.
- E-mail - insert here the purchaser e-mail. This e-mail is used to send notification e-mails to the customer. If you have another e-mail text field in the custom fields, it doesn't matter as the addresses don't have to be the same.
- Phone number - insert here the purchaser phone number. This field is used to send SMS notifications to the customer. If you have another phone number text field in the custom fields, it doesn't matter as the phone numbers don't have to be the same.
- Deposit - the deposit amount already left by the customer.
- Bill - the amount of the bill of the reservation.
- Bill Closed - flag this option when the purchaser pays the bill.
- Status - the status of the reservation (for new reservations the CONFIRMED status should be used by default). Every time the status changes, the administrator(s), the operator(s) and the customer will be automatically notified via e-mail (only from the front-end). In case you are changing the status from the back-end you have to turn on the Notify Customer option in order to send a notification e-mail to the related customer.
There are 4 different possible statuses:
CONFIRMED - the reservation has been approved. The status CONFIRMED is set every time the customers complete a payment successfully or when the deposit to leave is equals to 0.00 and the default status is CONFIRMED (configuration setting).
PENDING - the reservation is stored in the database and the customer has to pay the deposit to reserve the table or has to wait for a manual approval. A reservation remains PENDING only for a limited period (that interval is given by the Keep Tables Locked for setting in the configuration).
REMOVED - a reservation becomes REMOVED when the customer didn't pay the order within the maximum established time (see Keep Tables Locked for setting).
CANCELLED - a reservation becomes CANCELLED when the customer cancels it from the Order page in the front-end. It is possible to disable the order cancellation from the configuration. When a customer cancels its order, it won't be refunded automatically from the system. - Payment - choose the payment to use for this reservation. From this dropdown it is possible to select also the unpublished payments.
- Notify Customer - if you enable this option, when you save the reservation, VikRestaurants will automatically send an e-mail notification to the customer.
- Other Fields - there are also the custom fields (for the restaurant), that you have created (or the default ones) and a textarea for type some extra notes that only the administrator can see. The required option of the custom fields in this page is ignored.
In case of Choosable menus, the page will report also a fieldset from which it will be possible to see all the menus that have been selected during the booking process.
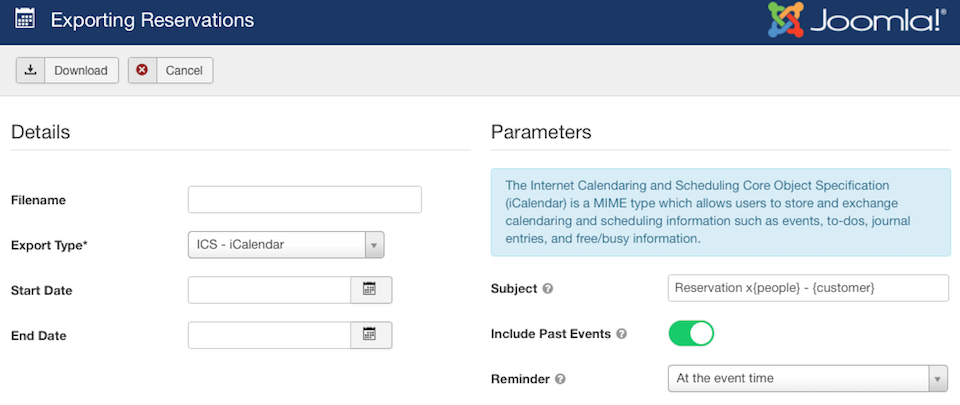
Export
The reservations can be exported by clicking the Export button from the Joomla toolbar. By default there are 2 different ways to export the reservations: ICS, CSV and Excel. The reservations to export can be filtered by date (check-in) and by ID.
Leave the date filters empty to load all the existing reservations.
In order to filter the reservations by ID, flag the reservations you need to export from the list and then click the Export button.
ICS - iCalendar
The reservations will be exported in a file following the standard structure of the iCalendar format. The exported file can be used to import the events (reservations) within an external calendar handler. The exported file is compatible with all the most important calendar handlers, such as Apple iCal, Google Calendar, Outlook Calendar and so on.
From the configuration of the program it is possible to configure an automated ICS exportation in order to have all your calendars always up-to-date.
Here's a list of supported parameters:
- Subject - an optional title to be used for the events. The following placeholders will be replaced by the respective reservation detail: {people}, {customer}. If not specified, the default subject will be used ("Reservation for %d people").
- Include Past Events - enable this option if you wish to keep all the existing reservations within the calendar. When disabled, reservations older than the current month won't be included.
- Reminder - if specified, the calendar will trigger a reminder/alert when the date time of the event is close to the current time.
CSV
The reservations will be exported in a file following the standard structure of the comma-separated values format.
The exported file is compatible with all the most important spreadsheet applications (Open Office, Excel and so on).
Here's a list of supported parameters:
- Confirmed Status - enable this option to include only the reservations with CONFIRMED status.
- Use Items - used to include the ordered dishes within a separated column of the spreadsheet.
- Delimiter - the character that will be used to delimit the values of the table (a comma or a semicolon).
- Delimiter - the character that will be used to wrap the values of the table (a single quote or a double quote).
Microsoft Excel
Exports the rows in a (non-standard) CSV format compatible with Microsoft Excel.
Here's a list of supported parameters:
- Confirmed Status - enable this option to include only the reservations with CONFIRMED status.
- Use Items - used to include the ordered dishes within a separated column of the spreadsheet.
Bill Management
The Bill button within the Joomla toolbar can be used to manage the bill details of the selected reservation.
Here it is possible to assign any products to the selected reservation, in order to automatically calculate the total cost of the bill.
In order to add an existing product to the bill of the reservation, it is needed to click the ADD button with the box of the desired food. A sidebar with the details of the food to add will be opened. Here it is possible to define the quantity of the food, the cost per unit and some optional notes. Every time you add something within the bill, the cart on the right side is automatically refreshed as well as the total cost of the bill.
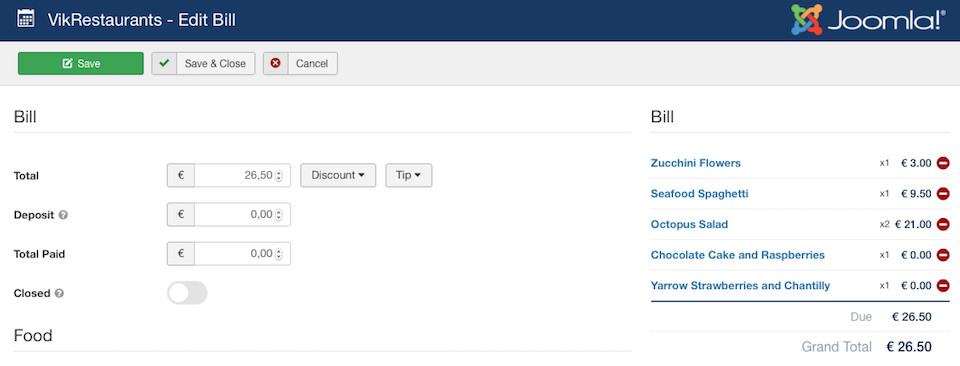
Above the list of available products, there is a button that can be used to quickly create any hidden products (such as service costs or daily dishes). Every time you create a hidden product, it will become immediately available within the products list.

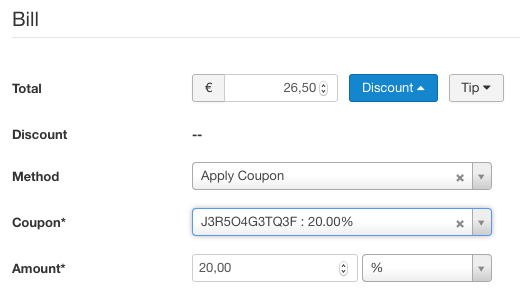
This page can be used also to redeem discounts and coupons or to completely remove them.
To redeem an existing coupon, you have to click the Discount button, select the Apply Coupon method, choose the coupon code from the list and save the details. It is possible to manually override the discount of the coupon code by changing the Amount parameter.
By selecting the Apply Discount method, you will be able to define a custom discount for this reservation but none coupon code will be assigned.
If a reservation already owns a discount or a coupon, there will be available also other 2 methods: Remove Discount and Remove Coupon.
Almost the same methods can be used to apply, change or remove any tips left by the customers.
Print Reservations
It is possible to print one or more reservations by clicking the Print button from the Joomla toolbar. The page to print will display the main details of the reservations and the details of the bill, if any.
It is required to check one or more reservations from the list before to print the details. By printing more than one reservation simultaneously, the details will be separated by a dashed line.
After clicking the Print button, the system will ask you to fill a few options before displaying the template to print.
- Header Text - a HTML description to display above the reservation details (on the top of the page).
- Footer Text - a HTML description to display below the reservation details (on the bottom of the page).
- Update Changes - check this option to maintain the changes for future printings. If you leave this option unchecked, the specified texts will be used only temporarily.
SMS Notifications
The Send SMS button in the Joomla toolbar is available only whether the SMS APIs have been configured from the configuration of the program.
This button is used to send SMS notifications to the customers with the details of their reservations. The content of the message can be created/changed from the configuration of the program.
In order to properly send a SMS you have to select at least a reservation and press the Send SMS button. The system will try to send a SMS to the phone number of each selected reservation. Then, you will see a response about the status of the messages (success or failure).
Invoices
It is possible to generate the invoices of the reservations by clicking the Invoice button in the Joomla toolbar. It is possible to generate multiple invoices by checking more than one reservation from the list. The system will generate the invoice only for the CONFIRMED reservations.
Before to generate the invoices, the system will ask you if you need to send them automatically via e-mail to the address of the customers.
The generated invoices can be seen from the apposite Booking > Invoices page, from which it is also possible to issue the invoices monthly.
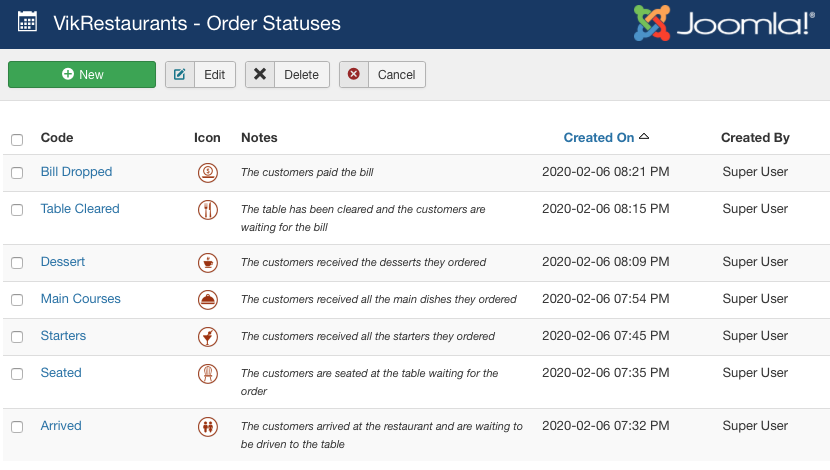
Order Statuses
From the Restaurant > Reservations page it is possible to select a certain status code by clicking the icon/text under the Code column.
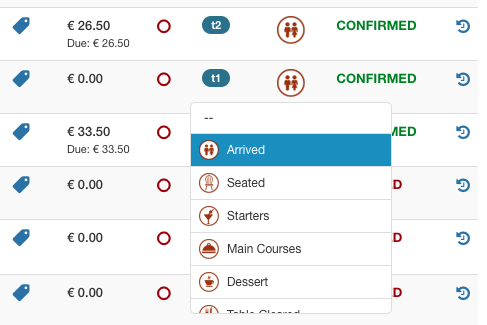
Every time you change code to a certain reservation, the system will update automatically its codes history (also called Order Statuses).
You can see the Order Statuses of a certain reservation by clicking the icon from the same Reservations page. While, the empty icon means the reservation doesn't own any code yet.