Design Sections
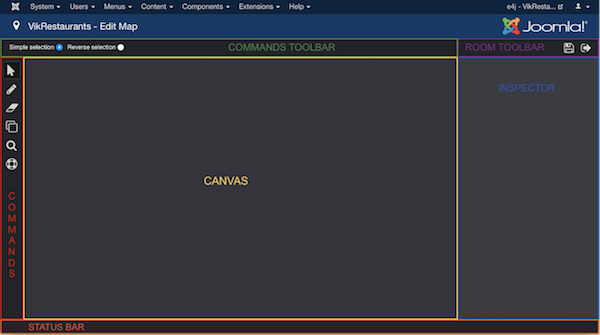
The maps management is built using different panels with different roles, all of them placed using the border layout pattern (from top-left to bottom-right: NORTH, WEST, CENTER, EAST, SOUTH).
The north panel includes the Toolbar. The west panel includes the Commands. The center panel includes the Canvas. The east panel includes the Inspector. The south panel includes the Status Bar.

Commands
The Commands panel contains a list of buttons that can be used to design the map. By hovering the mouse on each button, you will read what they do and what is the shortcut that can be used to trigger them.
Toolbar
The Toolbar panel is divided in 2 parts: left side and right side.
The left side displays the parameters (if any) related to the current selected command. For example, while drawing a new table, you will be able to select the shape to use.
The right side contains a few buttons for the room management. Here you can find the button to save the whole project and the button to exit.
Canvas
Within the Canvas you can draw the tables of the room. This is the main design area.
Almost all the commands take effect while clicking the canvas.
Inspector
The Inspector contains the attributes settings for the canvas elements that have been selected. For example, after clicking the canvas, the Inspector will show all the settings to change the canvas layout, such as the size, the background, the grid settings and so on.
Status Bar
The Status Bar reports a short description about the last action made. For example, after selecting one or more table, the Status Bar will display a text similar to "2 tables selected". Instead, after saving the map, it will write "Saved".