Your cart is empty!
Vik Rent Car Official Documentation

Version: 1.15.6
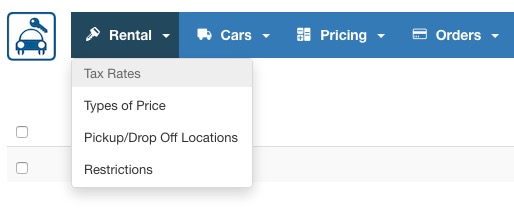
Rental
Tax Rates
From this task you can manage the tax rates that will be applied to the order total.
By clicking on New you can create a new Tax Rate.
A name and a percentage value are the only things that you have to fill in.
Types of Price

From this task you can manage the Prices for the vehicles.
Each Price has a name, an optional attribute and an optional tax rate.
An Attribute is a characteristic of the Price that can be used when inserting the fares and it can change daily.
Example:
Price Name: Standard Insurance
Price Attribute: Miles Included
Tax Rate: (select the tax rate that should affect this price)
Then click on Save for creating the Price. It's always possible to edit the Price by clicking on the checkbox next to it and then on the Edit button from the toolbar.
In the example above, the page Fares Table will ask to specify a rental cost for each car for the type of price called "Standard Insurance", and to enter a value for each day of rent for the attribute "Miles Included", like 100 per day. If you don't need to set additional information for the attributes, then you can just leave it empty and enter only the name for your type of price.
If you would like to set different rental costs for each car, like to offer the possibility of choosing between various types of insurance, or different cancellation policies, then you should create one Type of Price for each price-choice you would like to offer. A common setup of the Types of Price is to offer two types of insurance (price), one for a "basic insurance" and another for a more "flexible insurance" (Damage/Collision Waiver etc..).
Pickup/Drop Off Locations
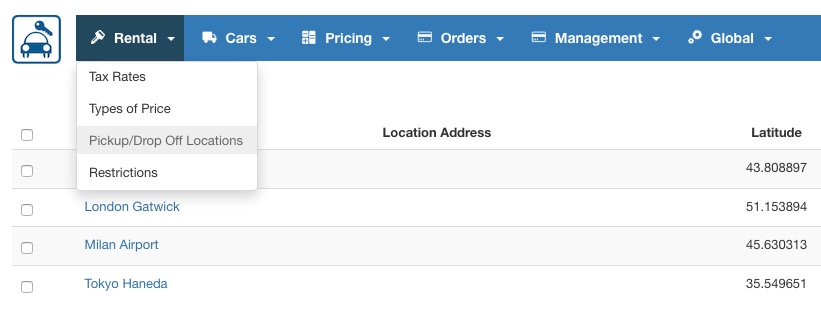
From this task you can manage all the locations for Pickup and Drop Off where your offices are located.
To create a new location click on the new button from the toolbar and fill in the details of the location.
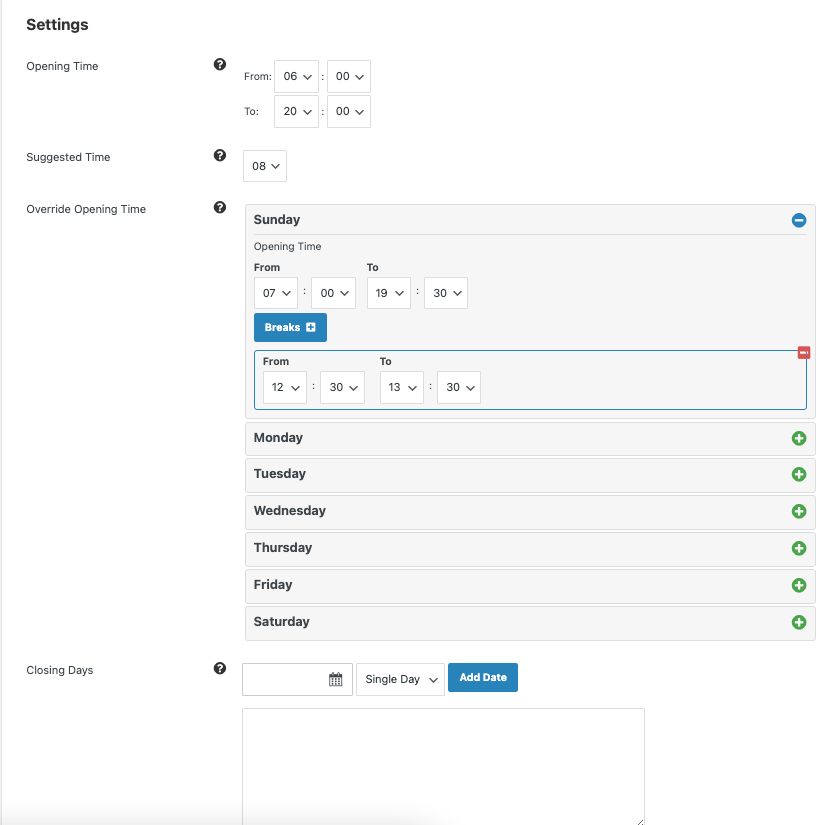
You will be asked for an optional latitude and longitude, these values will be used by the location map in the front site to place a marker on the google map. You can also set an Opening Time for this location that can be different from the other locations or from the global Store Opening Time.
Additionally, it is also possible to define a Suggested Time, as well as to override the Opening Time on some days of the week. If your location is open 24 hours, for example, but you would like the drop down menu to pre-select 9AM, then you should set 9AM as "suggested time". With the Override Opening Time function you can set a different opening time for a specific days of the week, for example, on Sunday rather than being opened 24 hours, you could define the actual opening time for pick up and drop off.
Each location can also have some Closing Days. The closing days can be single dates of the year, or some specific week days, like "every Sunday".
Time Breaks: Within the function "Override Opening Time" you can add time breaks each weekday at the Location level.
Each location can also have some Closing Days. The closing days can be single dates of the year, or some specific week days, like "every Sunday".
Notice: You will need to sign up to Google Maps and recieve your own API key to insert in the back-end for this function to work properly. This will solve any possible "Oops! Something went wrong" problems.
Restrictions
The Booking Restrictions are rules that can be set up to define some limits for the orders on some dates of the year. For example, to force a minimum number of days of rent on some dates of the year, you can create a Restriction. The same thing works if only for some dates you want to set a maximum number of days of rental.
The Restrictions were built by following the OpenTravel standards, and so some terms may sound similar to the hotel industry, because that's actually where they come from. For example, terms like "CTA" and "CTD" stand respectively for "Closed to Arrival" and "Closed to Departure". You should enable these parameters in your Restrictions if you would like to disable pick up (arrival) and/or drop off (departure) on some week days in your restriction dates.
Thanks to the Restrictions you could also force the pick up on a specific combination of week days, or define a minimum length for the rental with a multiplier, like 7 days, 14, 21 etc..
Please notice that only one restriction can be applied on some specific dates, and a Restriction that sets just a 1 day as minimum rental period is NOT considered as a valid restriction according to the OpenTravel standards. That's because 1 day is already supposed to be the minimum duration of the rental.
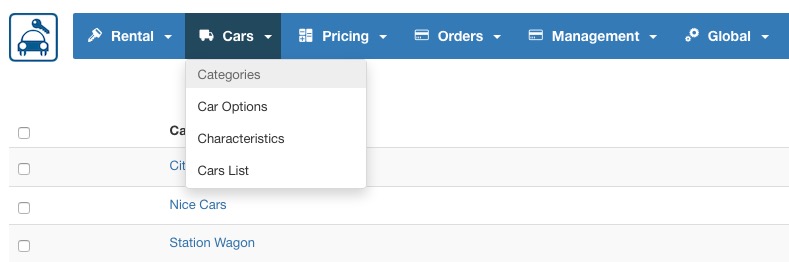
Cars
Categories
From this task you can manage the categories to which cars belong. Categories are useful when the users are searching for cars because they can filter the results by selecting the category from the search form.
You will only be asked for the category name and for an optional description that will be shown in the view type Cars List filtered by a category.
Options
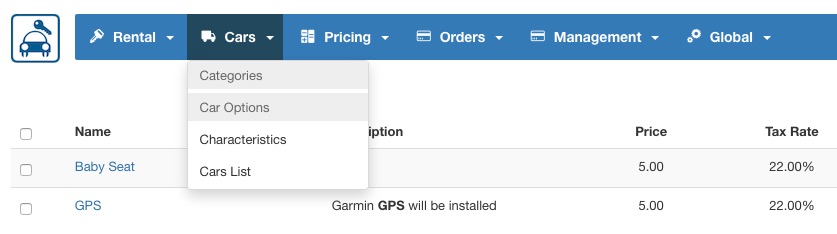
From this task you can manage the options that the users may want to add to their rental orders. Options can be anything, a GPS, a baby seat, an insurance etc.
Options have a Name, an optional description, a cost, an optional tax rate, an optional image and three parameters:
daily cost: the price will be multiplied for the days of rental;
selectable quantity: if this parameter is on the user will be asked for the units desired, otherwise a checkbox will be displayed;
maximum cost: in case the option price is multiplied by the days of rental or the units, it is possible to set a maximum cost that the option can reach.
You can also force the option to be always selected, this could be useful in case you need to make the user pay for some service and list this service in the order summary as a separated cost from the rental fare.
Characteristics
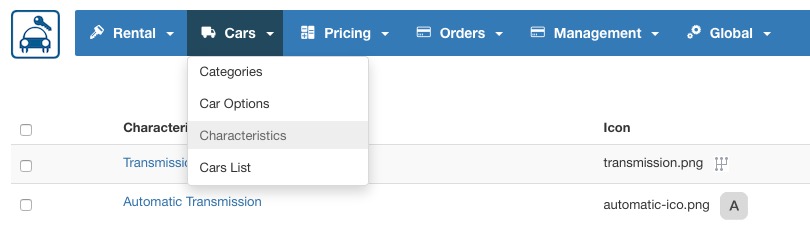
From this task you can manage the characteristics of the vehicles. Characteristics have a name, an optional icon and a text to be displayed in the front site.
If the configuration setting for using the Characteristics as search filter is enabled, users will be able to tick or untick certain Characteristics to filter the search results. This is supported only in page displayed after making a search.
The Characteristics must be assigned to each vehicle from their Edit page or they won't be visible on the Views "Cars List", "Car Details", "Search Results", "Result Pricing".
Cars List

At this point, you are supposed to have created the locations, the prices, the options and the categories.
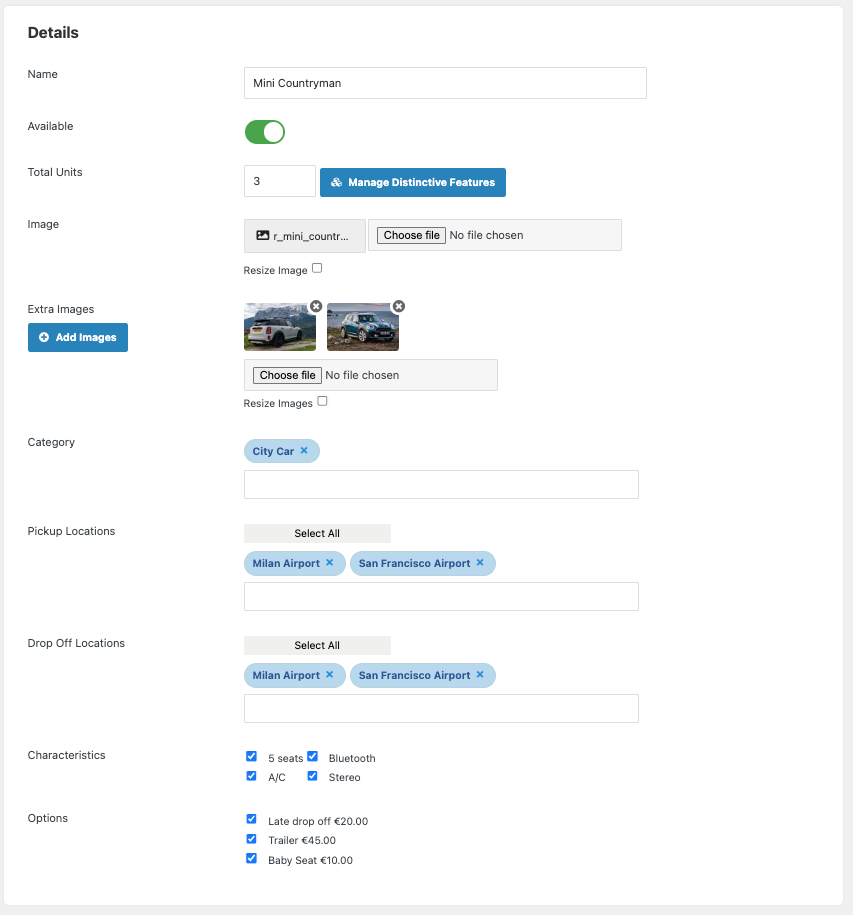
By clicking on New, you can create a car. You will be asked to provide some information:
the name, the main image, optionally more images to create an image gallery, the category to which the car belongs, optionally a description test.
The locations where pickup is available and the locations where the drop off is available:These values can be multiple, click on the location desired when holding the ctrl button. It is also possible to assign some of the characteristics to the vehicle by clicking on the checkbox next to them. The same thing works for the options, this way you can only assign some of the characteristics and options created before, not all of them.
Another important feature of the vehicle is the units field. This value will be considered when the system is checking the availability of the cars depending on the orders received.
After clicking on Save, you will be redirected to the fares-creation page.
In this task you can create the fares for each existing type of price. In order to insert the fares, you have to put the number of days/hours and the daily cost for each type of price.
Example:
You have two types of price: standard insurance and full insurance. By putting from 1 to 10 days, €50 per day for the standard insurance and €60 per day for the full insurance, the system will automatically multiply the prices by the days obtaining €500 for 10 days of rental- standard insurance, €600 for 10 days of rental-full insurance.
Refer to the Fares section to find out more about the pricing system.
It is also possible to add import remote iCal calendars containing reservations to sync the availability for the vehicle.
Pricing and rental fares
Fares Table
This is the pricing table of each vehicle. Rates are expressed by duration of rental in Days, Hours or Extra Hours.
Here you are supposed to specify your base rental costs for each car, and to define a rental cost for each Type of Price previously configured. You will be able to modify the base rental costs on some seasons, holidays, weekends and dates of the year by creating some Special Prices.
Please notice that cars with no rental costs defined in the page Fares Table will not be available for booking. Also, even if you are working with hourly rentals only, the cost for 1 day of rent should always be defined, unless you work with daily rentals always greater than 1 day. In fact, if no rates are defined for the duration of the rental requested, then the cars will not be available in the search results.
Daily Fares
The system will always require to have the cost for 1 day of rental if you are willing to offer hourly rentals as well. For adding your daily costs, use the form displayed at the top of the page and make sure the vehicle selected in the drop down is the right one.
You will be able to specify a cost for each Type of Price and it is possible to add a rate for a specific type of price only for a certain duration. For example, it is possible to add a cost for the "Full Insurance" rate plan only from 3 days of rental or more by not setting any cost for that Type of Price for 1 or 2 days.
Rates can be added by using the form like this:
- From 1 - to 3 Days: EUR 50 per day.
This will populate the rates up to 3 days of rental and 3 days will cost EUR 150. With the current configuration, 4 days of rental would not be allowed for this vehicle because there are no rates defined.
Rates can be modified by using the input fields displayed in the grid below the creation form and then by clicking on the Update Fares button on the top-right of the grid. Rates can be removed day by day by selecting some with the checkboxes and by clicking on the toolbar button Remove Fares.
Hourly Fares
The hourly rates are applied only to rentals shorter than 24 hours. The system will calculate the exact duration of the rental from the pick up date and time and the drop off date and time.
If there is a cost for 1 day of rental and a cost for the calculated hours, the system will apply the cost for that amount of hours defined in the Hourly Fares tab.
If there isn't a cost for the number of hours requested, the system will apply the tariff for 1 day of rental. In case the cost for 1 day is missing, the system will raise an error and the vehicle will not be bookable.
Extra Hours Charges
The Extra Hours Charges are only applied to rentals greater than 24 hours. For example, a rental lasting 2 Days and 4 Hours can be charged for the 4 extra hours.
The system always calculates the exact duration in Days and Hours for each rental. Given the example above of 2 Days and 4 Hours, the system will check if a charge for 4 Extra Hours is defined in the Fares Table. If there is a cost for 4 hours, the system will apply the cost for 2 days of rental + the charge for 4 extra hours. If a cost for 4 extra hours hasn't been defined, the system will apply the cost for 3 days of rental in that example.
There is a configuration setting to ponder the calculation of the days and hours of rental, it's the "Hours of Extended Gratuity Period". In the example of 2 Days and 4 Hours of rental, if that configuration setting was set to 3 Hours, the system will check if a charge for 1 Extra Hour is defined. If so, the system will apply the cost for 2 Days of rental plus the charge for 1 Extra Hour because 3 hours are free. Again, if that configuration setting was set to 4 hours, a rental for 2 Days and 4 Hours would be charged for just 2 Days, no matter if there are Extra Hours Charges defined.
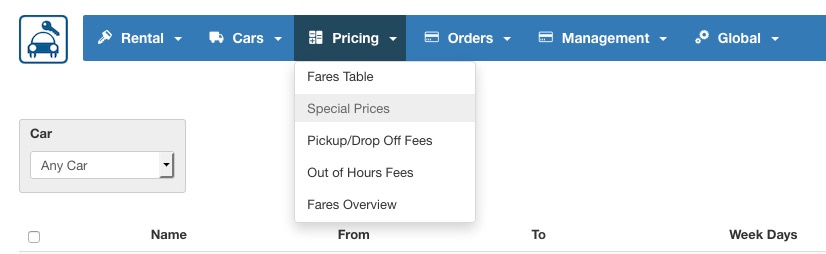
Special Prices
The Special Prices are rules to lower or increase the rental costs for some cars on some dates or weekdays of the year.
By clicking on New, the task will ask you to provide a Starting and an Ending Date for creating a Season.
These values are not required, you can just select one or more days of the week to create a Special Price that will be applied every week of the year. Use a Season and select one or more days of the week to combine the filters.
In case you are creating a Season, you can decide to apply the Special Price only in case the Pickup Date is after the begin of the Season. Some companies use this policy.
It is also possible to keep the rate of the first day of rental so for example, in a rental of 7 days where only the first 4 days are affected by your Special Price "High Season", you can decide to consider the other 3 days as "High Season". This policy could be used by your company.
The special Price Name is a value that will never be shown in the front site, only in the administrator section for management purposes.
The type can be Charge or Discount and a value, percentage or absolute will be applied to the rental daily fare.
The discount or charge value can be overwritten depending on the days of rental, for example, you can decrease the value for 10, 11, 12, 13, 14 days of rental. The default value will be applied in case there are no overrides for the selected days of rental.
It's required to select one or more Vehicles in order to apply the Special Price. The location filter is not required and can be left as Any.
When creating Special Prices with percentage values, it is possible to obtain costs with decimals. Use the function "Round to Integer" to never have prices with decimals.
Each Special Price can be applied every year, or only on the dates for the year you selected if you enable the parameter "Tied to the Year". However, the list of the current Special Prices in the back-end may still display the current year if the dates are not in the past. You can use the Rates Calculator tool in the page Fares Overview to quickly check your current rental costs. This is to avoid simulating a search via front-end to see the final rental cost.
To see some complex examples of how the calculation of the Special Prices take place, please visit the Knowledge Base section of Vik Rent Car, where you will find various examples and a longer explanation of the algorithm used, which follows the OpenTravel standards.
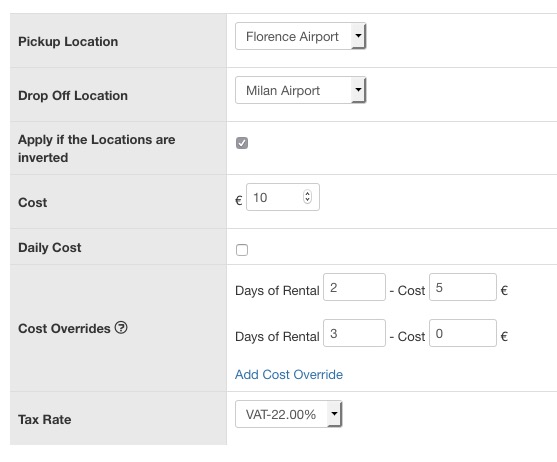
Pickup and Drop off fees
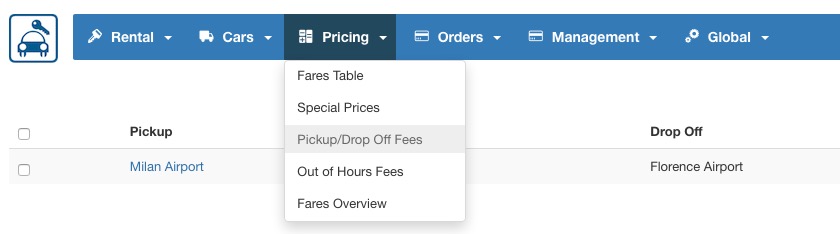
From this task you can create charges to be added to the daily rental fare depending on the pickup and drop off locations chosen by the user.
You just have to select the pickup and the drop off location, insert the cost to be added to the rental fare, decide whether the cost has to be multiplied by the days of rental and optionally assign this cost to a tax rate.
Flag the Option "Apply if the locations are Inverted" and, in case the Drop Off Location is chosen as the Pickup and the Pickup Location of this fee is chosen as the Drop Off, the fee will be applied as well.
The value can be overwritten depending on the days of rental, for example you can lower the fee for 10, 11, 12, 13, 14 days of rental.
Out of Hours Fees
Some Car Rental Companies apply charges depending on the time of Pickup and/or Drop Off. This function will let you do exactly this thing. Give the Fee a name and define the Time Interval to which you would like to apply a charge. For non-consecutive times just create multiple fees. For example, say that the Station/Location Milan Airport applies a charge from 1AM to 5AM: you will be able to define a charge in case the customer picks up the car at that time and/or if the customer returns the car at that time. It is also possible in the last example, to define a maximum charge to be applied in case the fee is applied for both pick up and drop off.
These Fees can be different depending on the Car and, of course, depending on the Location.
Out of Hours Fees - Weekdays
It is also possible to specify a week-day filter for the configuration of the Out of Hours Fees. This will let you create different opening times for each day of the week and the system will apply the corresponding fee depending on the pick up or drop off date.
Some companies apply different charges on the weekend for example, if the vehicles are returned at a later or earlier time than the usual opening time.
Orders
Current Orders
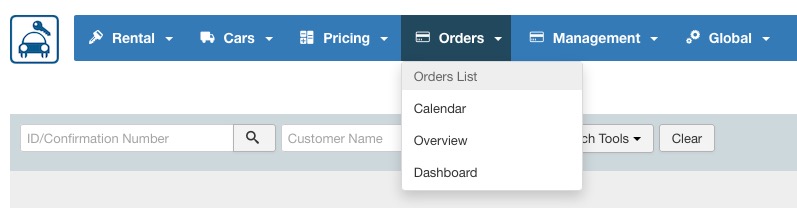
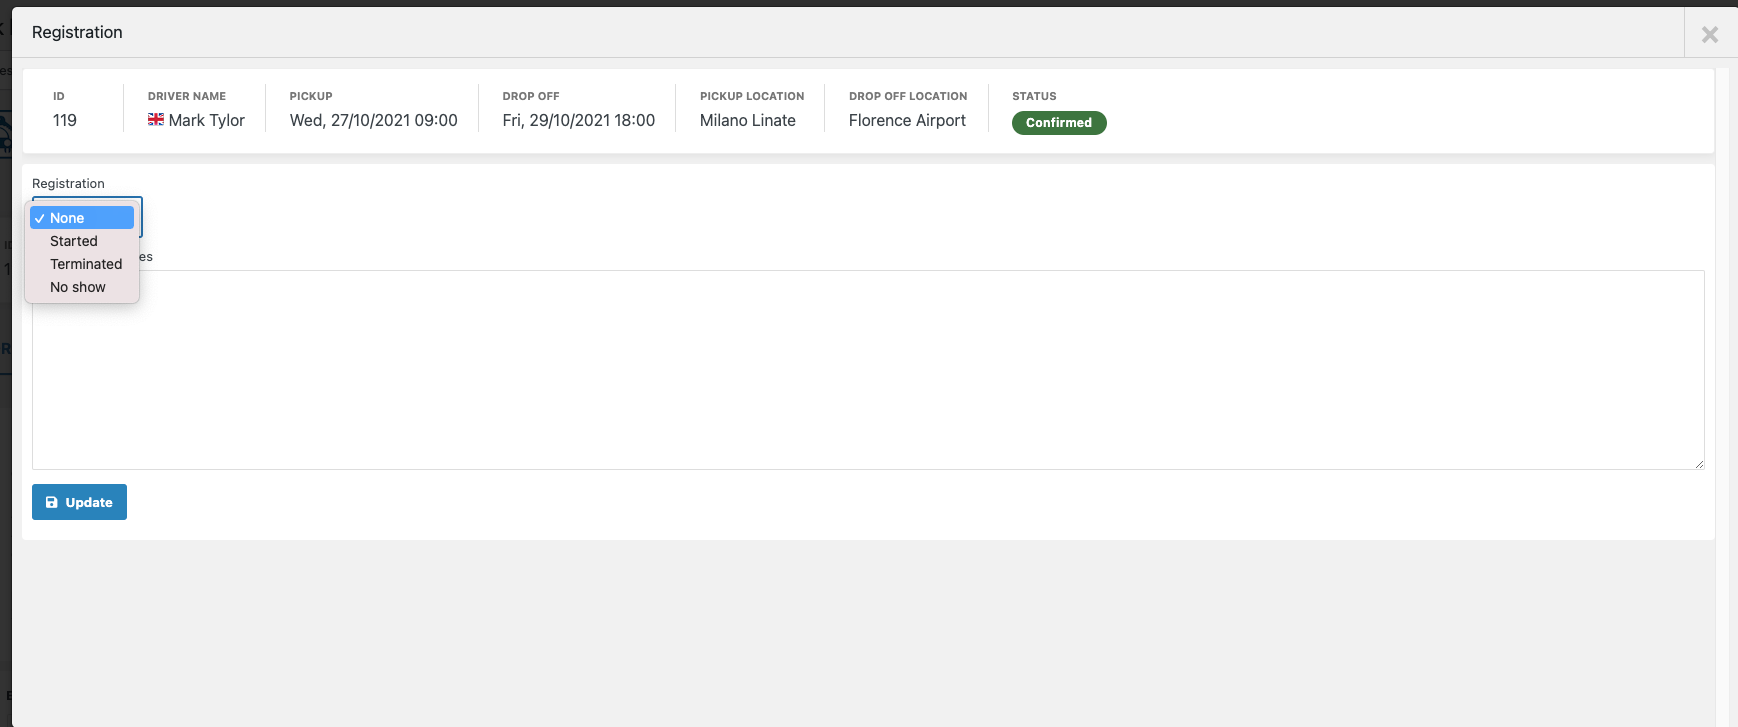
From this task you can manage all the orders received and also the reservations created from the administrator. A list is showed and by clicking on the date of the order you can see all the details.
From this task is also possible to set an order to Confirmed if it is still Pending. In this case a confirmation email will be sent to the customer and the unit of the vehicle will be considered as booked for the dates of the order.
You can use various filters and sorting options to find a specific rental order, or a group of orders that require your attention.
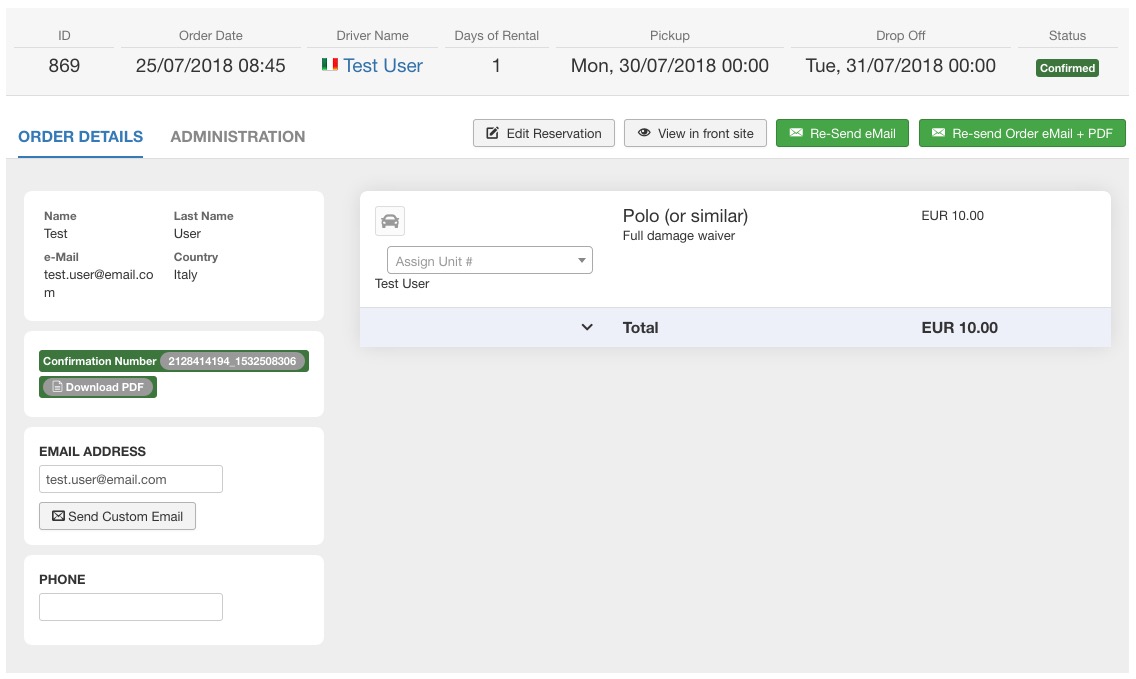
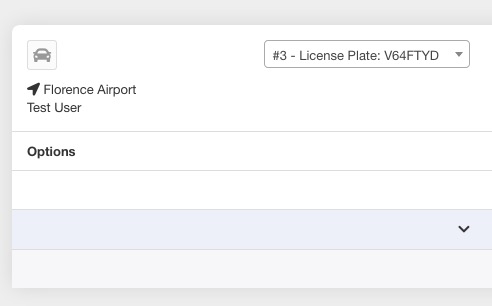
Is possible to register the status of the rental for each reservation. If the date of the check-in has started, you can update the status of this rental into "STARTED" mode. This will mean that the customer has picked-up his car regularly. If the date of the check-out has started and the customer has returned the car, you can update the status into "TERMINATED" If the date of the check-in has started but the customer did not come to pick the car, you can update the status into "NO SHOW" You have a text area to add any notes about the updates.
Removed Orders
Every rental order can have 3 different statuses: Stand-by, Confirmed and Cancelled. Whenever you remove a non-cancelled order, this will take the status Cancelled. If you remove an order with status Cancelled, this will be completely removed from the database, and it won't be visible anymore in the Orders List.
The availability for the cars on some specific dates is only reduced when the status of the order is Confirmed. This means that if you change the status of an order from Confirmed to Cancelled, by removing it, the availability for this car will be increased by 1 unit on the previously booked dates.
Orders with Stand-by status can keep the cars booked as "locked" for an amount of minutes defined in the Configuration page (through the setting "Waiting Minutes for the Payment"). However, once these minutes have expired, the car will be available again unless the status of these orders has changed to Confirmed in the meantime.
Removing a Stand-by order with an active "lock" on a specific car for some dates will not free up the availability. You should rather "unlock" the car from the bottom of the page Dashboard, where all the locked records will be displayed.
Please notice that a "locked" car will not be visible in the availability calendars. For this reason, we suggest to keep the setting "Waiting Minutes for the Payment" to a low amount of time, the time required to complete a payment. Usually 15/20 minutes.
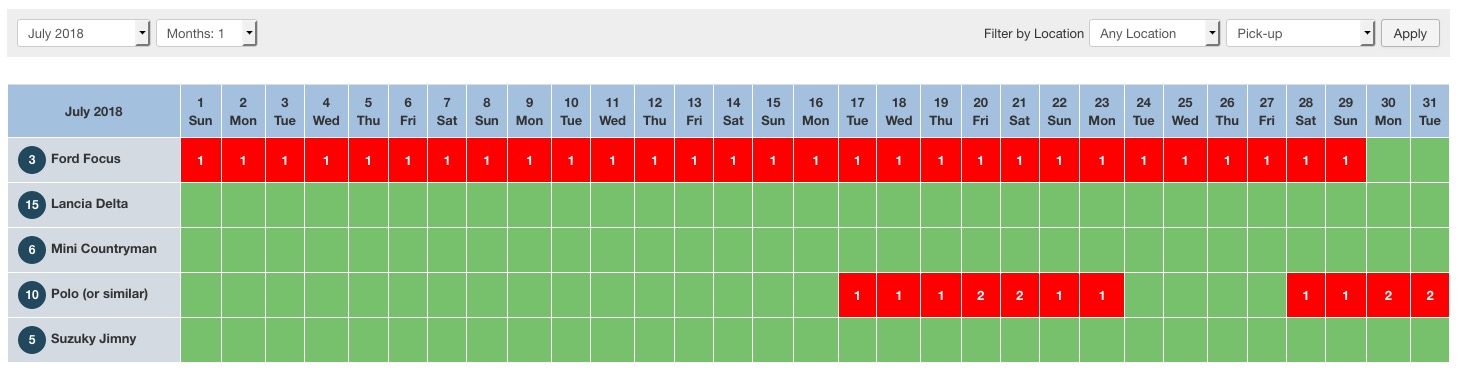
Overview
From this task you can have an Overview of the availability of each vehicle for the selected month. The view can be filtered by the next 12 months. The number inside the red cells shows the units that are booked for that day.
Calendar
The page Calendar is useful to get an overview of the bookings of a certain room, as well as for registering walk-in customers or any kind of reservation received over the phone or offline. By creating a new reservation you will reduce the availability of a car on certain dates. The page Calendar also allows to Close a specific car on some dates. By closing a car, the system will book all the units of your car, by making them unavailable. This will generate a special "reservation" just meant to close the availability. The page is divided into two parts:
- Quick Reservation form: for lowering the availability or for registering some bookings that were not received from the website
- Availability Calendars: get a view of up to 12 months from today's date with the bookings and the availability of a car
With the Quick Reservation form you can register some bookings as well as stop the sales (close room) on some dates. If you are registering a booking for a walk-in customer then it is recommended to use the button Fill Custom Fields so that the system can retrieve the email address of the customer as well as the Nominative, the Country and the Phone Number. Instead, if you would like to close the car on some dates and stop the bookings, you should tick the checkbox "Close Car on these Dates". This action will create a special booking that will be displayed as "Car Closed" in the Order List page. For re-opening the car it is sufficient to remove this booking.
Dashboard
Customize Widgets
Starting from version 1.14.5, the Dashboard of Vik Rent Car has a new look. It is divided in sections to host custom widgets. Clicking on the Customize Widgets button at the top-right of the page, you will open an edit side of the Dashboard. This interface will let you manage all the elements displayed in your Dashboard through Sections, Containers and Widgets.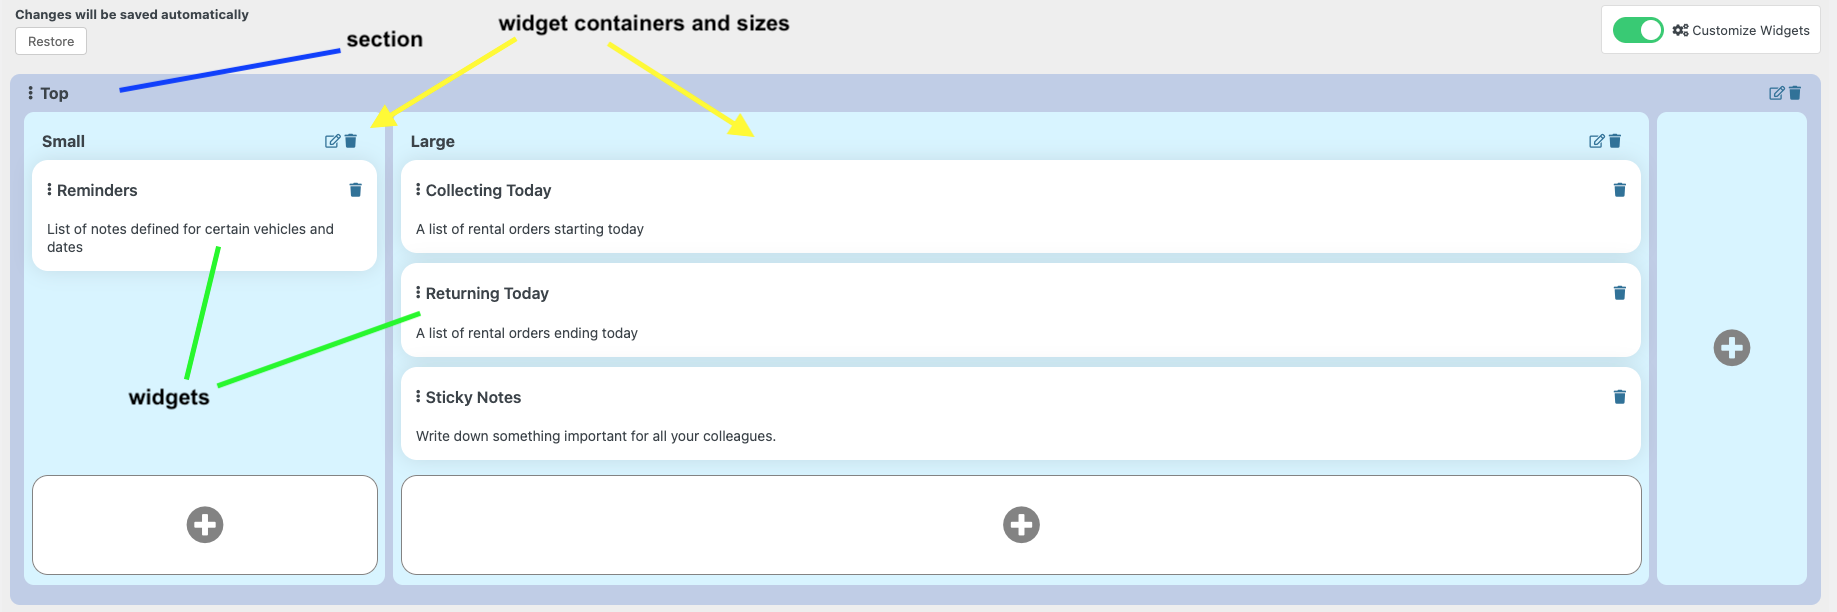
You can add new Sections to better organize your elements, and arrange their position with drag and drop actions, and also add new Containers with a proper size to contain your widgets.
Four sizes are available for the containers:
- Full Width gives a 100% width to the container. Only one container of this type will fit in one row.
- Large gives the container a 75% width. Another small container could fit in the same row next to this size.
- Medium gives the container a 50% width. Another medium container could fit next to it, or even two small containers.
- Small gives the container a width of 25%. One row could fit up to 4 containers of this size.
This is an example of how the widget type "Reminders" looks like:
Management
Coupons

The coupon system allows you to create discounts that will be applied to the order total.
A coupon has:
A code that can be any letter or number including special characters.
The type can be permanent or gift, in the first case the discount will be always applied when this coupon is used. If the type is gift, the coupon can be used only once, after that it will be removed.
The discount can be a fixed value expressed in your currency or a percentage value.
It's also possible to apply some filters to the coupons:
The coupon can be used only for some vehicles or for all the vehicles.
You can restrict the date of usage of the coupon.
You can set a minimum order total in order to apply the discount.
The users will be asked to enter the coupon code in the order summary page.
Advanced
Scheduled Cron Jobs
To know more about the Cron Jobs function read our Knowledge Base section
Statistics Tracking
In the "Advanced" menu you will find the function "Statistics Tracking".
The function “Statistics Tracking” will calculate the conversion rates, that is the relation between visitors and confirmed orders. It will track the traffic of Visitors, Customers and the Referrals. A Referral is the web source that brings you visitors on your website. You will be able to filter the tracking results for a specific range of date, type of date, country and Referrals. Thanks to this function, you can also create custom tracking campaigns: click on the “Tracking Settings” button to specify your tracking parameter.
Report
The Reports framework is a part of the system that can be extended through the creation of apposite PHP Classes that extend the parent interface. Reports are useful to obtain financial statistics as well as to produce calculations of tax/levy. By default, Vik Rent Car is installed with several types of Reports to generate and/or export data: Revenue, Rate Plans Revenue, Occupancy Ranking and Top Countries.
In the screenshot below you can see the calculation of the Occupancy Report obtained on a specific range of dates for the rental orders received.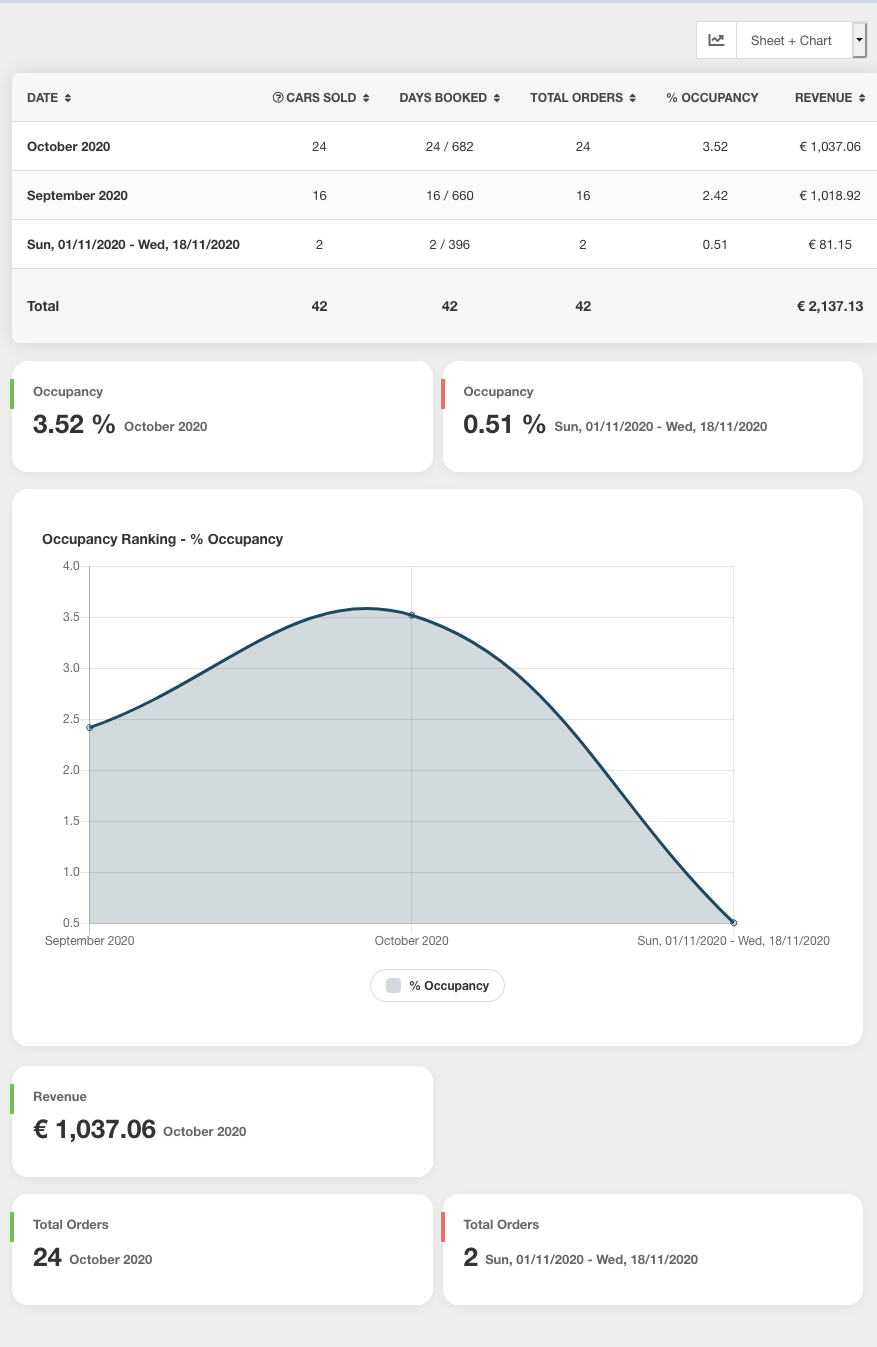
Global
Global Configuration
The Configuration of VikRentCar is divided into 4 tabs
Shop and Rentals:
From this tab of the configuration there are a lot of important settings.
- Enable Rental - With this option you can enable or disable the rental service, an offline message is available
- Shop Opening Time - All the reservation forms will have this configuration
- Hours of Extended Gratuity Period - This setting defines the hours that the component should consider before applying the rate for the next day. For example, Pickup on the 26th at 10am and Drop Off on the 28th at 11am will be considered as 3 days of rental if this setting is 0, if it was 1 or more hours, the fare would be for 2 days of rental.
- Apply Extra Hours Charges - decide whether to apply the extra hours charges on rental dates before or after the calculation of the Special Prices
- Car Damages in Check-in PDF - which damage details of the car do you want to show in the Car Damage Check-in PDF
- Enable Customers PIN Code - if enabled, when users are not registered or logged in and no cookies are available, customers will be able to enter their PIN code to get the billing information fields populated automatically
- Dropped Off car is available after - This defines for how many hours the vehicle should be still considered as not-available after the Drop Off. Sometimes vehicles might need a few hours of maintenance before being available for the next rental. The system considers the single unit of the rental order
- Require Login - If this setting is on the user will be forced to register or login before saving the order.
- Admin e-Mail - The eMail of the administrator that will receive the rental orders
- Minutes of Waiting for the Payment - When the order is confirmed, the unit of the vehicle is locked, it's considered as Confirmed while the user is making the payment. After these minutes the unit will become available again unless the order is Confirmed with a Payment or from the Administrator
- Maximum Date in the future from today - this will generate the maximum date in the future allowed for bookings. By default is 2 years
- Cars Category Filter - if enabled, this parameter will add a category filter search in the global search form
- Filter by Characteristics - if enabled, this parameter will let filter the searching result by cars characteristics
- Suggest solutions when no availability - if enabled, in case of no cars found from the input parameters, the system will display the closest available dates or other possible booking solutions for the same dates. We suggest enabling this function.
- Preferred Countries Ordering - you can sort your preferred language flags to display in the customers information fields of rental confirmation page
- Load jQuery Library - The component needs the jQuery library, depending on your template, this setting can be OFF
- Calendar Type - From VikRentCar 1.5, two types of calendar are available: the native Joomla Calendar, a basic calendar with no customization or the jQuery UI Calendar, light and easy to customize with many features.
- Date Mode - Some countries adopt a different date format, choose the one good for yours.
- Token Form Order Submit - This is a security measure that saves a crypted value in the session. Made for avoiding spam orders
Backup:
- Export Type - this function is useful to generate a backup of your Vik Rent Car configuration. The Export type "Full" will make a backup of all contents inside your Vik Rent Car, including reservations, customers records, and more. The Export type "Management" will only contains the general setup, with no records for contents like reservations or customers details.
- Folder Path - This is the path where the backup archives (ZIP files) will be saved on your website or server installation. The path can be inside or outside the root directory of your web-server. If you are unsure of what path to use, we suggest following the instructions in the comment below the path field so that you can append any custom folder to your installation base path. Something like "/your/server/installation/base/path/my-custom-backups
- Manage Backups - Will show the list of backups. By clicking on "New" you can create a new backup or upload an existing one.
Prices and Payments:
- Transactions Currency Code - Payment Methods like Paypal can use this setting, insert the code for your currency
- Currency Name - Some task of the front end uses a name instead of the symbol to display the currency. This could be EUR or USD for example.
- Currency Symbol - The symbol of your currency, you can also use html entities here.
- Payments Account - Put your Paypal Account to receive Payments here
- Pay Entire Amount - Disable this setting and put a percentage value for the deposit. The total amount that the user will pay will be calculated using this value.
- Prices Tax Included - If this setting is disabled and a tax rate exists and is assigned to the fare, taxes will be added to the total price.
- Payment Transaction Name - Some method of payment like Paypal can use this setting as the transaction name
- Allow Multiple Payments for one Order - if enabled, when the total amount paid is lower than the order total, customers will be able to place other payments for the remaining balance
View:
- Calendars First Day of the Week - choose the first day of the week that any calendar will display. Some countries prefer Saturday or Sunday to Monday.
- Number of Months to Show - this is to define the default number of availability calendars that each car will display in the details page.
- Show Partly Reserved Days - In the Cars List task (not the search results) of the front side you can view the details of each car and then make a reservation of it. This setting defines wether the program should put as yellow the days when the vehicle has some reservations but not all the units are booked. The cell can't be red because some units of the vehicle are still available.
- Number of Months to Show - Still in the same task as above, some calendars are shown, this setting defines how many after the actual month.
- Page Texts - You can write an opening and closing text for the page where the user makes the reservation with the form.
- Preferred Colors - Select your favorite colors to adjust the predefined front-end styles. This way, the appearance of the elements (titles, buttons, font colors and backgrounds) on the various pages of the reservation process can match the design of your theme or company.
Orders and Company
- iCal Events End Date - Choose how to display the booked dates in an Calendar
- Attach iCal Reminder - Attach the iCal file to the customer confirmation e-mail
-
Tracking Code - This is useful if you are using some external services to track or monitor your website activitie
- Conversion Code - This is useful if you need to track your sales with a conversion code
- Attach PDF to the order eMail - If this setting is enabled the system will generate and attach a PDF file to the order email containing the information loaded from the template file for the Invoice/Contract (see the section PDF Invoice/Contract Customization for more details).
- Company Logo - The logo of your company, a jpg, gif or png image file that will be included in every order email.
- Footer Text Order eMail - This HTML text can be placed in every order email at the bottom of the page.
- Disclaimer - a text showed in the page of the front site when the user is selecting the rental price and the options. This should not be used for the Terms and Conditions. Read the Custom Fields section for further information.
Conditional Texts:
In this section you can create your custom messages and texts for your customers based on specific needs or conditions:
- Conditional Text Name - the title of the custom text will be the name you want to add to this task, useful to remember what it is for. It won’t be shown to customers. Based on the title, the system will automatically create a tag that will be inserted in the template you want.
- Conditional Message - in this box, you must insert the custom text which will actually be shown to your customers. The editor supports HTML and CSS format, so you can customize the graphic of the text as you prefer.
- Add Rules - the rules are precise conditions that should happen in order to let the custom message appear. They work as filters assigned to your text.
Below you can find two examples of conditional texts:
- You need to make a special offer only for existing customers by giving them a special coupon for their next rental.
By adding the rule of type “Days” and a rule of type “Returning Customers”, if the customer that books a car on your website meets both conditions, then he will receive this custom message.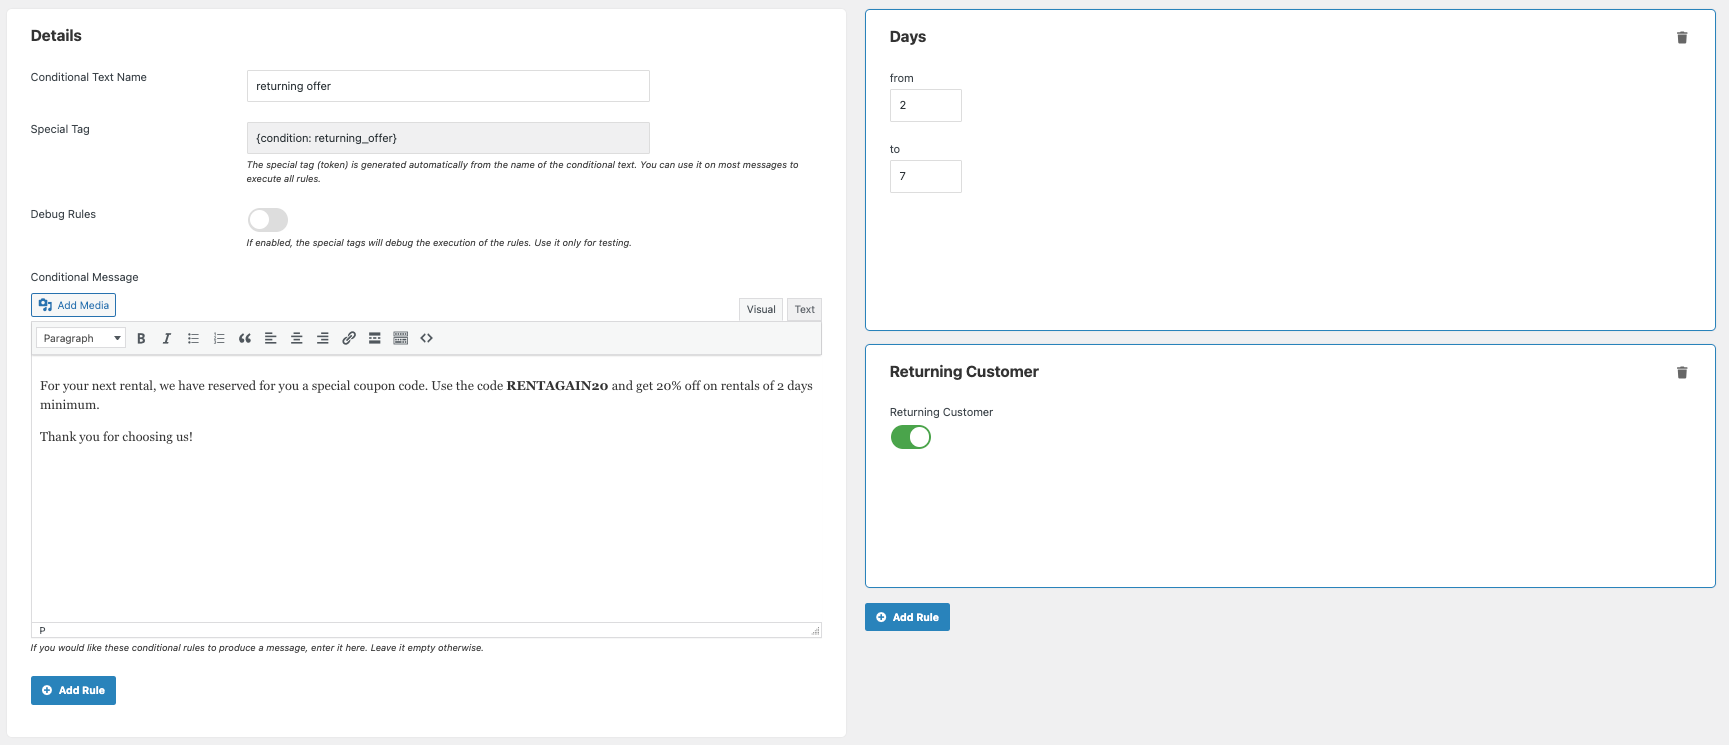
- You need to give additional information for a particular location, for example, in the case of cars rented in a secondary location, the reception is limited during Summer days so customers need to contact you upfront their arrival.
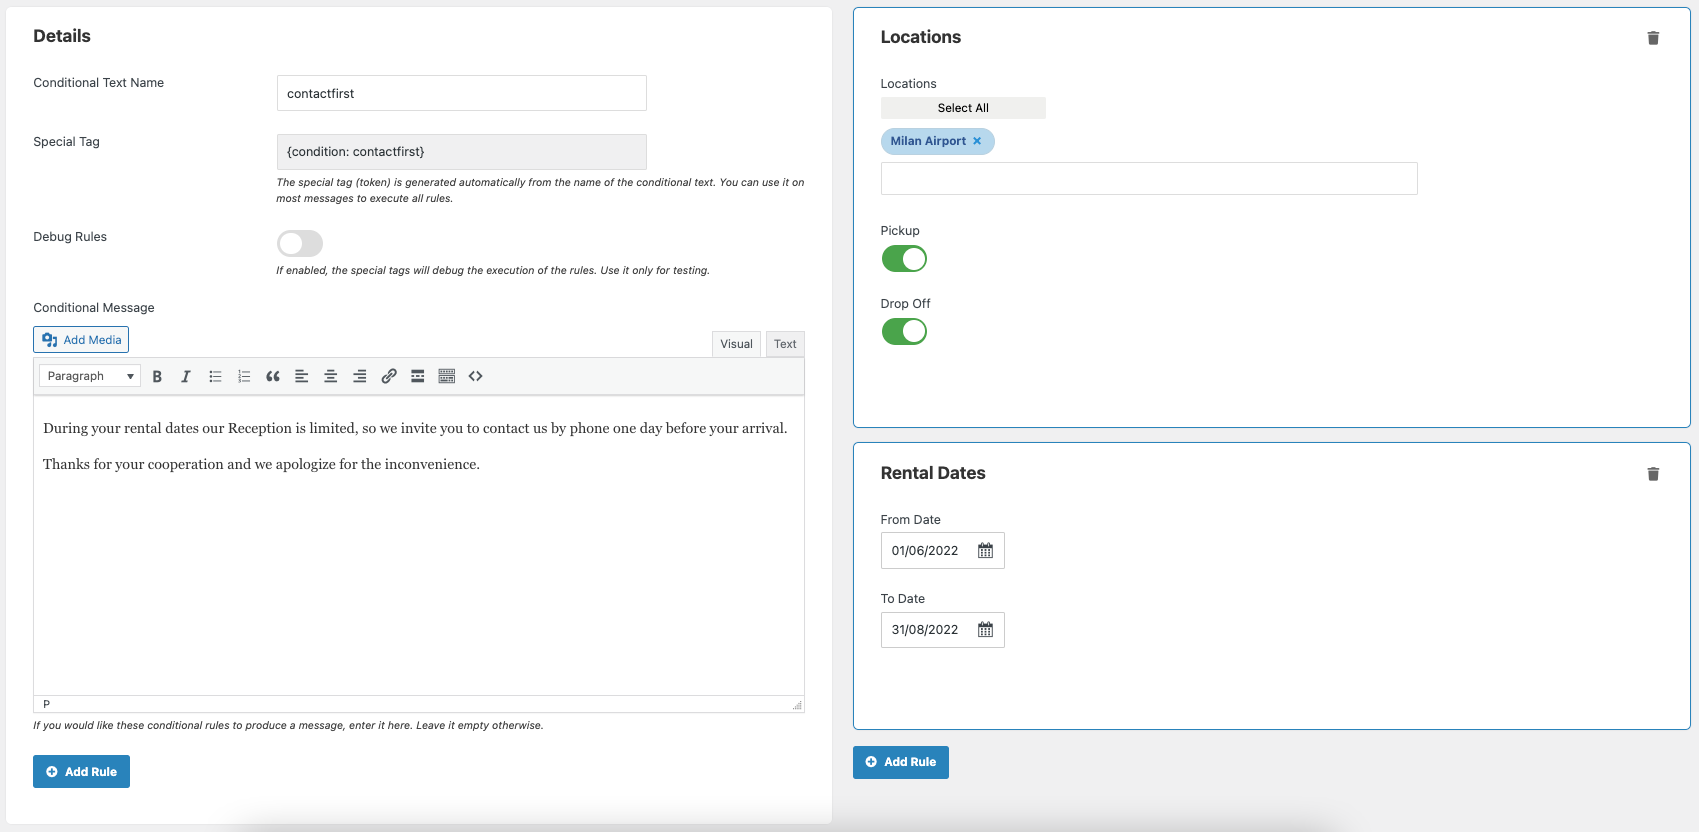
We added the rule “Locations” and selected among the list the specific location we want to give this information for. Then we add the rule "Rentals Dates" in order to delimit the message only to a specific season of rentals.
With this rule, any customer that will book a car for that Location and on the specified dates will receive this message.
PS. In case the context needs plain text and not HTML tags, you need to insert "[sms]" or "[plain text]" inside the body of the message (no matter in which point of the message, our plugin will strip that string). You'll specify the context of the message so that our plugin can recognize and avoid using the wpautop function for that message.
After saving, you will have the list of all your Conditional texts created.
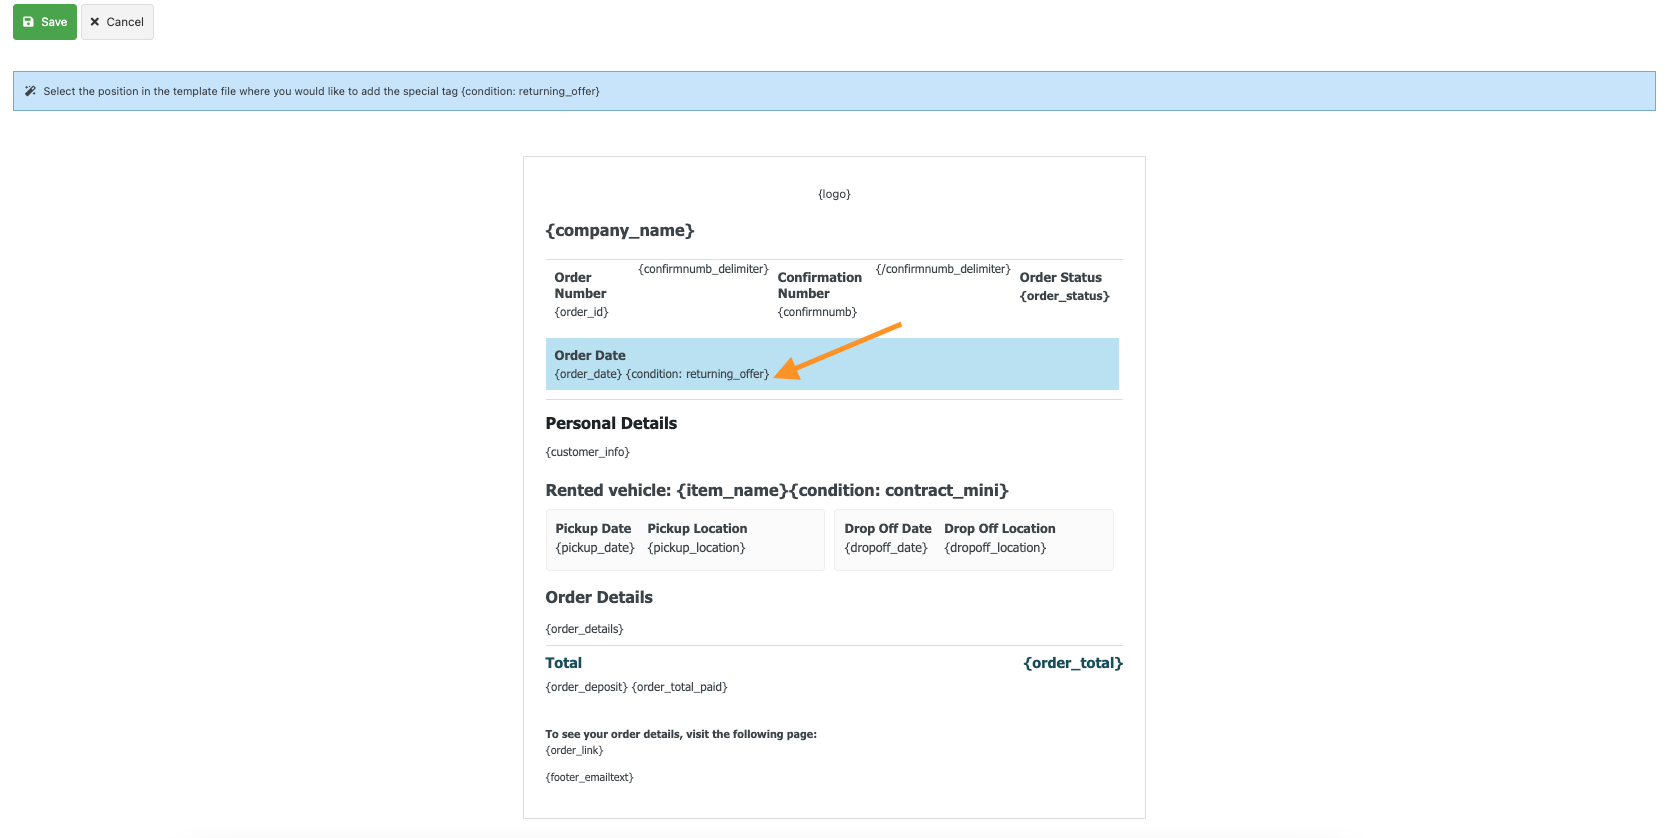
Remember to assign this text to a precise template where you need to display it: click on the desired template name among the three proposed: “Customer E-mail”, "Customer PDF", "PDF Check-in" or “PDF Invoice”.
When you choose the template, it will be opened in an interactive way, and you can insert your custom message by simply clicking on the position you prefer. When you click on a precise point of the template, the special tag will be added.
Payments
From this task you can manage the methods of payment for your website. Paypal, Offline Credit Card and Bank Transfer are pre-installed but disabled after the installation.
The methods of payment affect the order status that can be Pending or Confirmed. You can find a parameter called "Auto-Set Order to Confirmed" on each payment option. Make sure this is disabled for those payment processors that require a server validation otherwise, if enabled, when selecting that payment option the system will apply the status Confirmed automatically without showing any payment form.
In case of all the methods of payment are disabled, each order received is considered by the system as Confirmed and the user will not be asked to select any method of payment.
Paypal is a method of payment that processes a server response, to enable this payment you have to publish it and then from its Parameters you have to provide the Account for Payments (usually your email address).
Bank Transfer instead doesn't need to validate any external response.
By clicking on the title of the method of payment, the edit/configuration task will be opened
The Payment Name is the title showed in the front site during the order confirmation when the user has to select a method of payment.
The File Class is a php file that is executed by VikRentCar to validate the payment, do not change this unless you are creating a new method of payment.
Take a look at the documentation about creating a custom method of payment for VikRentCar.
A method of payment can apply a charge or a discount to the total order. From the setting Charge/Discount you can enter an amount, percentage or value that will be added/deducted from the order total. This can be useful if you want to give your clients a discounts if they are paying by credit card.
Custom Fields
From this task you can manage all the fields that the users will have to fill in before saving the order.
During the first installation of VikRentCar, some fields are created by the program but it's always possible to manage these fields.
The field types are:
- Text - the user will have to fill in an input text field
- TextArea - a text area with more rows will be shown
- Select - a select menu is shown in this case, you can create all the select options from the same task
- Checkbox - a checkbox field will be shown
- Separator - this field is not an input field but just a text separator. It can be used for dividing the Driver's Information from the Billing Information.
If the text of this field is longer than 30 chars, a different style will be applied to it. Some people use for writing extra information.
The field name is the label that will be next to the input field or the text of the separator.
If your website is multilanguage, the label should be a definition inside the .ini language file of each language that you have.
For example, the field Address should have a label like ORD_ADDRESS and each .ini file of VikRentCar that you have should contain a row like this:
ORD_ADDRESS="Address"
Take a look at the Answers Area F.A.Q. for furter information about languages and .ini files.
A field can be required or not, in this case the system will check that the user provided something for that information.
If the field type is Text and the setting Is Email is On, that email will be used to send the order email.
Another important setting of the fields is the Popup Link. This function is usually used when the field type is Checkbox and the user has to accept something, the Terms and Conditions for example. The popup link is a page that is ope
F. A. Q.
Basic Setup
Administrator Section
Basic Setup of the Extension
In order to start using the program on your website you need to set up some basic contents and functions:
- Tax Rates: create at leat one tax rate that you will need for configuring the next steps.
- Types of Price: create at least one type of price so that you will be able to manage your rental costs. "Full Insurance" is an example of a type of price. have a look at the section Types of Price for more details.
- Locations: create your locations available for Pickup and Drop Off. In case you don't want to use the locations just don't create any.
- Cars: you can now create a vehicle with images, a description and other settings. Remember to assign your vehicle to the locations where the pick up and drop off is available (in case you are using the locations).
- Fares Table: after having completed the steps above, you will be redirected to the page from which you can insert the costs for each day/hour/extra hour of rental for your vehicle. It's important to have the Fares Table set up correctly or you might get no results in the front site. For example, if you are searching for a vehicle for 4 days of rental and you don't have a cost for 4 days in the Rates Table, that vehicle will not be displayed in the search results.
The very basic setup of one Vehicle is now complete. You may then want to check the Configuration page to adjust some settings. A lot of other features are available in the Administrator section like the Options, the Categories, the Characteristics, the Special Prices, the Custom Fields, the Payment Methods and many other functions.
Front-end Section
Once you have at least one vehicle set up correctly you can proceed to publish a Menu Item or the Search Module in the front site.
- Menu Items: make sure your front site is showing a Joomla Menu Module in some position of your Template. On a fresh installation of Joomla you should see at least the Menu Item "Home". From the Administrator section, Menus, you can create new menu Items by clicking on New from your Menu(s). From the creation form, select the Type of the Menu Item and choose between one of the available Menu Items of type VikRentCar. For starting, it is recommended to use the Cars List view and the Search Form view. Give your menu item a name and save. Now your Menu in the front-end will show the new Menu Items that will point to the View(s) of VikRentCar.
- Search Module: inside the package that you have downloaded you will find some Modules that you can install from the Extensions Manager in the Administrator section. If you would like to have a Search Form published on a position of your Template then you should install the module "mod_vikrentcar_search" and publish it on your Template from the Module Manager. To avoid Javascript conflicts, make sure the setting "Load jQuery" of the search module is Disabled.
With this basic setup you can start working on your website and populate the Administrator section of VikRentCar.
PDF Contract/Agreement
PDF Customization
If the Configuration setting for attaching the PDF to the order eMail is enabled or if the PDF generation is requested from the Administrator panel, Order Details page, VikRentCar parses all the information of the Order and then invokes a template file that gives the layout and style to the PDF that can be used as Invoice and/or Contract.
The template file is the following:
/components/com_vikrentcar/helpers/pdf_tmpl.php
VikRentCar will replace all the special directives inside the brakets {}. You can move them or place them inside any html tag that you want. All the occurrencies of echo JText::_('VRC...'); are language definitions that can change depending on the language in use. Make sure that those language definitions are available in the .ini files for the front-site and for the administrator section or you might have problems when generating the PDF from the Administrator section.
You can add pages to the PDF by using the code {vrc_add_pdf_page}. By default, this template file renders the first page with the order details and then, after adding another page, generates a sample text with some information entered by the user (or the Administrator) with the Custom Fields. By using the code {customfield 2} the program will replace it with the Custom Field ID 2 which is the Name by default. Check the Custom Fields page to see the IDs of the fields.
PDF Troubleshooting
The PDF is generated only if the order status is CONFIRMED, if the setting in the Configuration is enabled or if the generation is requested from the Order Details page.
Custom Fields are not being Replaced: if this happens, make sure that the Customer Information text contains the right values. If the order for whom the PDF is generated was made from the Administrator, the Customer Information text must follow the replacing syntax which is: Custom_Field_Name: Value Entered (New line, Enter). From the Calendar task of the Administrator, when you are making a Quick Reservation, click on Populate Customer Information from the Options and then add the values for each custom field. This way the system will replace the Custom Fields.
Blank Page/Error when generating the PDF: this usually depends on the images that are not found by the system. If you added some image tag into the template file or if the Footer Order eMail Text of the Configuration loads some images, make sure that all the tags have this syntax:
<img src="/images/your_image.jpg" border="0" alt="..." />
Text Encoding Problems: in case the PDF file is showing some strange character, you need to use a different font for the PDF. The default font used is Helvetica, a light font but that doesn't support all the languages. Inside the full package archive of VikRentCar that you downloaded there's a folder called Dejavusans_PDF_Font. Upload all the files contained in that folder (not the folder, just the files inside) onto the following directory of your server:
/components/com_vikrentcar/helpers/tcpdf/fonts/
This way VikRentCar will use the font Dejavusans and every character will be encoded correctly. The reason why the program doesn't come with this font pre-installed is because it weighs about 5MB, too much for a Joomla installer.
TCPDF ERROR: [IMAGE] Unable to get image: ..... if you are getting a similar error then the problem can be caused by two different situations.
#1: Your server doesn't have the cURL libraries of PHP installed.
#2: Your virtual host doesn't have the permission to access files from an absolute path.
You can try to edit the PDF template file (/helpers/pdf_tmpl.php) and change {logo} into an image tag like this:
<img src="/images/mylogo.jpg"/>
This should fix the situation #1 and in some cases also the situation #2. If you keep getting the same error message then you should contact your hosting provider and show them the error message. Installing cURL should fix the issue as well.
Distinctive Features, Car Damages, Check-in PDF
Distinctive Features
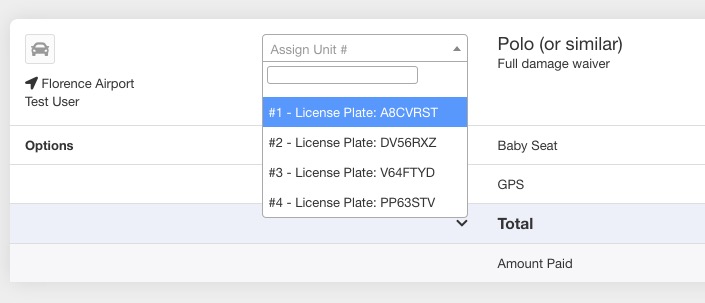
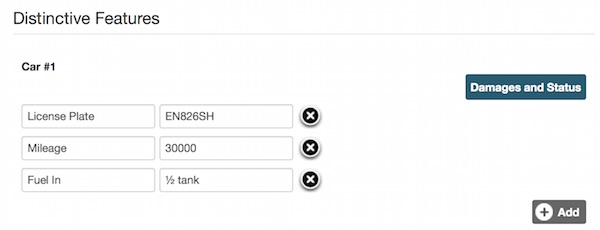
With the Distinctive Features the administrators can create certain "fields" for each unit available of a Car. For example, if the company has 2 units of the same Car "Mini Countryman", it is possible to specify some particular features of each unit. This is useful to distinguish one unit from another and for car rental companies, the first thing to identify one car should be the License Plate.
By default, the system will add 4 Distinctive Features (empty) for each unit of the Car: License Plate, Mileage, Fuel-In, Next Service. Important: the first Distinctive Feature will be the one displayed on any Confirmed Booking in the back-end, to assign a certain unit of a vehicle to a booking. For this reason the first feature of each unit should be something that will let you distinguish it from another.
Multi-language tip: when you are adding custom features, remember that you can also use a language definition of your .ini language file. For example, if you would like to create a custom feature for each unit of your car called "Colour", you can either put Coulour in the input text field or a language definition like VRC_FEATURE_COLOUR. Then you would simply have to put that language definition at the bottom of your Translation .INI File like this:
VRC_FEATURE_COLOUR="Colour"
Then copy that language definition on any other tanslation file and translate it.
The screen shot below shows how you can assign the car with the License Plate EN826SH to one booking because it was not assigned to any other booking on those dates:
The Distinctive Features are useful for management purposes first of all but also for the PDF
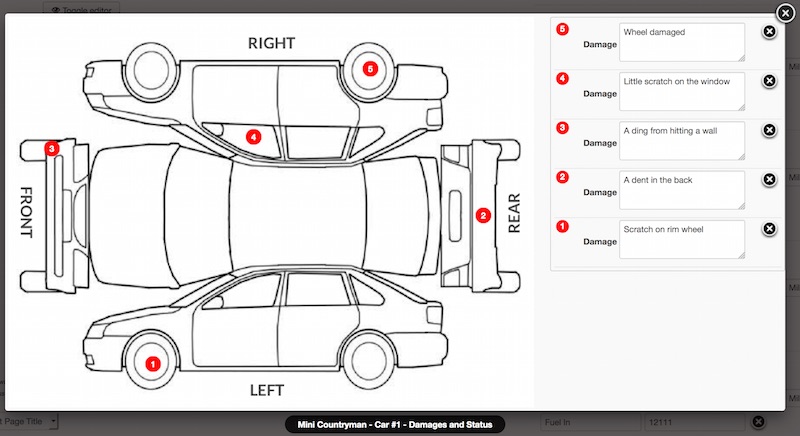
Car Damages
With this useful function you can keep the logs of your cars updated by marking the exact point of the vehicle where there is any kind of damage to be reported: a scratch, a dent or a ding for example.
Click on any point of the car where you would like to report a damage and add a description of it:
The default map of the car is just an image file that you can replace with your own PNG photo. The file is the following:
/components/com_vikrentcar/helpers/car_damages/car_inspection.png
While the red-mark showing the damage is another PNG file that you could replace with your own (you can also use a smaller or bigger image):
/administrator/components/com_vikrentcar/resources/damage_mark.png
IMPORTANT: the PHP-GD Libraries are required in order to generate the PNG file with the damages of your Car.
Once you have added or removed the damages for the specific unit of the car, remember to click the Save button to apply the changes. You should do this operation every time that car is returned/dropped off to keep its status updated.
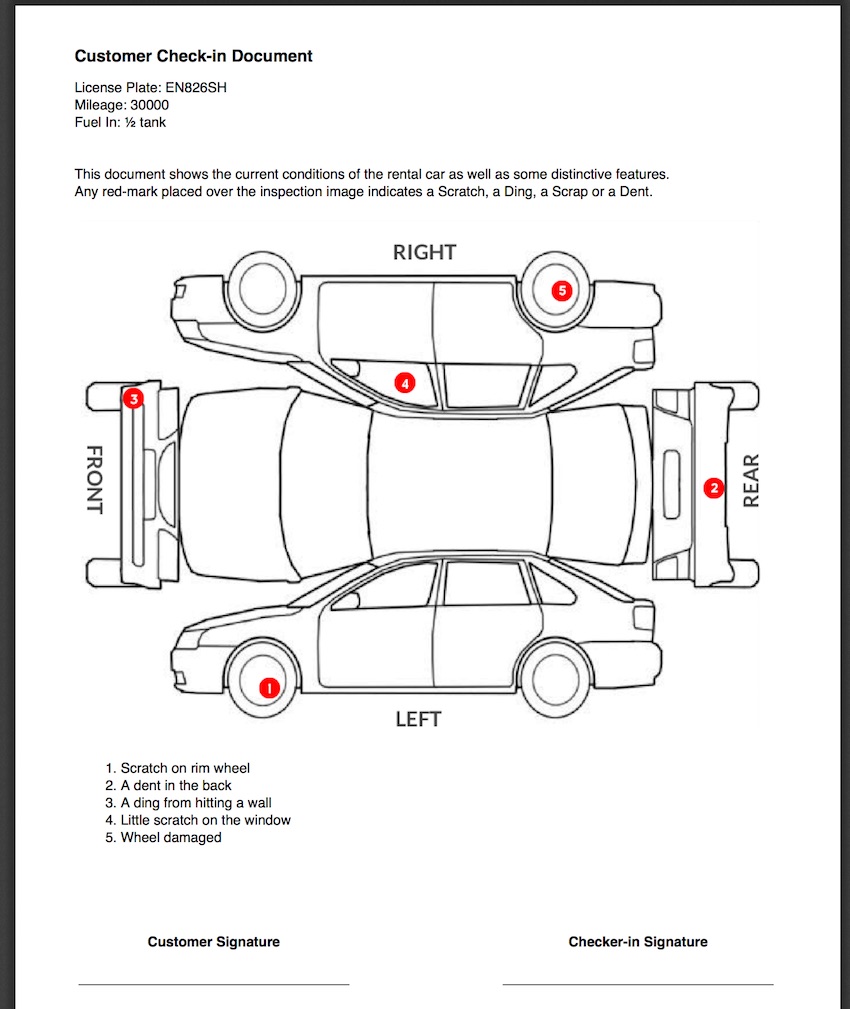
Check-in PDF
This is a function available only from the back-end, only if you have assigned a specific car to the booking.

This is an example of how the Check-in PDF will look like:
The check-in PDF file is generated through a PHP-Template-File that you can customize however you want. The file is the following:
/components/com_vikrentcar/helpers/checkin_pdf_tmpl.php
If you open that file you will find some useful PHP-Comments that will tell you what special-syntax tags are allowed to print some of the Distinctive Features and the Image containing the Damage Logs. Notice the damages can be displayed in 3 different ways: Damage Marks Only, Numbered Damage Marks or Numbered Damage Marks + Explanation of the Damage. This is up to you, if you would like to have the details of each damage or keep a number of the damage as reference. You can set this up from the Configuration page by changing the setting Car Damages in Check-in PDF.
iCal Bookings Sync
iCal Sync
You can easily keep your calendars updated by using the Sync function. This function is compatible with any online Calendar Software that allows the synchronizations with external URLs. Google Calendar, Yahoo! Calendar and MobileMe are probably the most used iCal only software and this function is compatible with those services.
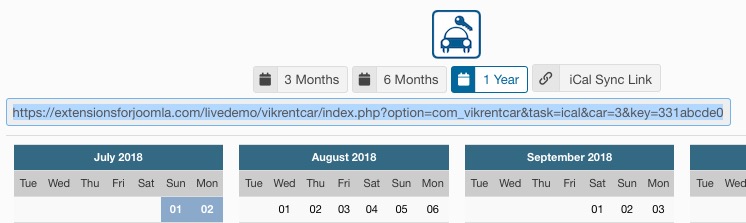
You can have one calendar for each car (suggested method) or you can sync all the bookings in just one calendar. This is only up to your needs. What you need to do first is retrieve the iCal Sync Link from the back-end of VikRentCar:
Copy that link and log in to your Google Calendar account. Click the Add By URL link as below:
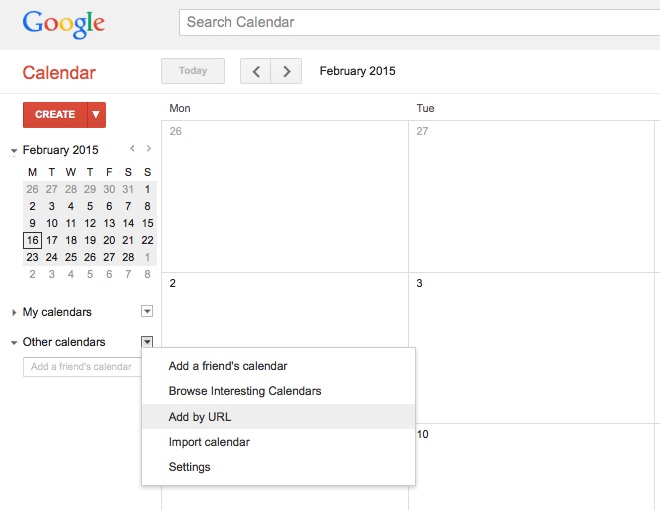
and then paste the copied URL as below:

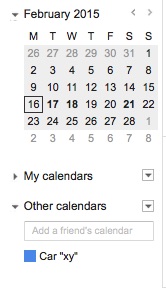
That's it. Google will periodically download your new bookings automatically and your calendar will be up to date!
You should repeat this procedure for all your cars because it is recommended to use one calendar for each Car. However, it is also possible to have all the bookings synchronized at once, you just have to do a little change to the iCal Sync Link that you copied from the back-end. Given this iCal Sync Link taken from the demo website:
http://www.e4j.com/livedemo/vikrentcar/index.php?option=com_vikrentcar&task=ical&car=2&key=331abcde0
The last part of the URL (key=...) is your secret key, ple
Development
Here you can see how a custom payment gateway can be integrated with VikRentCar.
How to develop a payment processor
The payment framework of VikRentCar can be extended by creating a PHP file declaring the VikRentCarPayment class.
The created file must be placed via FTP onto the directory: /administrator/components/com_vikrentcar/payments/
In order to develop the class VikRentCarPayment please follow the code example below.
<?php

defined('_JEXEC') OR die('Restricted Area');

class VikRentCarPayment {

	private $order_info;
	private $params;

	public static function getAdminParameters() {
		return array();
	}

	public function __construct($order, $params=array()) {
		$this->order_info = $order;
		$this->params = $params;
	}

	public function showPayment() {
		/** See the code below to build this method */
	}

	public function validatePayment() {
		/** See the code below to build this method */
		return array();

	}

	public function afterValidation($esit = 0) {
		/** See the code below to build this method */
	}
}
?>
Parameters Building
The parameters form for the administrator section can be built through the getAdminParameters() static method. This is useful to fill in private data or credentials, required for the creation and the validation of the payment/transaction. A Merchant ID and a Signature Key are an example of parameters that should be visible as well as editable in the back-end.
The parameters of the form are returned as an array with the following structure:
[
	"param_1" : [
		"label" : "Label 1",
		"type" 	: "text",
	],
	"param_2" : [
		"label" : "Label 2",
		"type" 	: "select",
	],
]- param_1 - is one key of the array that must be unique (required).
It represents the name of the parameter to use. - label - indicates the text to assign for the parameter in the administrator section (optional).
By placing a double slash (//) after the label, the text after will be displayed as a tip next to the field of the parameter (like "Merchant ID//this is a tip to display..."). - type - is used to render the right type of input field in the administrator section (required).
The values allowed for the type are the followings: custom, select, text. - html - will be used only when the type of the parameter is custom (optional).
- options - is an array containing all the possible values to use in the dropdown (required only when the type is select).
public static function getAdminParameters() {
	$logo_img = JURI::root().'administrator/components/com_vikrentcar/payments/mypay/mypay-logo.jpg';
	return array(
		'logo' => array(
			'label' => '',
			'type' => 'custom',
			'html' => '<img src="'.$logo_img.'"/>'
		),
		'merchantid' => array(
			'label' => 'Merchant ID',
			'type' => 'text'
		),
		'testmode' => array(
			'label' => 'Test Mode',
			'type' => 'select',
			'options' => array('Yes', 'No'),
		),
	);
}
The code above will generate a parameters form in the administrator section as follows.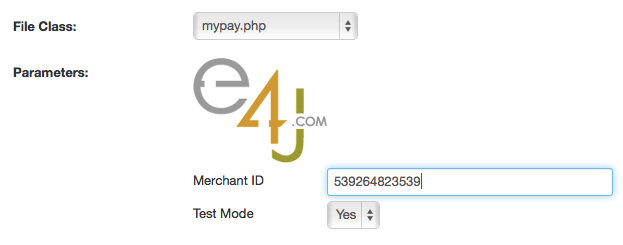
If your form doesn't come up, probably there is a syntax error on your file.
When you fill in the admin form, the parameters are stored in the array $params and you are able to get the values with the instructions below:
$merchant_id = $this->params['merchantid']; /* returns "539264823539" */
$test = $this->params['testmode']; /* returns "Yes" */
Order Info Object
The $order_info object is a mapped key/val array with the order information needed to complete the payment process. You can see below all the available keys of the array.
| Param | Type | Description |
|---|---|---|
| order | array | Array containing sub-parameters for the record of this reservation. |
| custmail | alphanumeric | The email address of the customer. |
| transaction_currency | char(3) | The currency of the amount (3-letter ISO 4217 code). The default is EUR. |
| return_url | string | The return url to come back to your shop from the bank on successful transactions. |
| error_url | string | The error url to come back to your shop from the bank on failed transactions. |
| notify_url | string | The notification url to validate the transaction data sent from the bank. This URL invokes the validatePayment method of your gateway. |
| total_to_pay | decimal | The total amount to pay as decimal (ex. 135.50). |
You can retrieve the information of the $order_info array with the example below.
$uniq_id = $this->order_info['order']['sid']."-".$this->order_info['order']['ts'];Show Payment
The method showPayment() of the object VikRentCarPayment is invoked every time a user visits the page of a reservation with PENDING Status. Here you need to echo the HTML form that points to the payment creation url of your bank gateway.
In this method it is also possible to make calls via cURL to retrieve tokens or to self submit the form to receive additional info to send to the bank.
public function showPayment() {

	$merchant_id = $this->params['merchantid'];

	$action_url = "https://yourbankgateway.com/";
	if( $this->params['testmode'] == 'Yes' ) {
		$action_url = "https://test.yourbankgateway.com/";
	}

	$form='<form action="'.$action_url.'" method="post">';
	// put here all the required fields of your gateway
	$form.='<input type="hidden" name="your_post_data_merchantid" value="'.$merchant_id.'"/>';
	$form.='<input type="hidden" name="your_post_data_amount" value="'.$this->order_info['total_to_pay'].'"/>';
	$form.='<input type="hidden" name="your_post_data_notifyurl" value="'.$this->order_info['notify_url'].'"/>';
	$form.='<input type="hidden" name="your_post_data_description" value="'.$this->order_info['transaction_name'].'"/>';
	// print a button to submit the payment form
	$form.='<input type="submit" name="_submit" value="Pay Now!" />';
	$form.='</form>';

	echo $form;

}
Validate Payment
The validatePayment() method is used to validate the transaction details sent from the bank. This method is invoked by the system every time the NotifyURL is visited (the one described in the showPayment() method). Usually the data are sent via POST method, and you can access them by simply using the $_POST super-global variable. Some gateways require a signature validation to make sure the transaction wasn't corrupted. The signature validation can be created only following the instructions on the official documentation of your bank.
This method must return a key/value array with the status of the transaction. The possible keys of the array are the followings.
| Param | Type | Description |
|---|---|---|
| verified | boolean | The status of the transaction. 1/true in case of success, otherwise 0/false. |
| tot_paid | decimal | The real amount paid by the customer, should be returned by the Gateway (ex, 102.75). |
| log | string | A log message sent to the administrator in case of failure. The log can contain any value returned from the Bank and it should be as specific as possible. When not empty, the system will store the logs in the db and they will be visible from the order details page of the back-end. |
Any different values in the returned array will be completely ignored during the validation of the transaction.
public function validatePayment() {
	$array_result = array();
	$array_result['verified'] = 0;
	$array_result['tot_paid'] = ''; /** This value will be stored in the DB */

	/** In case of error the log will be sent via email to the admin */

	$status = $_POST['status'];
	/** Process your gateway response here */
	if($status == 'success') {
		$array_result['verified'] = 1;
		/** Set a value for $array_result['tot_paid'] */
		$array_result['tot_paid'] = $_POST['amount'];
	} else {
		$array_result['log'] = "Transaction Error!\n".$_POST['error_msg'];
	}

	/** Return the array to VikRentCar */
	return $array_result;
}
After Validation
The afterValidation($esit) method is generally used to display a message and to redirect the gateway to the order summary view in case of success or failure. Please notice that this method should be in your Class only in case the Bank Gateway will not redirect the user to the ReturnURL. Also, this method, if it exists in the Class, will be invoked by the system after the validatePayment(). The $esit argument is a boolean value that represents the status of the transaction. In case of success (1/true) you should print a positive message and redirect the gateway to the return_url address, otherwise (0/false) you should print an error message and redirect the gateway to the error_url address. Remember also to put an exit or die rule at the end of the method to completely stop the flow.
public function afterValidation($esit = 0) {

	$mainframe = JFactory::getApplication();
	//Build the URL to the order details page
	$redirect_url = 'index.php?option=com_vikrentcar&task=vieworder&sid='.$this->order_info['sid'].'&ts='.$this->order_info['ts'];

	if($esit < 1) {
		JError::raiseWarning('', 'The payment was not verified, please try again.');
		$mainframe->redirect($redirect_url);
	} else {
		$mainframe->enqueueMessage('Thank you! The payment was verified successfully.');
		$mainframe->redirect($redirect_url);
	}

	exit;
	//
}
You can get HERE the complete code of this example gateway.